Table of Contents
Advertisement
WIDOS
W. Dommer Söhne GmbH
Working Instructions
Heating element butt welding machine
Headquarters: D-71254 Ditzingen-Heimerdingen County court Stuttgart HRB 200973 Managing director: Jürgen Dommer
Einsteinstr. 5
D-71254 Ditzingen-Heimerdingen
info @ widos.de
Translation
WIDOS 4900
Keep for further use!
Phone +49 7152 9939 - 0
Fax
+49 7152 9939 - 40
www.widos.de
Ku nst sto ffschweißtec hni k
Advertisement
Table of Contents

Related Manuals for widos 4900


Summary of Contents for widos 4900
- Page 1 WIDOS Einsteinstr. 5 Phone +49 7152 9939 - 0 W. Dommer Söhne GmbH D-71254 Ditzingen-Heimerdingen +49 7152 9939 - 40 info @ widos.de www.widos.de Ku nst sto ffschweißtec hni k Working Instructions Translation Heating element butt welding machine WIDOS 4900 Keep for further use! Headquarters: D-71254 Ditzingen-Heimerdingen County court Stuttgart HRB 200973 Managing director: Jürgen Dommer...
- Page 2 +49 (0) 3 71 / 8 15 73 - 0 Phone: +41 (0) 71 / 388 89 79 Fax: +49 (0) 3 71 / 8 15 73 - 20 Fax: +41 (0) 71 / 388 89 73 02.11.11 Working instructions WIDOS 4900 Page 2 of 46...
- Page 3 Therefore the searched information can be easily found. WIDOS 02.11.2011 W. Dommer Söhne GmbH Einsteinstraße 5 D-71254 Ditzingen-Heimerdingen All rights reserved Reprinting only allowed with permission of the corporation. Any changes prior to technical innovations. 02.11.11 Working instructions WIDOS 4900 Page 3 of 46...
-
Page 4: Table Of Contents
Machine overview ......................6 1.3. Safety measures ......................7 1.4. Conformity........................7 1.5. Designation of product....................7 1.5.1 Technical Data .......................7 1.5.1.1 WIDOS 4900 General data..................7 1.5.1.2 Planer........................8 1.5.1.3 Heating element .....................8 1.5.1.4 Hydraulic aggregate ....................9 1.5.1.5 Basic frame ......................9 1.6. Equipment and accessories: ..................9 SAFETY RULES........................ - Page 5 ELECTRIC AND HYDRAULIK DIAGRAMS..............31 10. SPARE PARTS LIST ......................35 10.1. Basic machine........................35 10.2. Planer..........................37 10.3. Hydraulic aggregate .......................39 10.4. Heating element ......................42 10.5. Reception box ........................44 11. DECLARATION OF CONFORMITY .................. 46 02.11.11 Working instructions WIDOS 4900 Page 5 of 46...
-
Page 6: Description Of Product
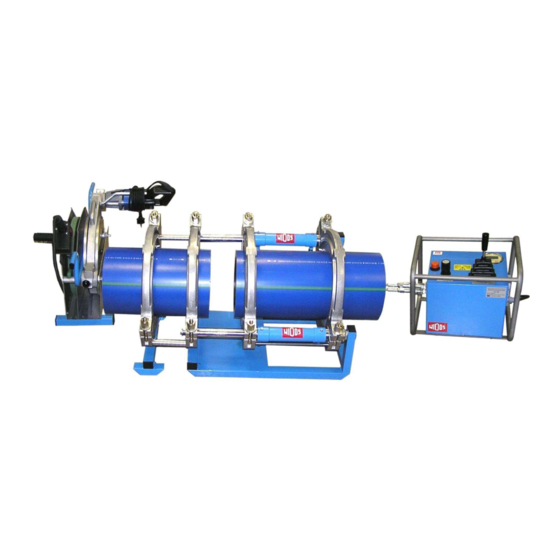
All technical details of the machine are put together as a general arrangement. 1.1. Application and prescribed use The WIDOS 4900 is made for heating element butt welding of pipes and fittings with a diameter range of Ø = 90 - 315 mm. -
Page 7: Safety Measures
The type-labels are fixed on the control unit and on the basic machine. They contain the type of the machine, the serial number, and the year of construction. 1.5.1 Technical Data 1.5.1.1 WIDOS 4900 General data Material: PP, PE 80, PVDF, PE 100 Pipe diameter range: outside-∅ = 90 – 315 mm Transport box (l x w x h) / weight: approx. -
Page 8: Planer
10 A (± 10 %) Frequency: 50 Hz Outside-∅: 350 mm Surface: Antistick-coated Elements: Electronic temperature control Control lamps, switch on / off Connecting cable and plug with earthing contact Weight: approx. 13 kg 02.11.11 Working instructions WIDOS 4900 Page 8 of 46... -
Page 9: Hydraulic Aggregate
Socket wrench size 27 1 each Allan key size 3; 6; 7; 8 1 each Allan key with T-grip size 5; 7 optional Reduction inserts, roller brackets for the pipes Torx-screw driverT10 02.11.11 Working instructions WIDOS 4900 Page 9 of 46... -
Page 10: Safety Rules
• It is a help for using all the functions on your machine in an optimal way and helps you to make the job easier. The regulations for the prevention of accidents are valid (UVV). 02.11.11 Working instructions WIDOS 4900 Page 10 of 46... -
Page 11: Obligations Of The Owner
• Workers who are to be trained are only allowed to work at the machine under control of an experienced worker. 02.11.11 Working instructions WIDOS 4900 Page 11 of 46... -
Page 12: Dangers While Handling The Machine
Ku nst sto ffschweißtec hni k 2.7. Dangers while handling the machine The machine WIDOS 4900 is constructed according to the actual technical standard and the acknowledged technical safety rules. However, dangers for the operator or other persons standing nearby may occur. -
Page 13: Special Dangers
• Make sure that no person has to step over the wires. • Make sure that the cables lie in such a way that the danger is maintained at a minimum. 02.11.11 Working instructions WIDOS 4900 Page 13 of 46... -
Page 14: Danger Of Squeezing By Clamping Tool And Guideways
• Machine parts that are not in perfect condition are to be replaced immediately. • Only use original WIDOS spare and wear parts. • In case of purchase orders please always note the machine and version number. -
Page 15: Functional Description
The pipes are joined with the prescribed welding pressure and then cool down under pressure (cooling time). The weld joint can be unclamped, the welding process is finished. Heating element heats the pipes up to welding temperature Finished weld joint with internal and external bead 02.11.11 Working instructions WIDOS 4900 Page 15 of 46... -
Page 16: Operating And Indicating Elements
Hydraulic connection for - Non-dropping quick-action hose coupling closing Hydraulic connection for - Non-dropping quick-action hose coupling opening Screw with oil level stick - Checking the oil-level - Filling in oil 02.11.11 Working instructions WIDOS 4900 Page 16 of 46... -
Page 17: Elements At The Heating Element
It prevents the heating element from sticking to the heated-up pipe ends. When inserting the heating element take care that it lies in the zone of the throat of the tear-off bar (see arrow). 02.11.11 Working instructions WIDOS 4900 Page 17 of 46... -
Page 18: Elements At The Planer
Switch on / off for planer - to switch on the planer. - the planer has to be switched off before and after use. 02.11.11 Working instructions WIDOS 4900 Page 18 of 46... -
Page 19: Starting And Operating
In case of ambient temperatures below 5°C the following measures have to be taken: If need be, put up a welding tent and heat up the pipe ends. • Take measures against rain, wind and dust. 02.11.11 Working instructions WIDOS 4900 Page 19 of 46... -
Page 20: Replacing The Reduction Inserts
• In case of welding fittings (elbows, T-pieces etc.) the inside narrow reduction insert can also be used flush with the outside. Reduction insert, axial (for pipes) The picture shows both internal clamping tools. Reduction insert narrow, flush with the outside (for elbows, T-pieces) 02.11.11 Working instructions WIDOS 4900 Page 20 of 46... -
Page 21: Welding Process
• Put the workpieces into the clamping tools, tighten the clamping nuts tightly and align the workpieces with respect to one another. In case of long pipe ends, use WIDOS rollerstands for alignment. • Close the slide, thereby reading the movement pressure on the manometer. - Page 22 During the cooling down period re-adjust pressure, if necessary (the pressure for cooling down is the same as the set adjustment pressure). • After expiration of the cooling down period, release pressure, remove the welded parts and open the slide. 02.11.11 Working instructions WIDOS 4900 Page 22 of 46...
-
Page 23: Welding Logs And Tables
Phone +49 7152 9939 - 0 W. Dommer Söhne GmbH D-71254 Ditzingen-Heimerdingen +49 7152 9939 - 40 info @ widos.de www.widos.de Ku nst sto ffschweißtec hni k 6. Welding logs and tables 02.11.11 Working instructions WIDOS 4900 Page 23 of 46... - Page 24 Welding logs and tables Chapter 6 Ku nst sto ffschweißtec hni k 02.11.11 Working instructions WIDOS 4900 Page 24 of 46...
- Page 25 [bar] time [mm] [mm] [mm] time pressure [min] 41,0 33,0 26,0 21,0 17,6 17,0 13,6 11,0 10,1 12,3 41,0 33,0 26,0 21,0 17,6 17,0 13,6 10,0 11,0 12,3 15,1 02.11.2011 Working instructions WIDOS 4900 Page 25 / 1 of 46...
- Page 26 13,6 11,4 11,0 14,0 17,1 41,0 33,0 26,0 21,0 17,6 17,0 10,3 13,6 12,7 11,0 15,7 19,2 41,0 33,0 26,0 21,0 17,6 17,0 11,8 13,6 14,6 11,0 17,9 21,9 02.11.2011 Working instructions WIDOS 4900 Page 25 / 2 of 46...
- Page 27 41,0 33,0 26,0 21,0 11,4 17,6 11,9 17,0 14,7 13,6 18,2 11,0 22,4 27,4 41,0 33,0 26,0 10,8 21,0 12,8 17,6 13,4 17,0 16,6 13,6 20,5 11,0 25,2 30,8 02.11.2011 Working instructions WIDOS 4900 Page 25 / 3 of 46...
- Page 28 26,0 11,9 21,0 14,2 17,6 14,8 17,0 18,4 13,6 22,7 11,0 27,9 34,2 41,0 33,0 10,7 26,0 13,4 21,0 15,9 17,6 16,6 17,0 20,6 13,6 25,4 11,0 31,3 38,3 02.11.2011 Working instructions WIDOS 4900 Page 25 / 4 of 46...
- Page 29 • low additional pressure at unclamping • no additional pressure during further cooling down • load onto the workpieces only after being completely cooled down 02.11.2011 Working instructions WIDOS 4900 Page 25 / 5 of 46...
- Page 30 [bar] min. over welding [bar] time [mm] [mm] [mm] time pressure [min] 17,6 12,3 15,0 17,6 10,0 15,1 18,3 17,6 11,4 17,1 20,8 02.11.2011 Working instructions WIDOS 4900 Page 26 / 1 von 46...
- Page 31 [bar] min. over welding [bar] time [mm] [mm] [mm] time pressure [min] 17,6 12,7 19,2 23,3 17,6 14,6 21,9 26,6 10,2 17,6 16,4 24,6 29,0 02.11.2011 Working instructions WIDOS 4900 Page 26 / 2 von 46...
- Page 32 [bar] min. over welding [bar] time [mm] [mm] [mm] time pressure [min] 11,4 17,6 18,2 27,4 33,2 12,8 17,6 20,5 30,8 37,4 14,2 17,6 22,7 34,2 02.11.2011 Working instructions WIDOS 4900 Page 26 / 3 von 46...
- Page 33 • low additional pressure at unclamping • no additional pressure during further cooling down • load onto the workpieces only after being completely cooled down 02.11.2011 Working instructions WIDOS 4900 Page 26 / 4 von 46...
- Page 34 [bar] min. over welding [bar] time [mm] [mm] [mm] time pressure [min] 10,0 10,0 11,0 12,5 13,5 10,5 10,8 15,0 11,0 11,9 16,5 12,5 13,5 02.11.2011 Working instructions WIDOS 4900 Page 27 von 46...
-
Page 35: Maintenance And Repair
• Remove the red screw at the top of the aggregate. • Take out the oil dip rod, clean it and insert it again. • The oil-level must be between the two markers. 02.11.11 Working instructions WIDOS 4900 Page 28 of 46... -
Page 36: Venting The Hydraulic Cylinders
• If there is still air in the lower cylinder this will ascent in the upper cylinder under pressure. 02.11.11 Working instructions WIDOS 4900 Page 29 of 46... -
Page 37: Transport
During the transport of the machine there may be cold weldings between the piston rod and the eyes of the planer shell. These spots on the piston rod may damage the sealing. • Therefore the eyes must be lubricated with PTFE-spray before transport ! 02.11.11 Working instructions WIDOS 4900 Page 30 of 46... -
Page 38: Electric And Hydraulik Diagrams
Phone +49 7152 9939 - 0 W. Dommer Söhne GmbH D-71254 Ditzingen-Heimerdingen +49 7152 9939 - 40 info @ widos.de www.widos.de Ku nst sto ffschweißtec hni k Electric and hydraulik diagrams Working direction Hydraulic diagram 02.11.11 Working instructions WIDOS 4900 Page 31 of 46... - Page 39 Electric and hydraulic diagrams Chapter 9 Ku nst sto ffschweißtec hni k 02.11.11 Working instructions WIDOS 4900 Page 32 of 46...
- Page 40 Electric and hydraulic diagrams Chapter 9 Ku nst sto ffschweißtec hni k 02.11.11 Working instructions WIDOS 4900 Page 33 of 46...
- Page 41 Electric and hydraulic diagrams Chapter 9 Ku nst sto ffschweißtec hni k 02.11.11 Working instructions WIDOS 4900 Page 34 of 46...
-
Page 42: Spare Parts List
10. Spare parts list 10.1. Basic machine 15 - 16 7 - 8 20 - 22 9 - 11 25 / 26 27 - 29 33 - 35 38 - 39 40 - 42 02.11.11 Working instructions WIDOS 4900 Page 35 of 46... - Page 43 Spare parts list Chapter 10 Ku nst sto ffschweißtec hni k Basic machine WIDOS 4900 Pos. Name Piece Art.-No. Outer clamp, fixed 216101 Inner clamp, fixed 216102 Inner clamp, movable 216103 Outer clamp, movable 216104 Upper clamp 214105 Thread insert M 6...
- Page 44 Spare parts list Chapter 10 Ku nst sto ffschweißtec hni k Basic machine WIDOS 4900 Pos. Name Piece Art.-No. Washer M 10 DIN 125 0125J Protective cap, round SL 22x102 J0216 Protective cap, round SL 14x1-2 J0212 Reducer inserts OD 90 - 280 1 set 3808...*...
-
Page 45: Planer
Ku nst sto ffschweißtec hni k 10.2. Planer 2 - 3 20 - 22 24 - 26 5 - 9 10 / 11 28 - 33 13 / 14 15 - 16 02.11.11 Working iInstruction WIDOS 4900 Page 37 of 46... - Page 46 KSCH38 Ball bearing L6013 Flat-head screw M 6x12 DIN 7991 7991F012 Chain wheel, large 3/8" x 7/32" 091406 Cover 216404 Pan-head screw M 4x16 DIN 912 0912D016 Torx-screw driver T10 ZT10 02.11.2011 Working instructions WIDOS 4900 Page 38 of 46...
-
Page 47: Hydraulic Aggregate
52 – 56 48 - 50 17 / 18 / 21 - 23 19–23 31 / 32 15 / 16 13 / 14 57 / 59 43 - 47 36 - 42 02.11.11 Working instructions WIDOS 4900 Page 39 of 46... - Page 48 Spare parts list Chapter 10 Ku nst sto ffschweißtec hni k 28 / 30 02.11.11 Working instructions WIDOS 4900 Page 40 of 46...
- Page 49 Spare parts list Chapter 10 Ku nst sto ffschweißtec hni k Hydraulic Aggregate WIDOS 4900 Pos. Name Piece Order no. Cover 1010021 Pan-head screw M4x12 DIN 912 0912D012 Motor on request Pump 1.9 l 102103 Capacitor 12,5 F EK12220 Universal RC - link...
- Page 50 Spare parts list Chapter 10 Ku nst sto ffschweißtec hni k Hydraulic Aggregate WIDOS 4900 Pos. Name Piece Order no. Hexagon nut M6 DIN 934 0934F Plug-in element P83-1/2"x3/16" 101043 Bearing block on request Pan-head screw M5x45 DIN 912 0912E045...
-
Page 51: Heating Element
Spare parts list Chapter 10 Ku nst sto ffschweißtec hni k 10.4. Heating element 2 - 5 8 - 9 12 - 14 19 - 22 25 - 26 02.11.11 Working instructions WIDOS 4900 Page 42 of 46... - Page 52 Spare parts list Chapter 10 Ku nst sto ffschweißtec hni k Heating element WIDOS 4900 Pos. Name Piece Art.-No. Heating element H 4900, 230 V H4900D Heating plate new HP4900D Heating plate for change HPT4900D Temperature probe PT1000 H09082 Probe holder...
-
Page 53: Reception Box
Spare parts list Chapter 10 Ku nst sto ffschweißtec hni k 10.5. Reception box 1 / 2 9 - 11 02.11.11 Working instructions WIDOS 4900 Page 44 of 46... - Page 54 Spare parts list Chapter 10 Ku nst sto ffschweißtec hni k Reception box WIDOS 4900 Pos. Name Piece Art.-No. Heat absorbing steel sheet 214528 Insertion for heating element 214523 Stirrup 214527 Fitting cab Ø20x2 J5401 Spacing bolt for heating element...
-
Page 55: Declaration Of Conformity
The technical documentation is completely available. The above-mentioned company will provide the following technical documentation for inspection: - test certificate - other technical documentation Ditzingen - Heimerdingen, the 02.11.11 Marting Dommer (Technical director) 02.11.11 Working instructions WIDOS 4900 Page 46 of 46...
Need help?
Do you have a question about the 4900 and is the answer not in the manual?
Questions and answers