Table of Contents
Advertisement
Quick Links
Advertisement
Table of Contents

Related Manuals for widos MINIPLAST 2 / T-Piece


Summary of Contents for widos MINIPLAST 2 / T-Piece
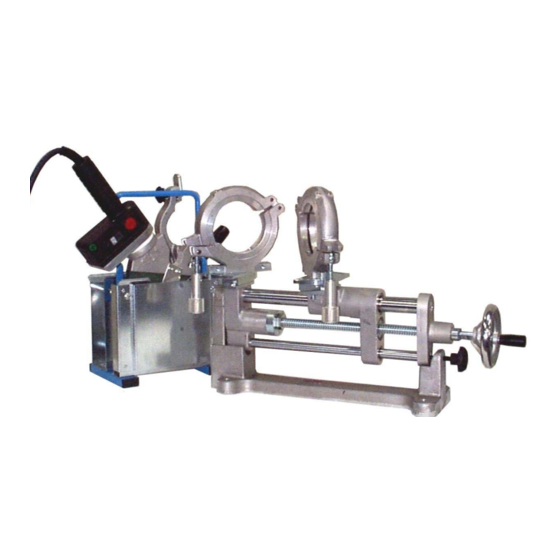
- Page 1 WIDOS Einsteinstraße 5 Phone +49 7152 9939 0 Wilhelm Dommer Söhne D-71254 Ditzingen +49 7152 9939 40 GmbH info@widos.de Internet: www.widos.de Working Instructions Translation Heating Element-Butt Welding Machine WIDOS MINIPLAST 2 / T-Piece Keep for further use!
- Page 2 Customer entries Inventory-No.: Location: Address of manufacturer WIDOS Wilhelm Dommer Söhne GmbH Einsteinstraße 5 D-71254 Ditzingen Phone: +49 7152 9939 0 Fax: +49 7152 9939 40 06.05.19 Working instructions WIDOS MINIPLAST 2 / T-Piece Page 2 of 34...
- Page 3 06.05.2019 WIDOS Wilhelm Dommer Söhne GmbH Einsteinstraße 5 D-71254 Ditzingen All rights reserved Reprinting only allowed with permission of the corporation. Any changes prior to technical innovations. 06.05.19 Working instructions WIDOS MINIPLAST 2 / T-Piece Page 3 of 34...
-
Page 4: Table Of Contents
Marking of the product ......................7 1.5.1 Technical data ........................7 1.5.1.1 WIDOS MINIPLAST 2 / T-Piece General data ..............7 1.5.1.2 Heating element ........................8 1.5.1.3 Planer ..........................8 1.5.1.4 Basic machine with table support ..................8 ... - Page 5 Cleaning the machine ......................29 8.6. Disposal ..........................29 9. TRANSPORT ........................30 10. ELECTRIC DIAGRAM ......................31 11. SPARE PARTS LIST ......................33 12. DECLARATION OF CONFORMITY ..................34 06.05.19 Working instructions WIDOS MINIPLAST 2 / T-Piece Page 5 of 34...
-
Page 6: Description Of Product
1.1. Application and prescribed use The WIDOS MINIPLAST 2 / T-Piece is made for heating element butt welding of pipes and fittings made out of PE, PP and PVDF with a diameter range of Ø = 20 mm - 110 mm (T- piece up to OD 90 mm). -
Page 7: Dangers While Handling The Machine
Description of Product 1.3. Dangers while handling the machine The machine WIDOS MINIPLAST 2 / T-Piece is constructed according to the latest state-of-the-art and the acknowledged technical safety rules. However, dangers for the operator or other persons standing nearby may occur. -
Page 8: Heating Element
Current: 50-60 Hz 50 Hz Frequency: on request on request Weight: See spare parts list for order-numbers and single parts, when ordering, please state the machine number ! 06.05.19 Working instructions WIDOS MINIPLAST 2 / T-Piece Page 8 of 34... -
Page 9: Equipment And Accessories
Allan key size 3; 4 Torx-screw driver T10 screws for reduction inserts, flat-head screws for reduction inserts, flat-head screws for optional fitting clamping tools option Stub end holder 06.05.19 Working instructions WIDOS MINIPLAST 2 / T-Piece Page 9 of 34... -
Page 10: Safety Rules
T h e r e g u l a t i o n s f o r t h e p r e v e n t i o n o f a c c i d e n t s a r e v a l i d ( U V V ) . 06.05.19 Working instructions WIDOS MINIPLAST 2 / T-Stück Page 10 of 47... -
Page 11: Obligations Of The Owner
A person who is being trained may only work at the machine under supervision of an experienced person. 06.05.19 Working instructions WIDOS MINIPLAST 2 / T-Piece Page 11 of 34... -
Page 12: Dangers While Handling The Machine
Chapter: 2 2.7. Dangers while handling the machine The machine WIDOS Miniplast 2 / T-piece is constructed according to the latest technical standard and the acknowledged technical safety rules. However, dangers for the operator or other persons standing nearby may occur. Also material damages are possible. -
Page 13: Danger Of Cutting And Catching Clothes By The Planer
No modifications, extensions or reconstructions may be made on the machine without permission of the manufacturer. Machine parts that are not in perfect condition are to be replaced immediately. Only use original WIDOS spare and wear parts. 2.10. Warranty and liability Fundamentally our "General Sales and Delivery Conditions" are valid. -
Page 14: Description Of The Welding Process
The welding joint can be unclamped, the welding process is finished. Heating element heats up the pipe ends onto welding temperature welded pipe with internal and external bead 06.05.19 Working instructions WIDOS MINIPLAST 2 / T-Piece Page 14 of 34... -
Page 15: Operating And Indicating Elements
- Guidance of the slide - Fixing the planer - Support for heating element Star wheel for basic frame - Fixing the basic frame onto the table support 06.05.19 Working instructions WIDOS MINIPLAST 2 / T-Piece Page 15 of 34... -
Page 16: Elements On The Heating Element And The Planer
- Turning the planer by means of the ratchet Star grip screw and tin disc - Attaching the planer at the guidance bar by turning the screw and tin disc 06.05.19 Working instructions WIDOS MINIPLAST 2 / T-Piece Page 16 of 34... -
Page 17: Elements At The Electric Planer (Optional)
Be especially cautions, there ist the danger of cuttings! Only activate the planer if it has been placed into the machine and secured by locking tin disc and star grip screw. 06.05.19 Working instructions WIDOS MINIPLAST 2 / T-Piece Page 17 of 34... -
Page 18: Clamping Tools
Detach the two pan-head screws on the left side and shift the clamping tool (arrow) until the difference is balanced. Afterwards tighten the 2 pan-head screws again. Pan-head screw for cross adjustment 06.05.19 Working instructions WIDOS MINIPLAST 2 / T-Piece Page 18 of 34... -
Page 19: Starting And Operating
In case of surrounding temperature below 5 °C (41 °F)measures should be taken: Build up a welding tent or heat up the pipe ends if necessary. In addition, take measures against rain, wind and dust. 06.05.19 Working instructions WIDOS MINIPLAST 2 / T-Piece Page 19 of 34... -
Page 20: Changing The Reduction Inserts
Do wear safety gloves as protection against burning ! A stop-watch should be available in order to be able to register the actual times for heating up and cooling down. 06.05.19 Working instructions WIDOS MINIPLAST 2 / T-Piece Page 20 of 34... - Page 21 (e.g. technically pure alcohol or pipe-cleansing cloths which can be bought at the WIDOS company) before every welding or if they are dirty. The anti-adhesive coating of the heating element has to remain undamaged in the working area.
- Page 22 If necessary, readjust the pressure during cooling down (the pressure for cooling down is the same as the adjustment pressure). After expiration of the cooling down period stop the pressure, remove the welded parts and open the slide. 06.05.19 Working instructions WIDOS MINIPLAST 2 / T-Piece Page 22 of 34...
-
Page 23: Welding Process For T-Pieces
If necessary effect a horizontal (right-hand clamping tool) or a vertical (left-hand clamping tool) mismatch compensation. In case mismatch compensation was effected, renewed planing has to be carried out afterwards. 06.05.19 Working instructions WIDOS MINIPLAST 2 / T-Piece Page 23 of 34... - Page 24 Plane the pipes with little pressing force until a revolving chip has been formed. Open slide and remove planer. Remove the chips without touching the worked surfaces. Check pipe mismatch and plane again. 06.05.19 Working instructions WIDOS MINIPLAST 2 / T-Piece Page 24 of 34...
- Page 25 (adjustment pressure = cooling pressure). After expiration of the cooling down time unclamp the finished T-piece and start a new welding process. 06.05.19 Working instructions WIDOS MINIPLAST 2 / T-Piece Page 25 of 34...
-
Page 26: Fabrication Of T-Pieces (90°)
WIDOS Einsteinstraße 5 Phone +49 7152 9939 0 Wilhelm Dommer Söhne D-71254 Ditzingen +49 7152 9939 40 GmbH info@widos.de Internet: www.widos.de 6. Fabrication of T-pieces (90°) 06.05.19 Working instructions WIDOS MINIPLAST 2 / T-Piece Page 26 of 34... -
Page 27: Welding Log And Tables
You can access our website and select our welding tables via the qr code shown here. Select ” 2500-ASM 160-315 ” and the corresponding material (PE / PP /PVDF). 06.05.19 Working instructions WIDOS MINIPLAST 2 / T-Piece Page 27 of 34... - Page 28 Welding Log and Tables Chapter: 7 06.05.19 Working instructions WIDOS MINIPLAST 2 / T-Piece Page 28 of 34...
-
Page 29: Maintenance And Repair
For machines with a specially high usage percentage the testing cycle should be shortened . The works should be performed at the WIDOS GmbH company or by an authorized partner. Replace damaged parts immediately, be particular carefull with electrical parts - dirt and wetness are very good current conductors. -
Page 30: Transport
Make sure that you transport the machine in its destined transport case if available. Storing of elements in transport case: Planer Basic frame Basic machine Protective box Heating element Reduction inserts Tools and accessoires 06.05.19 Working instructions WIDOS MINIPLAST 2 / T-Piece Page 30 of 34... -
Page 31: Electric Diagram
WIDOS Einsteinstraße 5 Phone +49 7152 9939 0 Wilhelm Dommer Söhne D-71254 Ditzingen +49 7152 9939 40 GmbH info@widos.de Internet: www.widos.de 10. Electric diagram 06.05.19 Working instructions WIDOS MINIPLAST 2 / T-Piece Page 31 of 34... - Page 32 Elektropläne 06.05.19 Working instructions WIDOS MINIPLAST 2 / T-Piece Page 32 of 34...
-
Page 33: Spare Parts List
Chapter: 11 11. Spare parts list You can access our website and select our spare parts lists via the qr code shown here. Select “Miniplast 2 / T-Piece” 06.05.19 Working instructions WIDOS MINIPLAST 2 / T-Piece Page 33 of 34... -
Page 34: Declaration Of Conformity
Heimerdingen, 06.05.2019 Place / Date Legally binding signature This declaration is to certify the compliance with the mentioned harmonizing regulations, however does not include any assurance of properties. 06.05.19 Working instructions WIDOS MINIPLAST 2 / T-Piece Page 34 of 34...
Need help?
Do you have a question about the MINIPLAST 2 / T-Piece and is the answer not in the manual?
Questions and answers