Table of Contents
Advertisement
Quick Links
WIDOS
Wilhelm Dommer Söhne
GmbH
Working instructions
Heating element socket welding machine
Headquarters: D-71254 Ditzingen-Heimerdingen Country court Stuttgart HRB 200973 Managing director: Jürgen Dommer, Dr. Kai Dombrowski
Einsteinstraße 5
D-71254 Ditzingen-Heimerdingen
E-mail: info@widos.de
Translation
WIDOS 7511
Keep for further use!
Phone
+49 71 52 99 39 0
Fax
+49 71 52 99 39 40
Website: www.widos.de
Advertisement
Table of Contents

Related Manuals for widos 7511


Summary of Contents for widos 7511
- Page 1 +49 71 52 99 39 40 GmbH E-mail: info@widos.de Website: www.widos.de Working instructions Translation Heating element socket welding machine WIDOS 7511 Keep for further use! Headquarters: D-71254 Ditzingen-Heimerdingen Country court Stuttgart HRB 200973 Managing director: Jürgen Dommer, Dr. Kai Dombrowski...
- Page 2 Order of spare parts and sales service: Address of manufacturer WIDOS W. Dommer Söhne GmbH Einsteinstr. 5 D-71254 Ditzingen-Heimerdingen Phone: +49 71 52 99 39 0 Fax: +49 71 52 99 39 40 Internet: www.widos.de E-mail: info@widos.de 19.05.15 Working instructions WIDOS 7511 Page 2 von 39...
- Page 3 Therefore the searched information can be found easily. 19.05.2015 WIDOS W. Dommer Söhne GmbH Einsteinstraße 5 D-71254 Ditzingen-Heimerdingen All rights reserved. Reprinting only allowed with permission of the corporation. Any changes prior to technical innovations. 19.05.15 Working instructions WIDOS 7511 Page 3 von 39...
-
Page 4: Table Of Contents
1.3. Conformity ................................ 6 1.4. Designation of the product..........................7 1.4.1. Technical data ................................7 1.4.1.1. WIDOS 7511 General data ........................7 1.4.1.2. Heating element ............................ 7 1.5. Equipment and accessories ..........................8 SAFETY RULES ..........................9 2.1. Explanation of the different symbols ......................9 2.2. - Page 5 Prism clamping tool for pipes ........................31 9.3. Prism clamping tool for fitting with support....................33 9.4. Heating element ............................. 35 9.5. Spigot and socket ............................37 10. DECLARATION OF CONFORMITY ..................... 39 19.05.15 Working instructions WIDOS 7511 Page 5 von 39...
-
Page 6: Description Of Product
1.1. Usage and purpose-oriented use The WIDOS 7511 is exclusively designed for the heating element socket welding of pipes and fittings out of PE, PP and PVDF with an outside diameter range from 20 mm to 75 mm. At heating element socket welding, pipe and fitting are welded overlapping. -
Page 7: Designation Of The Product
The lables contain the type of the machine, the serial number and the year of construction. 1.4.1. Technical data 1.4.1.1. WIDOS 7511 General data Material: PP, PE, PVDF, PB Pipe diameter range: OD = 20 - 75 mm (2” IPS) -
Page 8: Equipment And Accessories
(1 set already mounted) 1 set Gripping tools for pipes Ø 29 – 52 mm and Ø 40 – 75 mm (1 set already mounted) Heating spigots and sockets, according to order 19.05.15 Working instructions WIDOS 7511 Page 8 of 39... -
Page 9: Safety Rules
T h e r e g u l a t i o n s f o r t h e p r e v e n t i o n o f a c c i d e n t s a r e v a l i d ( U V V ) . 19.05.15 Working instructions WIDOS 7511 Page 9 of 39... -
Page 10: Obligations Of The Owner
It must be clearly defined who is responsible for transport, mounting and dismounting, and starting the operation. A person who is being trained may only work at the machine under supervision of an experienced person. 19.05.15 Working instructions WIDOS 7511 Page 10 of 39... -
Page 11: Dangers While Handling The Machine
2.7. Dangers while handling the machine The machine WIDOS 7511 is constructed according to the latest technical standard and the acknowledged technical safety rules. However, dangers for the operator or other persons standing nearby may occur. Also material damages are possible. -
Page 12: Danger Of Squeezing By Clamping Tool And Guideways
Machine parts that are not in perfect condition are to be replaced immediately. Only use original WIDOS spare and wear parts. In case of purchase orders, please always note the machine and version number! 2.11. -
Page 13: Functional Description
The pipe end, heating element and fitting socket are to match each other in size in such a way that a joining pressure will build up during joining. After expiration of the cooling time, the welded joint can be unclamped, the welding process is finished. Principle of heating element socket welding 19.05.15 Working instructions WIDOS 7511 Page 13 of 39... -
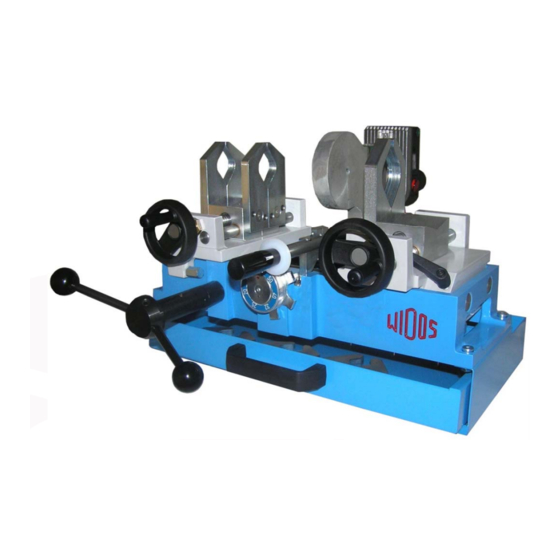
Page 14: Operating And Indicating Elements
Handle for fitting clamping tool tight side, clamping tool open / close Stop washer metric / inch, for insertion depth and zero offset Drawer with handle, storing accessories such as clamping tools, spigots, sockets and tool 19.05.15 Working instructions WIDOS 7511 Page 14 of 39... -
Page 15: Elements On The Heating Element
The nominal temperature has not been reached yet. 19.05.15 Working instructions WIDOS 7511 Page 15 of 39... -
Page 16: How To Mount The Heating Spigot And Socket
Use the special pan-head screw, the pressure spring, washer and hexagon nut for spigots without screw thread (according to the illustration). Heating socket Heating spigot 4.3. Accessore pipe champferer (optional) Pipe chamferer size 1, for 15°-chamfering the pipe end. 19.05.15 Working instructions WIDOS 7511 Page 16 of 39... -
Page 17: Clamping Tool Left For Pipe
For changing a jaw remove the flat-head screw and detach the jaw. Set the clamping jaw with other size on the straight pins and mount it with flat-head screw. 19.05.15 Working instructions WIDOS 7511 Page 17 of 39... -
Page 18: Starting And Operating
(e.g. PE – cleaning agent or WIDOS pipe cleansing cloths) before every welding or if they are dirty. The nonstick coating of the socket and spigot must remain undamaged in the working area. -
Page 19: Surrounding Conditions
In addition, the workpieces (fitting and pipe) to be welded must be clean. If need be, clean them with detergent and non-fraying paper. The pipe end is to be chamfered to appr. 15°. appr. 15° 2-3 mm 19.05.15 Working instructions WIDOS 7511 Page 19 of 39... - Page 20 Shut the machine until the dial rest against the stop bolt (upper left image) and fix this position with the clamping lever. Insert the chamfered pipe so that the end face is adjacent to the fitting. Close the pipe clamping tool and clamp the pipe by handle. 19.05.15 Working instructions WIDOS 7511 Page 20 of 39...
- Page 21 Now, the cooling time starts. After expiration of the cooling time open the clamping tools and remove the welded part. Release the clamping lever and drive open slides by grip handle. The welding process is completed 19.05.15 Working instructions WIDOS 7511 Page 21 of 39...
-
Page 22: Welding Log And Tables
SDR 17,6 clamped total SDR7,4 SDR17 [min] SDR6 6.2. Table for PVDF Pipe outside Min. pipe wall Heat-up Change-over Cool down diameter thickness - (max. time) [mm] [mm] clamped total [min] 19.05.15 Working instructions WIDOS 7511 Page 22 of 39... - Page 23 **) These fields contain merely interpolated values which are not verified by a valid standard and for which the WIDOS GmbH does not assume any warranty. Apart from that, the standard values for welding of the plastic pipe or fitting manufacturer are valid.
-
Page 24: Welding Log
Welding tables and welding log Chapter 6 6.5. Welding log 19.05.15 Working instructions WIDOS 7511 Page 24 of 39... -
Page 25: Maintenance / Storage / Transport
According to DVS, inspection works are recommended after 1 year. At machines which are used more than average, the inspection cycle should be shortened. The works have to be performed at the WIDOS company or at an authorized partner. 7.2. Storage ... -
Page 26: Setting The Mismatch Compensation
Setting the mismatch compensation is only required after repair works or exchange of spare parts. It may only be performed by WIDOS staff or accordingly authorized persons. You can make a horizontal mismatch compensation (max. 10 mm). Loosen the counter nut and adjust the adjustment bushing until the mismatch is compensated. -
Page 27: Electric Diagrams
+49 71 52 99 39 0 Wilhelm Dommer Söhne D-71254 Ditzingen-Heimerdingen +49 71 52 99 39 40 GmbH E-mail: info@widos.de Internet: www.widos.de 8. Electric diagrams 8.1. Electric diagram for machine with 230 V 19.05.15 Working instructions WIDOS 7511 Page 27 of 39... -
Page 28: Electric Diagram For Machine With 110 V
Electric diagrams Chapter 8 8.2. Electric diagram for machine with 110 V 19.05.15 Working instructions WIDOS 7511 Page 28 of 39... -
Page 29: Spare Parts List
E-mail: info@widos.de Internet: www.widos.de 9. Spare parts list 9.1. Basic machine 14 - 19 20 - 22 23 - 24 3 - 10 11 - 13 27 - 28 30 - 31 19.05.15 Working instructions WIDOS 7511 Page 29 of 39... - Page 30 Spring-loaded thrust pad GN615.3-M10-K-PFB on request Streight pin M 10x16 DIN 913 0913J016 Idler for heating element 3761034 Pan-head screw M 6x25 DIN 7984 7984H020 Pendulum strip 3751036 Stop shaft for heating element 3761035 19.05.15 Working instructions WIDOS 7511 Page 30 of 39...
-
Page 31: Prism Clamping Tool For Pipes
Spare parts list Chapter 9 9.2. Prism clamping tool for pipes 4 - 6 7 - 8 14 - 15 17 - 18 19.05.15 Working instructions WIDOS 7511 Page 31 of 39... - Page 32 Bush PAP2015 P10 PAP2015 P10 Guide block pipe side, in front 3761036 Slide bush PSM162016 A51 PSM162016A51 Guide block pipe side, rear 3761037 Bearing bush 3761026 Grub screw M 8x20 DIN 914 0914H020 19.05.15 Working instructions WIDOS 7511 Page 32 of 39...
-
Page 33: Prism Clamping Tool For Fitting With Support
Spare parts list Chapter 9 9.3. Prism clamping tool for fitting 9 - 13 14 - 15 6 - 7 17 - 18 19 - 20 19.05.15 Working instructions WIDOS 7511 Page 33 of 39... - Page 34 Pan-head screw M5x20 DIN 7984 7984E020 Guide block fitting side, in front 3761036 Slide bush PSM162016 A51 PSM162016A51 Guide block fitting side, rear 3761037 Bearing bush 3761026 Grub screw M 8x20 DIN 914 0914H020 19.05.15 Working instructions WIDOS 7511 Page 34 of 39...
-
Page 35: Heating Element
Spare parts list Chapter 9 9.4. Heating element 5 - 6 10 - 12 13 - 14 15 - 18 21-22 25 - 26 27 - 29 30 - 31 19.05.15 Working instructions WIDOS 7511 Page 35 of 39... - Page 36 Hexagon nut M 4 DIN 934 0439D Spring lock washer M 4 DIN 7980 7980D Cable screw connection PG11 EV0011 Connection cable EK3220 (31) Connection cable (110 V) on request Ball bushing KH1630 LKH1630 19.05.15 Working instructions WIDOS 7511 Page 36 of 39...
-
Page 37: Spigot And Socket
Spare parts list Chapter 9 9.5. Spigot and socket 19.05.15 Working instructions WIDOS 7511 Page 37 of 39... - Page 38 1 Set HD…* Pressure spring 150121 Hexagon nut 0934F Washer M 6 DIN 125 0125F Screw for socket and spigot 371530 *) When ordering, please state the dimension of the diameter 19.05.15 Working instructions WIDOS 7511 Page 38 of 39...
-
Page 39: Declaration Of Conformity
3. DIN EN 60555, DIN EN 50082, DIN EN 55014, Electro-magnetic resistance The working instructions in the mother language of the user are available. The technical documentation is completely available. Ditzingen-Heimerdingen, the 19.05.2015 Martin Dommer (Technical director) 19.05.15 Working instructions WIDOS 7511 Page 39 of 39...
Need help?
Do you have a question about the 7511 and is the answer not in the manual?
Questions and answers