
Related Manuals for Modena GI 10 S


Summary of Contents for Modena GI 10 S
- Page 1 GI 6 S GI 10 S BUKU PETUNJUK PENGGUNAAN PEMANAS AIR DAN KARTU GARANSI GAS INSTANT WATER HEATER MANUAL WARRANTY CARD 01/16 www.modena.co.id...
- Page 3 Bacalah buku petunjuk pengoperasian ini dengan seksama, agar seluruh manfaat dan kelebihan yang dimiliki Water Heater MODENA bisa Anda peroleh. Simpanlah buku petunjuk pengoperasian ini dekat dengan Water Heater Anda, agar sewaktu-waktu jika diperlukan mudah untuk mendapatkannya. Sertakan buku petunjuk pengoperasian ini jika Water Heater ini dialihkan kepada pihak lain, dengan demikian pemakai yang baru dapat segera memahami cara penggunaan Water Heater ini.
- Page 4 NOMOR : P.20.INDO3.00201.0212 DAFTAR ISI HLM. • Kata Pengantar • Bagian 1 : Nama-nama bagian • Bagian 2 : Instalasi • Bagian 3 : Cara penggunaan • Bagian 4 : Pemeliharaan • Bagian 5 : Tindakan pencegahan • Bagian 6 : Spesifikasi Bahasa Indonesia...
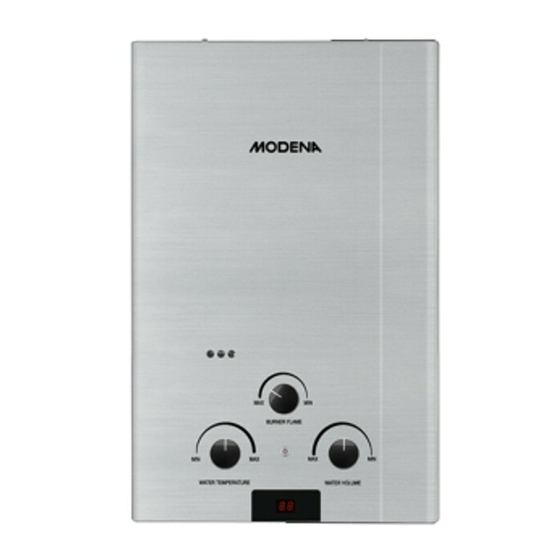
- Page 5 Bagian 1 : Nama-Nama Bagian GI 6S/ GI 10 S Bahasa Indonesia...
- Page 6 Bagian 2 : Instalasi Tangga dan pintu keluar Kabinet Kamar tidur Tidak ada instalasi Kamar mandi Lantai bawah tanah Ruang tamu Catatan : Posisi Water Inlet, Water Outlet dan pipa gas harus sesuai dengan tanda yang ada di body Bahasa Indonesia...
- Page 7 Water Heater. Periksa dahulu dengan hati–hati setelah selesai instalasi, yakinkan tidak ada kebocoran gas maupun air. Panjang maksimum selang karet adalah 2 meter. Kabel, pipa atau selang, dilarang melewati samping atau atas body Water Heater. Instalasi untuk gantungan harus horizontal. ...
- Page 8 Yakinkan tidak ada kebocoran udara pada sambungan pipa, kencangkan dengan mur dengan kuat. GI 10 S Gunakan pipa ventilasi dan aksesoris yang disertakan dalam kemasan. 1. Diameter dari pipa ventilasi adalah 50 mm. Diameter lubang...
- Page 9 Pemasangan pipa ventilasi tambahan (perpanjangan) Aksesoris tambahan (pipa siku dan pipa lurus) yang diperlukan untuk kondisi ini tidak disediakan dalam kemasan dan dapat dibeli secara terpisah. Perhatian: 1. Permukaan antara pipa ventilasi dan tembok gantung harus dilapisi material tahan api atau material beton.
- Page 10 Ukuran baut ulir penghubung pipa masukan gas pada water heater dengan pipa adalah diameter G1/2. Menghubungkan ke tabung LPG 1. Pasang penghubung yang ada pada kemasan ke katup masukan gas yang ada pada water heater (pastikan segel telah terpasang), kemudian hubungkan dengan selang khusus gas (selang...
- Page 11 Bagian 3 : Cara Penggunaan 1. Letakkan 2 buah baterai. 2. Buka katup gas-masuk dan air-masuk.. 1. Buka kedua katup air dingin dan air panas, pastikan air dingin keluar dari keran air panas kemudian tutup. 2.
- Page 12 b. Jika katup air diinstal sendiri, air dingin tidak boleh diputar terlalu banyak, untuk mencegah berkurangnya tekanan dari diffluence akan mempengaruhi operasi normal Water Heater. Di beberapa tempat, tekanan air mungkin terlalu kuat sehingga air tidak dapat dipanaskan. Dalam hal ini, silakan putar kebawah katup masuknya air. Flame pada panel Water Heater dapat diputar kearah max atau min ( seperti gambar di bawah ini ).
- Page 13 Pemeliharaan Water Heater oleh Pengguna : 1. Lepaskan akumulasi kotoran dan debu pada permukaan Water Heater dengan kain secara teratur. Jangan menggunakan bahan kimia yang dapat merubah warna permukaannya. 2. Bersihkan akumulasi debu dan karbon di dalam pipa ventilasi dan pergantian panas secara teratur untuk meyakinkan lancarnya jalur asap.
- Page 14 Bagian 6 : Spesifikasi TIPE GI 6S GI 10 S Jenis Instan Instan Warna Sumber pemanas Gas LPG Gas LPG Input gas (kg/h) 0.78 1.38 Kalori (Kcal/h) 8600 17200.8 Kapasitas (liter/menit) Pemasangan Vertikal Vertikal Pengaman tekanan air Thermostat Single Single...
- Page 16 INSTRUCTION AND GUIDE TO USING MODENA WATER HEATER Thank you for your trust and decision to buy MODENA product and make it a part of your modern family's needs and lifestyle. The stylish and advanced design in each product is an elegant combination for your daily household activities.
- Page 17 CONTENTS PAGE. • Introduction • Part 1 : Name of parts • Part 2 : Installation • Part 3 : How to use • Part 4 : Maintenance • Part 5 : Precaution Action • Part 6 : Specification English...
- Page 18 Part 1: Names of the Parts GI 6S/ GI 10 S Explanation : 1. display window 2. flame/furnace button 3.Temperature/water temperature button 4. Water volume/water capacity button 5. Temperature display 1. Drain pipe 2. steam collector funnel 3. lighter plug 4.
- Page 19 Part 2 : Installation Installation position ( Done in the separate room ) stair and door cabinet bedroom No installation bathroom downstair living room The position is right in the installation room Note : Inlet water, outlet water, and gas pipe position must be in accordance with the marks on the water heater body ( water heater ) First Check carefully after the installation is done, make sure that there is no gas or water leak.
- Page 20 Installation for the hanger must be horizontal If the wall is not resistant to heat, it is wise to be coated with a heat-resistant board, 100mm bigger than the water heater of every sides and 10mm from the wall. ...
- Page 21 - Make sure there is no air leak at the pipe connections, fasten it with strong screws. GI 10 S Use the ventilation pipe and accessory that are included in the package. . Diameter of the ventilation pipe is 50mm. Diameter of the ventilation hole is 70 mm and installed above the expansion screw that is used to hang the water heater with the minimum distance 105mm from the expansion screw.
-
Page 22: Valve Installation
Standard of the installation of the ventilation pipe Additional of the installation of the ventilation pipe Additional accessory (angled pipe and straight) that are needed for this condition is not provided in the package and can be bought separately. Attention : 4. - Page 23 1. It is a must to use the gas hose or standard metal pipe. 2. The gas valve must be installed to the gas inflow track. Installation of the electricity part GI 10 S AC 220v, 50Hz Place the plug and socket in the dry palce and free from dew.
-
Page 24: Temperature Control
Contact Open the hot water valve fully, then the water heater will turn on automatically and hot water will flow. If the hot water is not perfectly opened, then the heat excess or the fire will turn off. The water heater will be turned off automatically after 20 minutes operating continuously. - Page 25 Must be checked by professional : 1. Flexibility of the water and gas connection. 2. Clean the carbon accumulation on the buckled part of the heat exchange. 3. Give lubricants to the gas valve and on the middle part. 4. Caron accumulation and oxidation layer of the disturbing. Maintenance of the water heater by the user : 1.
- Page 26 Part 6: Specifications Model GI 6S GI 10 S Type Instant Instant Colour Stainless Stainless Heater resources Gas input (kg/h) 0.78 1.38 Calorie (kcal/h ) 8600 17200.8 Capacity (litre/minute) Installation Vertical Vertical Water pressure safety Thermostat Single Single Material from drum...
Need help?
Do you have a question about the GI 10 S and is the answer not in the manual?
Questions and answers