
Related Manuals for Barco wePresent WiPG 1600


Summary of Contents for Barco wePresent WiPG 1600
- Page 1 WiPG 1600 User Guide © wePresent 2017 For more information Contact: wePresentWiFi.com/contact.html www.wePresentWiFi.com Support: wePresentWiFi.com/contact-support.html WIPG-1600-USER-GUIDE-01...
-
Page 2: Table Of Contents
Contents Overview Package Contents Physical Details What you Might Need Quick Installation WiP-1600 Start/Standby Page Quick Guide Whiteboard USB Player Function Conference Control Mode Sender List Split Screen Mode Setup Remote Tocuh Control (UMT) Pen Menu Function under Projecting Mode Web Management Home page Conference Control... -
Page 3: Overview
Overview WiPG-1600 is a wireless presentation system which connects up to 64 devices on any platform (Windows/Mac/iOS/Android/Chromebook) for engaging interactive presentations. It supports Multi-touch technology, virtual whiteboard, HD video streaming, and USB HID compatible remote devices, such as a wireless mouse or keyboard. ICON FEATURE DESCRIPTION... - Page 4 Overview ICON FEATURE DESCRIPTION Project four PC/Mac screens to one projector/ 4 to 1 Projection display at once Mirror the presentation to up to four 1 to 4 Projection connected receivers at the same time Control projection from web Admin, or use mouse/keyboard to select a PC from the standby screen.
- Page 5 Overview Key Features • WiFi 802.1a/b/g/n (Dual-band 5G/2.4G WiFi) • Power over Ethernet • High performance screen/audio projection for Windows/Mac/Chromebook (Windows 7/8 and Mac 10.7/10.8/10.9/10.10) • Remote desktop control from Touch Screen or Mouse/Keyboard for Windows/Mac • Plug&Show: Launch software without installation. Extras with the Plug&Show function can be created in the wePresent software.
-
Page 6: Package Contents
Package Contents Package Contents • wePresent WiPG-1600 • Power Adapter (DC +5V, 2.6A) • 2 WiFi Antennas • Quick Installation Guide • Wall Mount Kit • Warranty Card • CE DoC © wePresent 2017 WIPG-1600-USER-GUIDE-01... -
Page 7: Physical Details
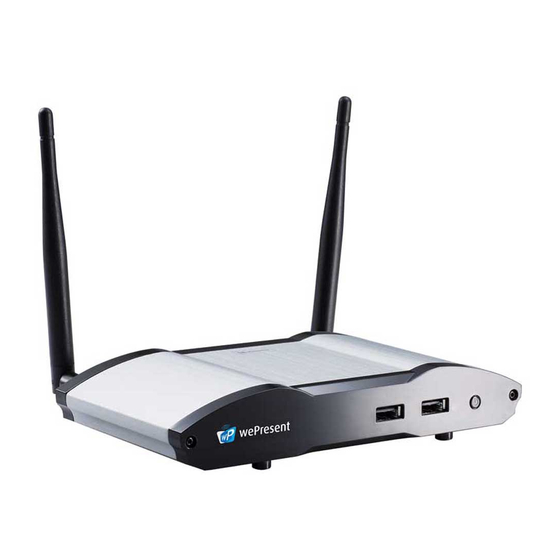
Physical Details Front Panel Front Panel DESCRIPTION Power Button Power on/off bottom and LED LED Indicator: System Loading (red), Ready (blue) USB Port (Front) 2 USB ports for USB, mouse and keyboard Rear Panel © wePresent 2017 WIPG-1600-USER-GUIDE-01... -
Page 8: Rear Panel
Physical Details Rear Panel DESCRIPTION Antenna WiFi Antenna USB Port (rear) USB port for USB Thumb drive or Touch Device 10/100M RJ-45 port RJ-45 PoE (Power Over Ethernet) VGA Connector VGA Connector HDMI HDMI Connector Audio Jack Audio Jack (3.5mm) Power Jack Power Jack (5V/2.5A) •... -
Page 9: What You Might Need
Physical Details Bottom Side DESCRIPTION Screw Hole Screw Hole for Wall Mount Kit Press reset button and power on the device to Reset Button execute Hardware Reset What You Might Need • Projector/display with VGA/HDMI input • Windows or Mac PC/Laptop •... -
Page 10: Quick Installation
Quick Installation Connect wePresent WiPG-1600 to Projector/display through VGA/HDMI port and turn on projector/display power. Connect the power adaptor to: • WiPG-1600 and press the power button to turn on WiPG-1600 • System will be ready when the LED light turns to blue Insert the speaker cable to WiPG-1600 audio jack for audio output (Optional). -
Page 11: Wip-1600 Start/Standby Page
WiPG-1600 Start/Standby Page 6.1 Quick Guide The device will show the startup screen as below, as well as the wePresent device information and function icons. 6.2 Whiteboard Click on the “whiteboard” icon on the start page to enter “whiteboard” function. Write and draw on screen through USB Mouse, Touch Screen or IWB device. - Page 12 WiPG-1600 Start/Standby Page Pen Menu Functions BUTTON DESCRIPTION Open/Minimize all Pen menu bar Home, Go back to wePresent home standby screen Clear all of the drawing/writing on the screen Erase part of drawing/writing Select the pen colour. (Red, Green, Blue) Select the size of the pen.
-
Page 13: Usb Player Function
WiPG-1600 Start/Standby Page 6.3 USB Player Function Click on the “USB Player” button on the start page to enter “USB Player” function. Access and play the Photo/Music/Video/Office files from the inserted USB drive. For additional details, please see the USB Player section. 6.4 Conference Control Mode Click to enable conference control mode and the users will be unable to present to screen themselves. -
Page 14: Sender List
WiPG-1600 Start/Standby Page 6.5 Connected User List Click on the “User-List” button to show all connected users. Moderator can select a user to present from the list. 6.6 Quad Screen Mode Click on the “Quad Screen” button on the start page to enter “Quad Screen” page. -
Page 15: Setup
WiPG-1600 Start/Standby Page 6.7 Setup Click on Setup icon , to view Firmware (FW) version, resolution, WiFi channel and AP-client status information on the screen. Select “Calibration” function to calibrate the projecting screen to an optimal setting. Click on the “Make PnS Token” to copy the Plug-n-Show application for Windows and Mac to attached USB drive. -
Page 16: Pen Menu Function Under Projecting Mode
WiPG-1600 Start/Standby Page 6.9 Pen Menu Function under Projecting Mode When users are projecting through Windows, Mac, Android and iOS application, any Win7/8 standard HID compatible device (i.e Mouse/IWB/Touchscreen) can be used for Pen feature. Users can do free drawings/writings and annotation on the projecting screen. -
Page 17: Web Management
WiPG-1600 Start/Standby Page BUTTON DESCRIPTION Save current screen image to USB driver Enable the magnifier function Change to Mouse mode for remote control function Select the color and size for Pen mode (Red, Green, Blue) Select the size of the pen (Small, Medium, Big) Change to Pointer Mode Web Management 7.1 Home Page... -
Page 18: Conference Control
Web Management Please select the “Windows Utility” or “Mac Utility” and execute the installation program. Note: Please disable the “Smart Screen Filter” on IE browser; otherwise file may not be downloaded. Download the Device Profile on your Windows or Mac laptop, double click the .wipg profile. The wePresent utility will launch automatically and connect to this device without further operation. 7.2 Conference Control Select “Conference Control” function, The current connected user list can be found on this page. Verify the lock on the start page is disabled. -
Page 19: Admin
Web Management Uncheck the “Allow Control from this page only”, and the centralized control will be diabled. User can project their screen to WiPG-1600 freely. Moderator can log out from the conference control mode by clicking on the ”Logout” on the upper right corner. -
Page 20: System Status
Web Management 7.4 System Status Click on “System Status” option, it will show current system status. Model Name: Product model name Versions: • Firmware version no.: Product firmware version number Device Information: • Resolution: Device output resolution • Host Name: Device network hostname Network Status: •... -
Page 21: Device Setup
Web Management 7.5 Device Setup Device Setup” option will show the device settings: • <Resolution>: 720p, 1080i, 1080p , UXGA(1600*1200), WXGA+(1440*900), WXGA(1360*768, 1280x768, 1280x800) ,XGA(1024*768) and HDMI Auto Detect • <Code>: You can select “Disable”, “Random”, or “Use the following code” to set a specified 4-characters Number “Date and Time Settings”... -
Page 22: Network Setup
Web Management 7.6 Network Setup “Network Setup” option shows network settings: <Host Name and Domain Name> • Host Name: Enter the hostname of this device. Note: You can enable the “use the same name as network name”, it will use the same name as SSID for the device host name. - Page 23 Web Management <DHCP Server Setup> <Note: Auto-Configuration Network Setup on WiPG-1600> The default setting of the wePresent WiPG-1600 as DHCP server. When the wePresent WiPG- 1600 is connected to a LAN that already has a DHCP server, the wePresent WiPG-1600 uses an IP address assigned by the server.
-
Page 24: Wifi Setup
Web Management 7.7 WiFi Setup • Wireless LAN: The default setting is “Enable” • Mode: Specify the WiFi Access Point mode, WiFi Station mode and Concurrent AP and Station Mode < Access Point Mode> • SSID: Change the default SSID (maximum length is 32 bytes) •... - Page 25 Web Management • Key: If Encryption is enabled, a key must be entered according to the encryption mode selected. (If the length of the key entered is not sufficient or too long, a warning message will pop up.) • Channel Bandwidth: select from 20M or Auto (20M/40M) < Station Mode> Connect to Existing AP: The default setting is “Disable”. If “Enable” is chosen, enter the existing AP SSID that you want to connect.
- Page 26 Web Management < Concurrent AP and Station Mode> Access Point • SSID: The default SSID can be changed, and the maximum Length is 32 bytes • SSID Broadcast: The default value is “Enable” • Channel: A fixed channel or auto selection can be selected. The “Auto” selection means after powering on the WiPG-1600, all wireless channels will be scanned and one clear channel automatically selected •...
- Page 27 Web Management Note: WiFi 5G feature is only available on WiPG-1600 device. The WiFi DFS band is not supported. The Station mode, concurrent AP and Station mode can’t support the advance authentication mechanism. © wePresent 2017 WIPG-1600-USER-GUIDE-01...
-
Page 28: Snmp Setup
Web Management 7.8 SNMP Setup • Enable or disable SNMP V3 service • User Name: configure the user name to manage this device through SNMP • Auth Password: configure the Auth password • Priv Password: configure the Priv password • Trap Destination: configure the trap receiver IP <Apply >: Press “Apply” button after configuration, and follow the reboot instruction when applicable. <Cancel>: Press button to abort action. Note: Please find the MIB file from wePresent token. © wePresent 2017 WIPG-1600-USER-GUIDE-01... -
Page 29: Osd Setup
Web Management 7.9 OSD Setup OSD Setup option Change Standby Image • <Reset to default>: Restore to default logo image. • <Image File Upload>: Enter or browse the file name and upload the customized image. Please refer to remark on screen when selecting the file. The following “Display Option” can be adjusted: •... -
Page 30: Webslides Setup
Web Management 7.10 Webslides Setup “WebSlides Setup” option: • Adjust Auto Refresh Interval or activate “Access Password Control” • Please pay attention to the note for information <Apply >: Press “Apply” button after configuration, and follow the reboot instructions when applicable. <Cancel>: Press button to abort action. 7.11 Change Passwords Click on “Change Password”... -
Page 31: Reset To Default
Web Management 7.12 Reset to Default “Reset to Default”: restores factory default settings. <Apply>: Confirm and take action. *** You can also restore factory default setting from WiPG-1600 reset button. The reset button can be found underneath the box. Please follow below procedures. Press [Reset] button and hold. -
Page 32: Firmware Upgrade
Web Management 7.13 Firmware Upgrade Click on” Firmware Upgrade” option to “import/export” system configuration and upgrade firmware. System Configuration Import and Export: • Export: Export the system configuration to a configuration file • Import: Import the system configuration file to WiPG-1600 You can find the firmware version and release date here Firmware Upgrade: Download current firmware file from www.wepresentwifi.com/downloads.html Click <Browse> to select the downloaded firmware file. Click <Upgrade> to start. A warning message and count down counter will appear on the screen. After a few minutes, a “complete” message will appear on the screen. Restart the wePresent WiPG-1600 to take effect. -
Page 33: Reboot System
Web Management WARNING: Do not power off the wePresent WiPG-1600 while firmware upgrade is in progress, otherwise the unit will be damaged and must be returned to the vendor for repair. 7.14 Reboot System Click on ”Reboot System” option and restart the system. •... -
Page 34: Logout
Web Management 7.15 Logout Click on “logout” on the upper right corner to logout of the administration webpage and return back to the web management front page. 7.16 Webslides Select the “WebSlides” button to enter the WebSlides page. If presenter has enabled the webslides feature, their presentation will then appear in the browser. ©... -
Page 35: Usb Player
USB Player The USB Player can playback the files stored in the attached USB drive, it can support photo/video/music/office files. BUTTON DESCRIPTION Switch to Projection mode Enter photo viewer function Enter video player function Enter music player function Enter office viewer function Enter Setup page © wePresent 2017 WIPG-1600-USER-GUIDE-01... -
Page 36: Photo Viewer
USB Player 8.1 Photo Viewer The USB Player can playback the files stored in the attached USB drive, it can support photo/video/music/office files. BUTTON DESCRIPTION Exit this file Go to previous file Start/Pause Slideshow Go to next file Rotate © wePresent 2017 WIPG-1600-USER-GUIDE-01... -
Page 37: Video Player
USB Player 8.2 Video Player Open the folder and find the video file to play on the local display. BUTTON DESCRIPTION Exit this file Fast-rewind Play/pause Fast-forward (2x/4x/8x) Volume level increase/decrease © wePresent 2017 WIPG-1600-USER-GUIDE-01... -
Page 38: Music Player
USB Player 8.3 Music Player Open the folder and find the music file to play on the local display. BUTTON DESCRIPTION Exit this file Fast-rewind (2x/4x/8x) Go to previous file Play/pause Go to next file Fast-forward (2x/4x/8x) Volume level increase/decrease Repeat all files/repeat single file Shuffle © wePresent 2017 WIPG-1600-USER-GUIDE-01... -
Page 39: Office Viewer
USB Player 8.4 Office Viewer Open the folder and find the document file to play on the local display. BUTTON DESCRIPTION Exit this file Go to previous page Go to next page © wePresent 2017 WIPG-1600-USER-GUIDE-01... -
Page 40: Setup
USB Player 8.5 Setup ITEMS DESCRIPTION Sideshow Duration 5/10/20/30 seconds Slideshow Repeat Repeat on/off Video Play mode Repeat on/off Music play mode Repeat single file, Repeat all files ITEM VALUE MPEG-1 / MPEG-2 / MPEG-2 TS / MPEG-4 / MWV9 / MOV / Motion Supported File Format JPEG / MKV / ASF / DVR-M5 MPEG-1 / MPEG-2 / MPEG-2 TS / MPEG-4* / WMV9** / QuickTime / Motion JPEG... -
Page 41: Wall Mount
Wall Mount Remove the rubber from the bottom side Insert the mounting screw on wePresent device Attach the mounting bracket on the wall with the screw © wePresent 2017 WIPG-1600-USER-GUIDE-01... -
Page 42: Safety
Safety Federal Communications Commission (FCC) Statement 15.105(b) This equipment has been tested and found to comply with the limits for a Class B digital device, pursuant to part 15 of the FCC rules. These limits are designed to provide reasonable protection against harmful interference in a residential installation. This equipment generates, uses and can radiate radio frequency energy and, if not installed and used in accordance with the instructions, may cause harmful interference to radio communications. - Page 43 Safety FCC RF Radiation Exposure Statement: This Transmitter must not be co-located or operating in conjunction with any other antenna or transmitter. This equipment complies with FCC RF radiation exposure limits set forth for an uncontrolled environment. This equipment should be installed and operated with a minimum distance of 20 centimeters between the radiator and your body.
Need help?
Do you have a question about the wePresent WiPG 1600 and is the answer not in the manual?
Questions and answers