Flycam FLCM-RK Instruction Manual
Redking video camera stabilizer
Hide thumbs
Also See for FLCM-RK:
- Instruction manual (14 pages) ,
- Assembly manual (9 pages) ,
- Assembly manual (15 pages)
Advertisement
Quick Links
Advertisement

Related Manuals for Flycam FLCM-RK


Summary of Contents for Flycam FLCM-RK
- Page 1 Redking Video Camera Stabilizer (FLCM-RK) Instruction Manual...
-
Page 2: Table Of Contents
At Flycam, our goal is to ensure 100% Customer Satisfaction in all that we do. We back our sales with a 1 year warranty from the date of purchase and work hard to resolve any problems in the unlikely event one should arise. -
Page 3: Foreword
On behalf of all the people that work so hard to provide you with the most up-to-date, flexible and cost-efficient production gear, we would like to welcome you into the Flycam family. By purchasing your Redking Video Camera Stabilizer, you have just joined a host of designers, engineers, machinists, assembly, customer service and office staff that take great pride in all that they do. -
Page 4: Introduction
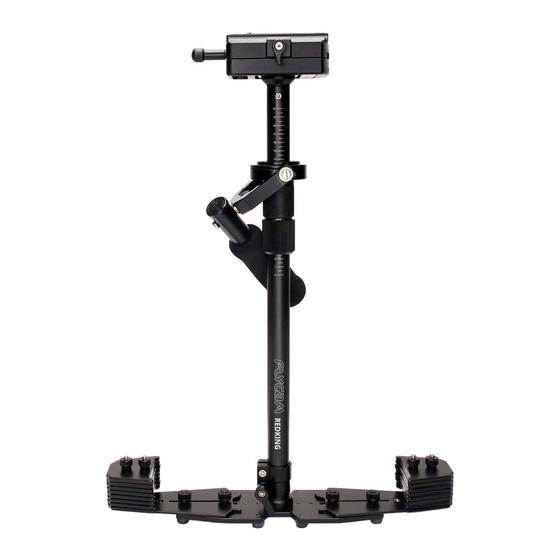
Introduction Flycam introduces its professional and rugged Redking handheld video stabilizer; designed for film and video cameras. Redking works so well that it allows you to shoot incredibly smooth and graceful shots even while going to extremes like running up and down stairs or traveling over rugged terrain. And when it comes to normal shooting, like walking or moving the camera slowly around someone, the results are equally magical. -
Page 5: Safety Hints
Safety Hints ATTENTION: PLEASE READ THIS BEFORE USING TO PREVENT SERIOUS DAMAGE TO THE GEAR! BE HIGHLY VIGILANT OF SURROUNDINGS Check the area you will be shooting in, before shooting. Make sure your path is clear. Look for obstacles and note anything you might run into or trip over. Extra care is also necessary when tackling stairs and other kinds of uneven ground. -
Page 6: Assembling
Assembling A threaded stud is located in the center of Base Platform for attaching Central Post. Securely tighten the adjustment knob on telescoping clamp by rotating it clockwise NOTE: The adjustment knob should only be tightened by hand. Do not over-tighten it as it could cause thread stripping. - Page 7 Horizontal adjustment on the base platform is made by loosening the retaining screws and moving the mounted cups closer to or further away from the stalk and then retightening. You will probably need to adjust and re adjust the horizontal position to achieve optimum performance.
- Page 8 Turn the adjustment knobs with your other hand (or use the stage motor transmitter) until you feel no pressure on your operating hand and the sled will be in static balance. Now that your Flycam Redking Camera Stabilizer setup assembled properly, you can test and setup the horizontal balance of the system.
- Page 9 If Stabilizer tilts to the front, then you will have to turn Adjustment Knob counter clockwise. If it still tilts to front, then move dovetail quick release plate more towards back by turning knob. If Stabilizer tilts to the back, then move dovetail quick release plate towards front by turning the knob clockwise.
- Page 10 Note: Recheck the balance by looking at sled. If necessary, use side screws and bottom plate screws to make required adjustments. Holding Your FLYCAM stabilizer When handling your Redking Video Camera Stabilizer one hand holds onto the handle while the other is used to gently guide the camera in the direction you wish to shoot and frame the shot.
- Page 11 Camcorder. We believe that better results are obtained when you attach monitor to Flycam Redking Stabilizer’s base, because this way you have to look slightly down to see the monitor and so, your feet are more visible to your peripheral vision. This makes negotiating obsta-...
- Page 12 Remove top plate of FLYCAM and line up your camera so that its center of gravity is as close to the center of the plate as possible (basically hold the camera in your hand until it feels balanced both left and right as well as forward and back).
- Page 13 Be sure to keep oil away from your camera, & clean up any over spill. Cleaning Do not use solvents or harsh cleaners of any kind on your Flycam Hand held stabilizer. If the unit becomes dirty, use a damp soft cloth or sponge and a mild detergent to gently clean external parts.
- Page 14 Practice makes perfect - Walking the line Practice this simple exercise to master your Flycam Redking stabilizer with professional results. Using masking or gaffers tape, create a cross mark on a flat and even wall. The mark becomes your framing center. On the floor leading up to the cross mark, lay a straight tape line of about 20 feet.
-
Page 15: Warranty
WARRANTY We offer a one year warranty for our products from the date of purchase. We will repair or replace your product, free of charge, in the event of a defect in materials or craftsmanship obtained during normal use or handling based on the user manual. Please note that we will not cover any shipping costs for returning the product to us.
Need help?
Do you have a question about the FLCM-RK and is the answer not in the manual?
Questions and answers