
Related Manuals for Comica CVM-WS50


Summary of Contents for Comica CVM-WS50
- Page 1 CVM-WS50 Multi-channels Smartphone Wireless Microphone FOR SMARTPHONE USER MANUAL...
-
Page 2: Specification
Specification Lavalier Transmitter (TX) : Channels Wireless Frequency 520.00MHz ~ 526.00MHz Transmitting Power 15dBm Hand-held Transmitter (HTX) : Channels Wireless Frequency 520.00MHz ~ 526.00MHz Transmitting Power 15dBm Receiver: Channels Wireless Frequency 520.00MHz ~ 526.00MHz... - Page 3 Foreword Thank you for purchasing Comica WS50 multi-channels smartphone wireless microphone. WS50 is a creative wireless microphone for smartphone with built-in mobile phones holders. With built-in lithium polymer batteries, it uses UHF wireless technology and high-resolution LCD code screen, stepless adjustable volume at receiving end, and integrated into power monitoring, audio dynamic display bar, real-time monitoring and other functions;...
-
Page 4: Main Features
Main Features . Working Distance Up to 60m (In Open Area, 30m in Barrier Area) ; . Built-in Metal Material Smartphone Holder; . LCD Screen for Displaying Channels and Audio Status; . Stepless Volume Adjustment; . Real-time Audio Monitor; . Extendable for Connection with LED Light, Grip, Tripod, Cold-shoe, etc; . - Page 5 Notice . This product is compatible with both IOS and Android system, and when used with the iphone 7 or above, you need to use the original adapter cable; . For smart phones with IOS system (Iphones), this Mic works well either in Audio or Video mode;...
-
Page 6: Packing List
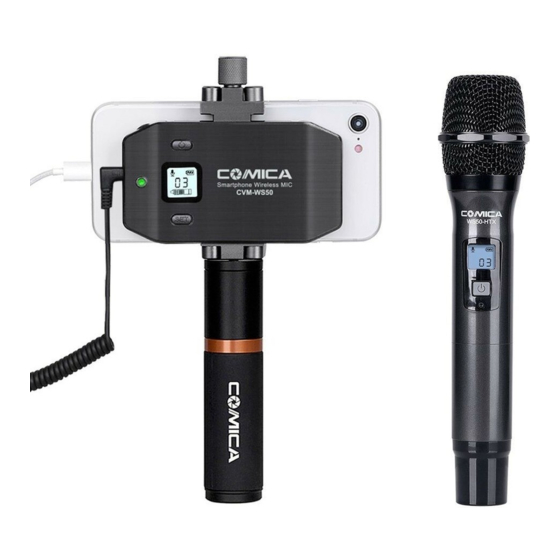
Packing List Main Body: Lavalier Transmitter (TX) Hand-held Transmitter (HTX) Receiver Electronic Grip Ordinary Grip Tripod on Table WS50(A)= WS50(B)= WS50(C)= WS50(H)= Accessories: 1. 3.5mm Audio Mic 2.TRRS Audio Output Cable 3. USB Charging Cable 4. Belt Clip 5. Wind Muff 6. - Page 7 Components and Instruction Components Lavalier Transmitter(TX) 1.Set Button for Channel Selection 2.On-off/Muting Button 3.Working Status Indicator Light 4.Mic / LINE Input Socket/ Reset Hole 5.Micro USB Charging Socket 6.Belt Clip Hole 7.1/4 Thread at the Back The function of reset hole:When function program of the product is disorganized and unable to make normal adjustment or even shutdown, you can use an appropriate...
- Page 8 Hand-held Transmitter(HTX) 1. Microphone 2. LCD Display 3. Power /CH Setting Button 4. ‘Low Cut/Normal’ Audio Switch 5. AA Battery Holder...
- Page 9 Receiver 1.Set Button for Channel Selection 2.Adjusting Screw 3.On/Off Button 4.Working Status Indicator Light 5.3.5mm Audio Output Socket/ Reset Hole 6.Micro USB Charging Socket 7.3.5mm Monitoring Socket 8.Smartphone Clamp 9.1/4 Thread at the bottom 10.1/4 Thread at the top 11.Volume Adjusting Button External light and other equipment can be used on 1/4 thread at the top;...
- Page 10 Ordinary Grip 1. 1/4 Screw Thread 2. 1/4 Thread at the Bottom...
- Page 11 Electronic Grip 1. 1/4 Screw Thread 2. Adjustable Screw 3. 1/4 Thread at the Bottom 4. Bluetooth Remote Controller 5. On-off/Function Button of the Remote Controller The bluetooth remote controller can be taken down for remote control; Bluetooth remote controller supports both IOS and Android system;...
- Page 12 Tripod on Table 1. 1/4 Screw Thread 2. Adjustable Screw 3. Stretchable Tripods 4. Direction Control Switch...
- Page 13 Screen Display Instruction Lavalier Transmitter(TX): Normal Recording Muting Power Indication Channel Audio Dynamic Display Bar Hand-held Transmitter: Normal Recording Power Indication Channel...
- Page 14 Receiver: Normal recording Power Indication Channel Audio Dynamic Display Bar...
- Page 15 Function Button Instruction Long Press Power On/Off On-off//Muting Button Muting Mode (Take effect when the screen is Short Press lighted up) Lavalier Channel Selection Transmitter Set Button Short Press (Take effect when the screen is lighted up) MIC/LINE Input / Audio Recording / Insert the Mic line for audio recording / Reset Hole...
- Page 16 On-off Button Long Press Power On/Off Channel Selection Short Press Set Button (Take effect when the screen is lighted up) Audio Output / Audio Output / Insert the Mic line for audio output / Receiver Reset Hole Reset Insert a small object like a pin for reset OUTPUT Reset Dial the wheel to...
- Page 17 Indicator Light Instruction Green Light Keeps On Normal Working Status Red Light Keeps On Muting Mode Lavalier Transmitter Red Light Flickers Low-power reminder Green Light Flickers Channel doesn’t match with the transmitter Receiver Green Light Keeps On Channels matches Red Light Flickers Low-power reminder Blue Light Flickers Grip doesn’t match with the smartphone...
-
Page 18: Installation And Usage
Installation and Usage Lavalier Transmitter(TX): 1.Connect the belt clip to the connection hole 2.Long press the power button to turn on the Lavalier Transmitter Power / Muting Button According to different environment you could short press ‘Power/Muting Button’ to enter the MUTE mode. - Page 19 3.Insert the 3.5mm audio input line into the “Mic”socket “Mic”socket 4.Target the Mic to the audio source and check whether the Lavalier Transmitter is working properly according to the audio display bar on the screen Audio Dynamic Display Bar...
- Page 20 5. Short press set button to select the channel Channel “set”button...
- Page 21 Hand-held Transmitter (HTX) : 1. Install two AA batteries into the battery tray according to the positive and negative electrode;...
- Page 22 2. Long Press the power button switch to turn on the hand-held transmitter;...
- Page 23 3. Short press the power button to make channel match the receiver; Green light When the receiver channel matches the hand-held transmitter, the green light keeps on...
- Page 24 Receiver: 1.Rotate the four clamps, then adjust the screw to appropriate height, install the phone in the neutral position; connect one end (black) of the audio output line to OUTPUT socket, the other end (gray TRRS) to mobile phone audio input socket; A 3.5mm headset can be inserted in real-time monitoring socket according to the need.
- Page 25 2.Long press the power button to turn on the receiver; Power Button 3.Short press set button to make channel consistent with the transmitter, and adjust the volume to the optimal status through the volume adjusting wheel; volume adjusting wheel Transmitter Channel Receiver Channel When the receiver channel matches the transmitter, the...
- Page 26 4.Can be extendable for connection with LED light or other auxiliary equipment; 5.Go for the normal audio recording;...
- Page 27 Electronic Grip: 1.Connect the 1/4 screw thread of the electronic grip to the 1/4 thread of the receiver, then fix the receiver through the adjusting screw; fix the receiver through the adjusting screw...
- Page 28 2.Long press the power button to turn on the grip; Power Button 3.Turn on the bluetooth of the phone, match with the bluetooth named 'Viewflex - H', then you can use your smartphone for recording. China Mobile In photo shooting mode, press the remote controller for photo taking;In video mode, press the remote controller to start video, and press again to finish.
- Page 29 Tripod on Table: 1. Connect the receiver with the tripod through the 1/4 screw thread, fix the receiver by adjusting the adjustable screw, press the direction control switch to adjust the direction; receiver fix the through the adjusting screw press the direction control switch to adjust the direction...
- Page 30 Specification Lavalier Transmitter (TX) : Signal / Noise >65dB Antenna 1/4 Wavelength Wire Antenna Stray Radiation <-60dBc Sound Delay <20ms Audio Distortion <0.5% 3.5mm socket Audio Input Socket Batteries Polymer Lithium Battery 3.7V 1150mAH Endurance 8 Hours Charging Socket Micro USB Dimension 85 x 59 x 16.3 mm Operating Temperature...
- Page 31 Hand-held Transmitter (HTX): >65dB Signal/Noise PCB Antenna Antenna Stray Radiation <-60dBc <20ms Sound Delay <0.5% Audio Distortion 2pcs AA Battery Battery Dimension Φ 53.5 (MAX) x 248mm Operating Temperature 0℃ ~ 50℃ Storage temperature -20℃ ~ 60℃...
- Page 32 Receiver: Signal / Noise >65dB 1/4Wavelength Wire Antenna Antenna Receiving Sensitivity -95dBm Sound Delay <20ms Audio Distortion <0.5% 20Hz ~ 18KHz Frequency Response Audio Input Socket 3.5mmSocket Batteries Polymer Lithium Battery 3.7V 1150mAH Endurance 8 Hours Micro USB Charging Socket Dimension 104 x 57.6 x 16.3mm Charging Socket...
- Page 33 Bluetooth Electronic Grip: Bluetooth Version Effective Distance Battery CR2032 x 1 Auto power-off time with no operation 10 minutes Dimension 35 x 25 x 8.4mm...
- Page 35 Email: support@comica-audio.com...
Need help?
Do you have a question about the CVM-WS50 and is the answer not in the manual?
Questions and answers