
Related Manuals for Comica CVM-WM100


Summary of Contents for Comica CVM-WM100
- Page 1 USER MANUAL...
-
Page 2: Main Features
Foreword Thanks for purchasing the COMICA WM100 UHF wireless microphone. WM100 utilizes UHF wireless technology and LCD lattice screen, it comes with totally 48 channels and 16-levels adjustable volume, built-in with ‘Adjustable RF Strength’, ‘Local Audio Testing’, ‘Real-time Audio Monitor’ functions,etc., which takes you more professional and convenient recording;... - Page 3 Notice The antenna will affect working distance, be sure to protect it and avoid any man-made damage; Working distance will be affected by surround environment, make sure the background is open with no interference, and turn off the device’s WIFI during usage;...
- Page 4 In Packing List Main Body Transmitter Receiver Accessories 3.5mm Audio Mic 3.5mm-3.5mm Audio Output Cable 3.5mm-XLR Audio Output Cable Waist Belt Clip x 2pcs Camera Mount x 2pcs Wind Muff Portable Case User Manual Warranty Card...
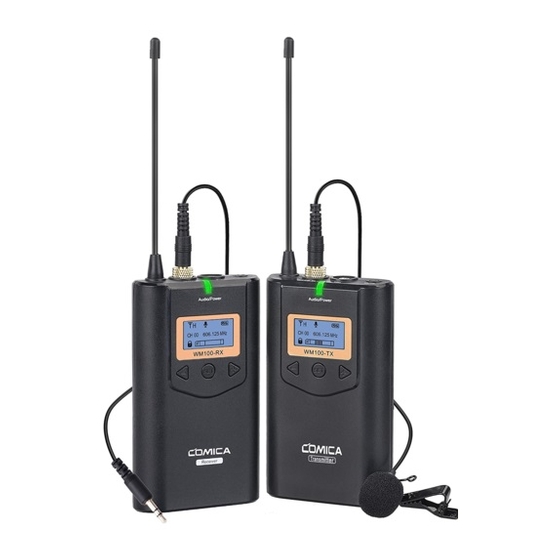
- Page 5 Components and Instruction Components Transmitter Antenna LINE IN Input MIC Input Power/Muting Button Working Indication Light Function Selection Button - Function Setting Button Function Selection Button + AA Battery Holder...
- Page 6 Receiver Antenna 3.5mm Audio Output 3.5mm Audio Monitor Output Power Button Working Indication Light Function Selection Button - Function Setting Button Function Selection Button + AA Battery Holder...
- Page 7 Screen Display Instruction Transmitter RF Transmitting Strength High Icon: RF Transmitting Strength Low Icon: Normal Audio Mode Icon: Muting Mode Icon: Power Indication 00 520. 000 Channel Channel Frequency Locking/Unlocking Icon Audio Status Indication Bar...
- Page 8 Receiver Power Indication RF Receiving Strength Volume Indication VOL 15 00 520. 000 Channel Channel Frequency Locking/Unlocking Icon Audio Status Indication Bar...
- Page 9 Function Button Instruction Power/Muting Button Long Press Power On/Off Short Press Muting(Unlocking Mode) Locking/Unlocking Long Press Function Setting (Unlocking Mode) Set Button Short Press Function Selection(Unlocking Mode) + Button Short Press Function Selection - Button Short Press Function Selection Indication Light Instruction Green Light Keeps On Work Normally Green Light Flicker...
-
Page 10: Installation And Usage
Installation and Usage Transmitter Step 1: Install Batteries into Battery Holder by following the ‘+’ and ‘-’ Icon, and clip the waist holder onto back of transmitter ; Step 2: Long-press the power button to open the transmitter; Step 3: According to your own requirement, to choose to connect the Mic cable onto ‘Line in’... - Page 11 Step 5: Refer to the Function Button Instruction to set the relative functions, for example: CH Adjustment, RF Strength Adjustment; A.Unlock: 520. 000 Lock Long press SET button 520. 000 Unlock...
- Page 12 B.CH Adjustment: Short press SET button Adjust CH channel Adjust the CH channel by - + button...
- Page 13 C.RF Strength Adjustment : Short press SET button Adjust RF Adjust the RF signal strength by - + button...
- Page 14 Receiver Step 1: Install the Receiver onto the device via cold-shoe, and connect one end of the audio cable into Output socket, connect another end of the audio cable into device’s audio input socket; And plug your earphone into the audio monitor’s socket for audio monitor if you need;...
- Page 15 Step 2: Set CH to match the channels, and adjust VOL to set the volume until you’re satisfied; A.Unlock: VOL 11 520. 000 Lock Long press SET button VOL 11 520. 000 Unlock...
- Page 16 B.Set CH to match the channels: Short press SET button VOL 11 Adjust CH channel Adjust CH by - + to match the Transmitter The Green Light will keep on after channel matched.
- Page 17 C.Set the volume until you’re satisfied: Short press SET button VOL 11 Adjust VOL Adjust volume by - + button Step 3: Go for the normal audio recording.
-
Page 18: Specification
Specification Transmitter TX Channels Wireless Frequency 520.000MHz~534.100MHz Signal / Noise >65dB Antenna 1/4 Wavelength Antenna Stray Radiation <-60dBc Sound Delay <20ms Audio Distortion <0.5% Audio Input Socket 3.5mm Socket Batteries AA Batteries x 2pcs Size 111.5 x 65 x 25.3mm Working Temperature 0℃... -
Page 19: Audio Output
Receiver RX Channels Wireless Frequency 520.000MHz~534.100MHz Signal / Noise >65dB Antenna 1/4 Wavelength Antenna Receiving Sensitivity 95dBm Sound Delay <20ms Audio Distortion <0.5% Frequency Range 20Hz ~ 18KHz Audio Output 3.5mm Port Batteries AA Batteries x 2pcs Size 111.5 x 65 x 25.3mm 0℃...
Need help?
Do you have a question about the CVM-WM100 and is the answer not in the manual?
Questions and answers