Table of Contents
Advertisement
Quick Links
Advertisement
Table of Contents

Related Manuals for Coemar ReLite Led Kit VariWhite 250


Summary of Contents for Coemar ReLite Led Kit VariWhite 250
- Page 1 ReLite Led Kit VariWhite * ReLite Led Kit 150 version...
- Page 2 Italiano ReLite Led Kit VariWhite Serial Number: ....................................... Purchase date: ...................................... Dealer: ...................................... Address: ...................................... Suburb: ...................................... Country: ...................................... Phone / Fax: ...................................... Please note in the space provided above the relative service information of the model and the retailer from whom you purchased your ReLite Led Kit: this information will assist us in providing spare parts, repairs or in answering any technical enquiries with the utmost speed and accuracy.
-
Page 3: Table Of Contents
Italiano Index 1. Packaging and transportation .......................Pag. 4 1.1 Packaging ............................Pag. 4 1.2 Transportation ...........................Pag. 4 2. General information .......................... Pag. 4 2.1 Safety informations ......................... Pag. 4 2.2 Warranty conditions ........................Pag. 5 2.3 EC norms ............................Pag. 5 3. -
Page 4: Packaging And Transportation
Italiano Congratulations on having purchased a Coemar product. You have assured yourself of a fixture of the highest quality, both in componentry and in the technology used. We renew our invitation to you to complete the service information on the previous page, to expedite any request for service information or spares (in case of problems encountered either during, or subsequent to, instal- lation). -
Page 5: Warranty Conditions
Italiano The level of technology of ReLite Led Kit requires the use of specialised per- sonnel for all service applications; refer all work to your authorised Coemar service centre. A good earth connection is essential for the proper functioning of the projec- tor. -
Page 6: Product Specifications
Italiano . Product specifications Technical characteristics Power supply 80-264 V, auto-sensing, 50/60 Hz Depending on the LED module and the size/model of the Maximum current fixture Power factor Cosϕ > 0.95 (all versions) Max power consumption Depending on the fixture Color temperature CCT proportional control from 2.700 to 6.500 K Color Rendering Index (CRI) -
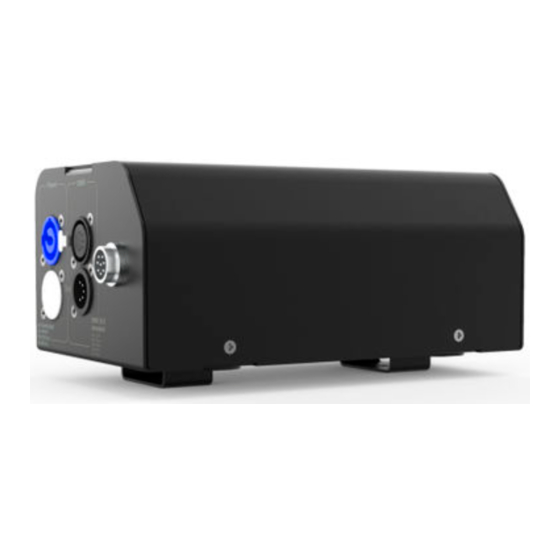
Page 7: Unit's Main Components
Italiano Unit’s main components * ReLite Led Kit 150 version Components description A Display panel DMX In DMX Out PowerCon In PowerCon Out Skintop... -
Page 8: Installation
Italiano Installation Mechanical installation With ReLite Led Kit will be possible to give new life to your projector, simply replacing the old lamp with the ReLite Led group. The ReLite Box can be fixed to your projector’s yoke through the fixing plates present on the box (A). Warning!! Always ensure that your support structure and fixing (bolts, clamps, etc…) are rated to support the weight of the fixture. -
Page 9: Powering Up
Note: in case of cable replacement, similar cable with comparable thermal resistant qualities must be used exclusively (cable 3 X 1,5 ø external 10 mm, rated 300/500V, tested to 2 KV, op- erating temperature -40°C + 180°C, Coemar cod. CV5311). Connection to mains power ReLite Led Kit is equipped with two power connectors, one as input and one as output. -
Page 10: Control Signal Connections
Italiano . Control signal connections Control signal connection by XLR5 plugs The digital control signal is transmitted to the projector via a two pole cable screened in ac- cording to the International standards for DMX 512 data transmission. The connection must be serial, using connectors XLR5 male and female located on the back of ReLite Led Kit labelled DMX512 IN e OUT. -
Page 11: Turning The Projector On
Italiano . Turning the projector on After having followed the preceding steps described, proceed with the power supply and turn on the projector connecting it to the mains power. The software version installed on the internal microprocessors will be shown on the display, suddenly it will show the current DMX address- ing. -
Page 12: Dmx Chart
Italiano . DMX chart 8.1. DMX Chart 6 channels type of channel function effect decimal percentage control master adjust luminous output proportional 0 - 255 - 100% dimmer intensity from 0 to 100% dimmer fine proportional fine dimmer control 16 bit 0 - 255 - 100% 3200 K... - Page 13 Italiano step no effect from the previous step to temperature proportional - 126 - 49% selected fine whte tone step no effect 127 - 128 50% - 50% proportional from temperature selected the following step 129 - 254 51% - 99% step no effect 100%...
-
Page 14: Dmx Chart 2, 1 Channels
Italiano 8.2. DMX Chart 2, 1 channels channel type of function effect decimal percentage control master adjust luminous output intensity proportional 0 - 255 - 100% dimmer from 0 to 100% 3200 K 0 - 10 2700 K 11 - 16 2800 K 17 - 22 2900 K... -
Page 15: Display Panel Functions
Changing the preset settings made by Coemar can vary the functions of the projector so that it will respond differently to the controller; therefore carefully read about the functions described here before carrying out any possible selection. -
Page 16: Quick Cct Menu
Italiano Quick CCT menu CCT: 2800 By pressing enter button, it will be pos- sible to chose among three different CCT [2.800 K] (2.800 K, 4.200 K and 5.600 K). Once the CCT will be chosen you can select the percentage of the light output. -
Page 17: Main Functions Menu
Italiano Main functions menu Dimmer: dIMM It allows the selection of different dim- mer curves: exponential (default), loga- [Dimmer] rithmic, linear and halogen; Test: Allows to manually set the DMX channels controlled by a DMX console: • Dimmer: sets the luminous intensity; •... - Page 18 Italiano DMX channels: Allows to choose the number of channels 6 CH with which operate in DMX mode. [DMX] Display functions: Changes the display settings: 2 CH • Reverse: rotates the display of 180°; • Hold Sets or disables the automatic display lock function that occurs after 10 seconds of inactivity;...
-
Page 19: Measures Menu (Meas)
Italiano Measures menu (MEAS) Temperature: tEMP Shows the current temperature values: t.LEd • LED: shows the LED module temper- [Temperature] ature; • Board: shows the electronic board temperature. t.brd Volt: Shows the power supply voltage. uOLT DMX Input: Shows the value of the DMX channels received by the fixture on every channel [Supply Voltage] that the fixture occupies on the line. - Page 20 Italiano Alarm: ALrM This menu shows the alarm statuses if there is any. [Alarms] LED: Shows the percentage value of the LED status. Frequency: Shows the operating frequency of the LED (611 Hz as default). [LED Status] Fan speed: Shows the voltage in which the fan is op- erating.
-
Page 21: Electronic Alignment Of The Leds
The display panel of ReLite Led Kit allows the electronic alignment of the LEDs, this procedure is performed by Coemar at the time of testing, this procedure may be useful for special effects or in case of replacement of internal components (PCBs, LEDs, etc...). -
Page 22: Special Functions Of The Fixture
If a malfunction occurs, ReLite Led Kit has a self-diagnostic system that will show the error message on the display. The following table will explain in detail the most common errors. If, despite of suggested intervention, the problem persists, call the Coemar Service Center. Error code... -
Page 23: Spare Parts
Italiano Spare parts All ReLite Led Kit ’s spare parts are available from your Coemar service centers. Specifying in de- tail the projector model and the replacement part requested, will help the service center to serve you in the best way. - Page 24 Italiano User notes ............................................................................................................................................................................................................................
- Page 25 Italiano User notes ............................................................................................................................................................................................................................
- Page 26 Information on disposal of the equipment The equipment at the end of its useful life must be disposed of at an appropriate recycling center for waste electrical and electronic equipment. The treatment and disposal of environmentally friendly, helps prevent potential negative environmental and health and promote the reuse and / or recycling of materials making up the equipment.
- Page 27 Coemar Lighting s.r.l. Via Carpenedolo 90 46043 Castiglione delle Stiviere, Mantova, Italia tel. +39 0376/1514412 - fax +39 0376/1514380 info@coemar.com Coemar reserves the right to change specifications without prior notice...
Need help?
Do you have a question about the ReLite Led Kit VariWhite 250 and is the answer not in the manual?
Questions and answers