Table of Contents
Advertisement
Quick Links
Advertisement
Table of Contents

Related Manuals for Black BLK-CWS108NH


Summary of Contents for Black BLK-CWS108NH
- Page 2 The lightning flash with an arrowhead symbol, within an equilateral triangle is intended to alert the user to the presence of uninsulated dangerous voltage within the product's enclosure that may be of sufficient magnitude to constitute a risk of electric shock to persons. The exclamation point within an equilateral triangle is intended to alert the user to the presence of important operating and maintenance (servicing) instructions in the literature accompanying the appliance.
-
Page 3: Table Of Contents
■ Contents Menu Flow Features ■ Setup Page Menu Precautions ㆍ PRESETS ㆍ LENS Components and Accessories ㆍ WDR ㆍ WHITE BALANCE Overview ㆍ AGC (Auto Gain Control) ■ Front View ㆍ DNR (Digital Noise Reduction) ■ Side View ㆍ SENS-UP ■... -
Page 4: Features
■ Features Warning ■ The camera requires periodic inspection. High Resolution color for crisp, VIDEO/DC Drive Lens clear video Contact an authorised technician to carry out the inspection. The video drive lens and the DC drive lens ㆍProgressive image capture can be selected by the touch of a switch. -
Page 5: Precautions
■ Precautions Do not install the camera in Do not install or use the camera in an Do not drop the camera and protect Never keep the camera pointed extreme temperature conditions. environment where the humidity is high. it from physical shocks. directly at strong light. -
Page 6: Components And Accessories
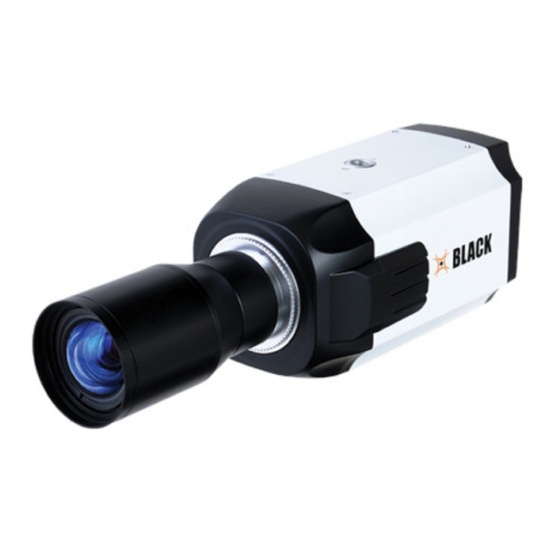
■ Components and Accessories Overview ■ Front View ① 1. Ultra High Resolution WDR Color CCD Camera 2. Auto Iris Lens Connector Plug ③ ② 3. C-Mount Adapter ① Tripod Mounting Bracket Screw Hole Used to fix the Tripod Mounting Bracket to the top of the camera. ②... -
Page 7: Side View
■ Overview Side View Bottom View ⑤ ④ ④ Auto Iris Lens Connector Used to connect Auto Iris Lens plug. ⑤ Tripod Mounting Bracket Screw Hole Used to fix the camera on a bracket or tripod. The screw sizes for this hole are as follows: 1/4"-20 UNC (20 THREAD) L:4.5mm±0.2mm (ISO standard), or 0.197"... -
Page 8: Rear View
■ Overview Installation Procedures ■ Rear View ⑧ ⑩ Power IN Port Connect the power as specified for each model here. REMOTE Lens ⑨ ⑥ The lens is not supplied with this camera. Purchase a lens suitable for POWER your environment. This camera accepts the auto iris lens and both VIDEO OUT C-and CS-mount lens. -
Page 9: ㆍWhen Using C/Cs Mount Lens
Pin 2: NC Pin 2: Damping + Focus Control Lever of camera side after combining CS-Mount lens. Pin 3: White (Video Signal) Pin 3: Drive + Pin 4: Black (Ground) Pin 4: Drive - Lens cable No. 3 Pin connector No. -
Page 10: Connecting A Monitor
■ Installation Procedures • When Using a C Mount Lens Connecting a Monitor 1. Remove the protective glass cover at the front of this product and turn the Connect the Video OUT port on the rear panel of the camera to a monitor. CMount Adapter clockwise to install it. -
Page 11: Connecting Power
■ Installation Procedures Menu Flow ■ Connecting Power Setup Page Menu Since power specifications differ depending on the model, make sure to check your model name and specifications before connecting power. You can connect power as shown in the following figure. SETUP PRESETS CUSTOM... - Page 12 ■ Menu Flow Menu Flow ■ Special Page Menu Advanced Page Menu ADVANCED SETUP SPECIAL VIDEO STANDARD CAMERA ID NTSC ON.. ID, Position SYNC DAY&NIGHT AUTO.. COLOR SHARPNESS -8 --------------------- 8 MIRROR APERTURE -8 --------------------- 8 VERSION (D15-1.0) BACKLIGHT RETURN ON..
-
Page 13: ㆍLens
■ Setup Page Menu Setup Page Menu ■ LENS WHITE BALANCE White Balance is a function which compensates different colors of light being ㆍLens emitted from different light sources. SETUP Choose the lens type DC, Video Users can select the above levels as they desire according to the environment. PRESETS CUSTOM and Manual lens by using the... - Page 14 ■ Setup Page Menu Setup Page Menu ■ SENS-UP Sens-up helps maintain a bright, clear screen image by automatically detecting SETUP changes in the level of light in low light level conditions. PRESETS CUSTOM LENS AUTO SETUP WHITE BAL. ㆍAs the level of gain increases, the PRESETS CUSTOM MIDDLE...
-
Page 15: Special Page Menu
■ Special Page Menu Special Page Menu ■ CAMERA ID DAY & NIGHT User can enter a unique name for the respective camera. This camera has a function that automatically selects the mode that is appropriate for daytime or night-time conditions. The COLOR mode operates in daytime conditions The maximum length of the ID is ten characters. - Page 16 ■ Special Page Menu Advanced Page Menu ■ BACKLIGHT VIDEO STANDARD Backlight is feature of a Camera which compensates when there is a large Choose video system between PAL and NTSC by moving the selector. amount of background light. ADVANCED MENU ㆍWhen Backlight is ON, Back Light SPECIAL gets activated.
-
Page 17: Specification
■ Advanced Page Menu Specifications ■ SHARPNESS ITEM Specifications The outline of the video image becomes cleaner and more distinctive as the level of SHARPNESS increases. If the level gose up excessively, however, it may Image Sensor PIXIM 1/3'' High Resolution ORCA C-MOS affect the video image and generate noise. - Page 18 ■ MEMO...
Need help?
Do you have a question about the BLK-CWS108NH and is the answer not in the manual?
Questions and answers