
Related Manuals for Swiss Madison Annecy Bathroom Vanity


Summary of Contents for Swiss Madison Annecy Bathroom Vanity
- Page 1 INSTALLATION wiss adison ® INSTRUCTIONS Annecy Bathroom Vanity Share your pictures for a feature! using #SwissMadison www.swissmadison.com | 19 Stults Rd, Dayton, NJ 08810 | 1-434-623-4766 | info@swissmadison.com...
- Page 2 Prior to Installation: Inspect vanity to ensure no damages have occurred while in shipping. Observe all plumbing and building codes in accordance with your state and local requirements. Additional oor and wall preparations may be necessary to avoid damage to the product. All dimensions are nominal! Be sure to measure your vanity prior to installation.
- Page 3 Thank you for your purchase Thank you for purchasing a Swiss Madison Vanity. We appreciate your business and know you will enjoy your sink for many years to come. If you have any questions or require assistance we would be happy to help, please contact us at 1-434-6234766 or info@swissmadison.com.
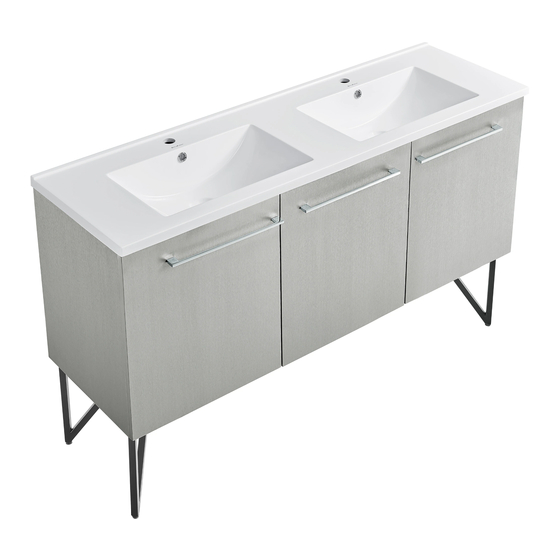
- Page 4 BATHROOM VANITY MODELS 24.2” 36” SM-BV212, SM-BV222, SM-BV232 SM-BV213, SM-BV223, SM-BV233 24.2” x 19.8” x 34.6” 36” x 19.8” x 34.6” 47.6” 36” SM-BV214, SM-BV224, SM-BV234 SM-BV216, SM-BV226, SM-BV236 47.6” x 19.8” x 34.6” 59” x 19.8” x 34.6” NOTE: All dimensions are nominal. —...
-
Page 5: Parts List
Drain (not included)* Swiss Madison Sink Vanity Components Mounting Hardware SM-PD23B SM-PD23Z NOTE: Specialized tools may be necessary to install Swiss Madison Vanity. *Matching drains are not included, please contact us if you wish to purchase one. — 4 —... -
Page 6: Installation Instructions
BATHROOM VANITY INSTALLATION INSTRUCTIONS The step-by-step guidelines in the installation instructions are a general reference for installing a Swiss Madison Vanity. Should there be any discrepancies, Swiss Madison cannot be held liable. It is recommended to install all Swiss Madison products by hiring a licensed professional Read the complete instruction manual before beginning installation. - Page 7 Freestanding Vanity Installation 0.39" Leave a 0.39” gap to the edge of the vanity. 4 PCS STUDS — 6 —...
- Page 8 Wall Hung Vanity Installation Select hardware that is best suited for your wall type. Important: Use “pan head” or “round head” screws with seat washers. Seat screws tightly against back rail or panel without driving into back rail or panel material. STUDS STUDS: Secure to wall with #10”...
- Page 9 Vanity Top Installation Install the faucet per manufacturer’s installation instructions. Hand tighten the pop-up drain with a wrench. Be careful not to over-tightening the pop-up drain. Over tightening may cause cracks on the marble top. Set the vanity top on top of the vanity base, checking the location of the p-trap and drain. Remove vanity top from vanity base.
- Page 10 The Swiss Madison® warranty is a comprehensive and explicit limit of liability, and all items outside of it are not addressable by or the responsibility of Swiss Madison®. Certain states have variances regarding implied warranties and in those situations we remain fully compliant.
Need help?
Do you have a question about the Annecy Bathroom Vanity and is the answer not in the manual?
Questions and answers