
Related Manuals for Kanguru KCLONE-4NVME


Summary of Contents for Kanguru KCLONE-4NVME
- Page 1 KanguruClone 4 M.2 NVMe SSD Duplicator User Manual Model no.: Copyright 2019, All Rights Reserved. KCLONE-4NVME...
- Page 2 Business Machines Corporation. All other brand or product names are trademarks of their respective companies or organizations. Kanguru Solutions will not be held responsible for any illegal use of this product nor any losses incurred while using this product. The user himself is responsible for the copyright laws, and is fully responsible for any illegal actions taken.
-
Page 3: Table Of Contents
Table of Contents TABLE OF CONTENTS 1. INTRODUCTION ................. 5 1.1 Package Contents ................5 1.2 Specifications ................5 2. GENERAL OPERATION ..............6 2.1 Hardware Setup ................6 2.2 Parts and Appearance ..............7 2.2.1 Front View ................. 7 2.2.2 Side View ................ - Page 4 Table of Contents 7. NETWORK ACCESS (WINDOWS ONLY) ........19 7.1 Configuring the Maxi Management Software ....... 19 7.2 Maxi Functions ................21 7.2.1 Copy .................. 21 7.2.2 Compare ................21 7.2.3 Verify ................. 21 7.2.4 Erase .................. 21 7.2.5 Stop ................... 21 7.2.6 Refresh Files ..............
-
Page 5: Introduction
√ Network manageable 1.1 Package Contents If any of the following items are missing, please call Kanguru Solutions’ Tech Support department at: (508) 376-4245, extension 2 and replacement parts will be shipped to you ASAP. • KanguruClone 4 M.2 NVMe Duplicator • External Power Adapter and Power Cable... -
Page 6: General Operation
General Operation 2. GENERAL OPERATION 2.1 Hardware Setup 1. Place the KanguruClone where there is proper ventilation. Avoid using the KanguruClone in environments with high temperatures. 2. Make sure that sufficient power is supplied to the KanguruClone. Incorrect power will cause faulty operation. -
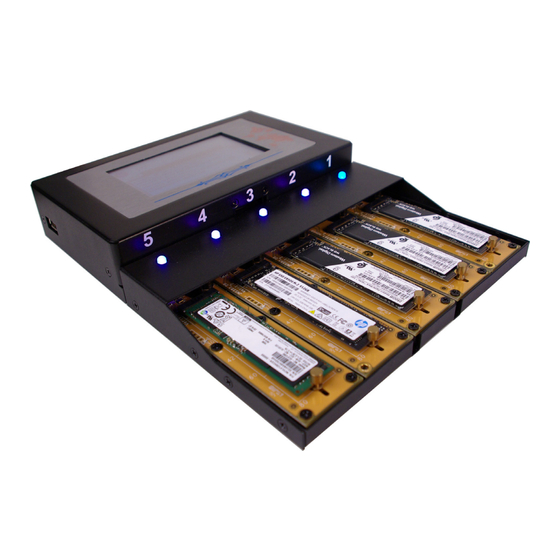
Page 7: Parts And Appearance
General Operation 2.2 Parts and Appearance 2.2.1 Front View LED Indicator Touchscreen Port Number (NVMe#) Drive Locking Pins 2.2.2 Side View USB 2.0 Port 2.2.3 Rear View Reset Button Power Switch RJ45 Port DC Input... -
Page 8: Calibrating The Touchscreen
-calibration. To calibrate the touchscreen: 1. Power on the duplicator. 2. Wait for the boot screen that displays the Kanguru Logo and the device firmware and Mac address. When this screen appears, tap the center of the touchscreen. -
Page 9: Connecting Nvme Drives
General Operation 2.4 Connecting NVMe Drives The KanguruClone 4 NVMe supports NVMe SSDs that have an M.2 M-keyed connector. The duplicator only supports drives that run on the PCIe protocol, so M.2 SATA drives are not supported. To connect an NVMe solid state drive to the KangurClone 4 NVMe: 1. - Page 10 General Operation 4. Press down on the top of the drive so that it lies parallel with the duplicator. There should be a few mm space between the drive and the duplicator. 5. Slide the Drive Locking Pin foward until it fits into the notch located at the rear of the NVMe drive.
-
Page 11: The Main Menu
The Main Menu 3. THE MAIN MENU All operations are performed through the touch-screen display. All the main functions and configurations can be accessed through the Main Menu. - Copy the data from the drive connected to the Source Position to all other drives. - Resize Copy is used specifically when copying drives that are of different capacities. -
Page 12: Copy And Compare Modes
Copy and Compare 4. COPY AND COMPARE MODES The KanguruClone can copy data from a Master drive to Target drives in one of five modes: FULL, BRIEF, RATIO, RESIZE, and IMAGE. After a copy has been performed, you can manually run a Compare operation to check the data on the Master drive against the data on the Target drives, to ensure that the all data was copied successfully. -
Page 13: Resize
Copy and Compare 4.4 Resize Resize copy is used to copy between Master and Target drives of different capacities. When duplicating in Resize mode, Target drives should all be the same capacity. Resize copy supports the following file systems: FAT, FAT32, NTFS. If the Source is not formatted as a supported file system then the duplicator will automatically switch to Disk mode. -
Page 14: Image
Copy and Compare 4.5 Image Image mode allows you to access image files saved on a Storage Center drive. A Storage Center drive is an NVMe drive that has been formatted to store image files of Master drives, providing a convenient way to archive and load commonly used Master drives as images files. 4.5.1 Create a Storage Center Drive To turn a normal NVMe drive into a Storage Center drive, you only need to format it as NTFS. -
Page 15: Other Operations
Other Operations 5. OTHER OPERATIONS Besides the Copy and Compare modes, the KanguruClone Hard Drive Duplicator has several additional operations that are incredibly useful, including ERASE and VERIFY. The following chapter will cover these operations. 5.1 Erase To erase drives connected to the duplicator: 1. -
Page 16: Settings
Settings 6. SETTINGS The Settings menu can be accessed by tapping the Settings icon located at the bottom right of the Main menu. 6.1 Reset to Default You can revert all settings to the factory defaults by tapping on the Reset to Default button located at the bottom of the Settins menu. -
Page 17: Erase Settings
Settings 6.4 Erase Settings • Methods - Configure a CUSTOM erase methodology. Multiple methods can be selected. ○ Write 0: Overwrite all addressable locations with binary zeroes. Enabled by default. ○ Write 1: Overwrite all addressable locations with binary ones. Disabled by default. ○... -
Page 18: Advanced Settings
Settings 6.6 Advanced Settings • System Time - Set the current date and time and then tap the Save button. • Logs ○ Save - Enable to allow system logs to be saved in the duplicator’s flash memory. ○ Dupm to USB0 - Tap to save the system logs to a USB flash drive connected to the duplicator’s USB port. -
Page 19: Network Access (Windows Only)
Network Access 7. NETWORK ACCESS (WINDOWS ONLY) The Maxi Management software allows you to connect and manage a duplicator with a PC. Maxi Management software (henceforth referred to as Maxi) is only compatible with Windows PCs. To make the duplicator visible to a network, connect the duplicator to a network router via the RJ45 port on the back of the unit and then make sure “Enable Server Control”... - Page 20 Network Access 3. Click on Connect to connect Maxi with the KanguruClone duplicator. Maxi will detect and attempt to connect to any duplicators on the same LAN. When Maxi establishs a connection with a duplicator, the duplicator’s screen will change to a blue colored theme and the machine will appear in Maxi under the Machine Summary tab.
-
Page 21: Maxi Functions
Network Access 7.2 Maxi Functions 7.2.1 Copy Click on Copy to start a copy on a connected KanguruClone. 7.2.2 Compare Click on Compare to start a compare on a connected KanguruClone. 7.2.3 Verify Click on Verify to start a verify on a connected KanguruClone. 7.2.4 Erase Click on Erase to start an erase on a connected KanguruClone. -
Page 22: Brief Load
Network Access 7.2.7 Brief Load Brief Load is used to build a data image of a Master drive conencted to the duplicator’s Source port, and save it locally on the PC running Maxi. 1. On the KanguruClone, assign the Source position, and connect the Master drive to the Source port. -
Page 23: Restore Image To Client Source Devices
Network Access 7.2.9 Restore Image to Client Source Devices Restore or load an image file saved on the host PC to a Master drive connected to the KanguruClone’s Source port. 1. On the KanguruClone, assign the Source position and connect a Master drive to the Source port. 2. -
Page 24: Faq
8. FAQ Q: Do all Target drives have to be the same capacity? A: If you select Full copy or Brief copy, the Target drives must have at least the same capacity as the Master hard drive. Q: Can I clone a smaller capacity Master drive to larger capacity Target drives? A: Yes, use the “RESIZE COPY“... -
Page 25: Warranty Information
Please refer to the RMA Procedure section of this manual if your duplicator needs servicing. Kanguru Solutions does not offer money back returns on its duplicator product lines due to the unique nature of the product. All units will be fully supported under manufacturer’s and/or... -
Page 26: Technical Support
“tracking” feature to verify “proof of delivery.” The customer is responsible for shipping charges when returning a product. Shipping back to the customer is covered by Kanguru Solutions during the first 90 days of purchase. After 90 days of purchase the customer is responsible for shipping both ways. - Page 27 Kanguru Solutions 1360 Main Street Millis, MA 02054 www.kanguru.com 10.28.19 v1.0 © 2019 Kanguru Solutions Legal terms and conditions available at www.kanguru.com. Please review and agree before use. Thank you.
Need help?
Do you have a question about the KCLONE-4NVME and is the answer not in the manual?
Questions and answers