
Related Manuals for Kanguru kclone-5hd-twr


Summary of Contents for Kanguru kclone-5hd-twr
- Page 1 Kanguru Clone Tower Duplicator User Manual Model no: KCLONE-5HD-TWR KCLONE-11HD-TWR Copyright 2015, All Rights Reserved...
- Page 2 Kanguru Solutions will not be held responsible for any illegal use of this product nor any losses incurred while using this product. The user himself is responsible for the copyright laws, and is fully responsible for any illegal actions taken.
-
Page 3: Table Of Contents
Table of Contents Table of Contents 1. INTroDUCTIoN .............. 5 1.1 Package Contents ............6 1.2 Specifications ............. 6 1.3 Parts and Functions............. 7 1.4 Inserting Hard Drives ..........8 1.5 The User Interface ............9 1.6 Before First Use ............10 2. - Page 4 Table of Contents 4.9 Button Sound .............. 22 4.10 Show EXE Time ............22 4.11 CMD Time Out ............23 4.12 Tran Size ..............23 4.13 Device Info ............... 23 4.14 System Info ............... 24 4.15 Total Copy Count ............. 24 4.16 Set to Default ............
-
Page 5: Introduction
The Kanguru Clone copies the content of a Master hard drive to up to 5 or 11 target drives simultaneously (depending on model). With fast copy speeds up to 6GB/min, the Kanguru Clone is the economical choice for your duplication project. -
Page 6: Package Contents
Package Contents / Specifications 1.1 Package Contents If any of the following items are missing, please call Kanguru Solutions’ Tech Support department at: (508) 376-4245, extension 2 and replacement parts will be shipped to you ASAP. • Kanguru Clone Tower Hard Drive Duplicator unit with internal power supply • Power cable... -
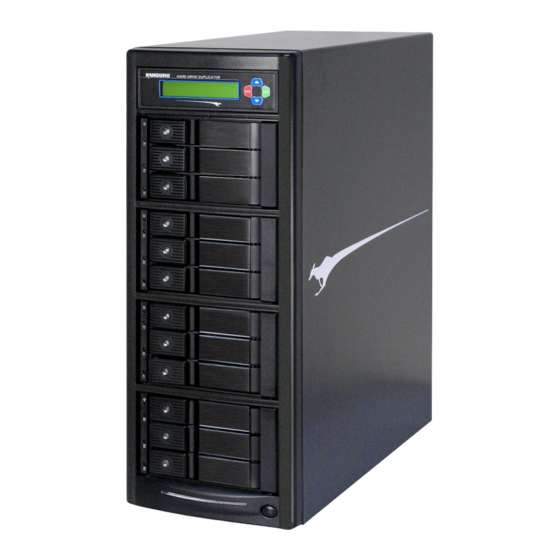
Page 7: Parts And Functions
Parts and Functions 1.3 Parts and Functions Front View LCD Display Input Buttons Source Drive Bay Target Drive Bays Power button rear View Exhaust fans Voltage Adjustment Switch Power Cable Connection... -
Page 8: Inserting Hard Drives
SATA hard drives quick and easy. Each bay can be opened by lifting the latch switch on the door. • 3.5” SATA drives can be inserted directly into any of the Kanguru Clone bays with the SATA connectors facing down and into the duplicator. -
Page 9: The User Interface
The User Interface 1.5 The User Interface Kanguru Solutions designed the Kanguru Clone’s menu system with the professional in mind. The menu system is fast, responsive, and easy to navigate. This means fewer key presses are needed to achieve a desired action. -
Page 10: Before First Use
It is highly recommended that you connect your Kanguru Clone using a UPS (uninterruptible power supply). 3. You are now ready to begin using your Kanguru Clone. To begin, turn on the unit by pushing the power button. -
Page 11: General Operation
General Operation / The Menus 2. GENEraL oPEraTIoN The information in the following sections will describe each of the Kanguru Clone’s functions in detail. Please read this material carefully before attempting to operate your Kanguru Clone. 2.1 The Menus There are two tiers to the Kanguru Clone’s user interface: Main menu and Setup menu 2.1.1 The Main Menu... -
Page 12: Menu Diagram
Menu Diagram 2.1.3 Menu Diagram MAIN COPY MENU SETUP MENU BRIEF SET COPY RESIZE SET COMPARE DISK BRIEF IMMEDIATE VERIFY HDD WIPE ERASE SKIP READ ERROR SETUP NO CAP CHECK HPA CHECK DCO CHECK BTN. SOUND SHOW EXE TIME CMD TIMEOUT TRAN SIZE SET WRITE PAT DEVICE INFO... -
Page 13: Duplication Modes
Duplication Modes 2.2 Duplication Modes The Kanguru Clone can duplicate hard drives in any one of three modes: BRIEF mode, RESIZE mode and DISK mode. Note: After duplication has been completed you can configure the duplicator to automatically compare the data on the Master drive with the data on the Target drives to ensure that the all information was copied. -
Page 14: Defining Copy And/Or Compare Functionality
Defining Copy and/or Compare Functionality 2.3 Defining Copy and/or Compare Functionality Before performing a duplication, take a moment to define the SET COPY and SET COMPARE options under the Setup menu. These options will tell the duplicator how the BRIEF, RESIZE and DISK modes will operate. -
Page 15: Set Compare Functionality
Defining Copy and/or Compare Functionality 2.3.2 Set Compare Functionality When enabled BRIEF, RESIZE and DISK modes will execute a Compare process, comparing the data between the Source and Target drives and confirming that they are identical. The SET COMPARE option is disabled by default. To change the SET COMPARE option: 1. -
Page 16: Duplication
WarNING! Do not remove any drives while duplication is in process. If you want to stop the duplication process, press the ESC button to cancel at any time. 4. Once the copy process has completed the Kanguru Clone will list each Target drive location with either a “V” or “X”. -
Page 17: Other Operations
Data verification rate Remaining data Percentage verified 3. Once the verification process has completed, the Kanguru Clone will list each Target drive location with either a “V” or “X”. ○ V - Appears next to any drive verified successfully. ○ X - Appears if a drive fails verification for any reason. When a drive fails verification, an error code can be generated. -
Page 18: Erase / Wipe
You can also configure the Kanguru Clone to run a Disk Wipe instead of an Erase operation. Although the Erase operation will remove the data from a drive, data may still be retrievable afterwards with the proper tools. -
Page 19: The Setup Menu
The Setup Menu / Set Copy / Set Compare 4. ThE SETUP MENU To enter the Setup menu, from the Main menu press the UP or DoWN button to navigate to SETUP and then press the ENT button. Once you have entered the Setup menu: • Press the UP or DoWN button to navigate the Setup menu options. -
Page 20: Hdd Wipe
HDD Wipe 4.4 hDD Wipe The HDD WIPE option allows you to enable or disable HDD Wipe operation. When enabled, the ERASE operation in the Main menu will change to WIPE (see section 3.2 Erase / Wipe on page 18). The HDD Wipe operation ensures that data on the hard drive is completely erased and unrecoverable. -
Page 21: Skip Read Error
Skip Read Error / No Capacity Check / HPA Check 4.5 Skip read Error The SKIP READ ERROR option allows you to enable or disable error skipping during BRIEF, RESIZE and DISK copy operations. Press the ENT button to change this option. • [ ] –... -
Page 22: Dco Check
DCO Check / Button Sound / Show EXE Time 4.8 DCo Check The Device Configuration Overlay (DCO) is a partition on the hard drive that is not normally visible to an operating system. If the Master drive contains a DCO partition, then the DCO may not be accessible to the duplicator unless this option is enabled. -
Page 23: Cmd Time Out
CMD Time Out / Tran Size / Device Info 4.11 CMD Time out CMD Time Out allows you to set the number of commands the duplicator will send to a non-responsive drive. If the duplicator experiences any issues when attempting to communicate with an attached drive, the duplicator can send 1 to 9 unreturned ATA commands to the drive before it errors out. -
Page 24: System Info
To view the system information: 1. From the SETUP menu, press the UP or DoWN button to navigate to the SYSTEM INFO function. 2. Press the ENT button to begin viewing information for your duplicator: KANGURU DUPLICATOR VER: 4.03 BLD:0407 3. -
Page 25: Update Firmware
Update Firmware 4.17 Update Firmware The UPDATE FIRMWARE function allows you to upgrade your Kanguru Clone system to the latest firmware version. Warning! Do not attempt to update your duplicator’s firmware unless specifically instructed to do so by a Kanguru Technician. -
Page 26: Burn In
Burn In 4.18 burn In The BURN IN function allows the system to perform a Copy, Compare, Verify or Erase function continuously to stress test for endurance, reliability and stability. To perform a continuous Burn In test: 1. From the Setup menu, press the UP or DoWN button to navigate to the BURN IN option. [SETUP >[ ] BURN IN... -
Page 27: Error Code List
When a drive fails duplication, an error code can be generated. For a list of common error codes and their meanings, please see chapter 5. Error Code List on page 27. • KCLONE-5HD-TWR press the UP button to view error codes • KCLONE-11HD-TWR press and hold the ENT button to view error codes The Error Code List can give you some information to help you understand any problems that occur during duplication. -
Page 28: Faq
Q: Can the duplicator defragment a partition? a: No, this must be done directly by the operating system of your PC. Q: Can the Duplicator copy Encrypted HDD’s? a: The Kanguru Clone is able to copy a limited number of encrypted HDD types through Disk copy. -
Page 29: Troubleshooting
The Kanguru Clone Make sure that the voltage of the outlet Kanguru Clone is plugged into will not start or there is matches the voltage of the Kanguru does not match the Kanguru no display on the LCD Clone. Clone. -
Page 30: Warranty Information
“tracking” feature to verify “proof of delivery.” The customer is responsible for shipping charges when returning a product. Shipping back to the customer is covered by Kanguru Solutions during the first 90 days of purchase. After 90 days of purchase the customer is responsible for shipping both ways. - Page 31 Kanguru Solutions 1360 Main Street Millis, MA 02054 www.kanguru.com 01.22.15 v2.0 © 2015 Kanguru Solutions Legal terms and conditions available at www.kanguru.com. Please review and agree before use. Thank you.
Need help?
Do you have a question about the kclone-5hd-twr and is the answer not in the manual?
Questions and answers