Table of Contents
Advertisement
Advertisement
Table of Contents

Related Manuals for WERTHEIM 7 Series


Summary of Contents for WERTHEIM 7 Series
- Page 1 7 Series...
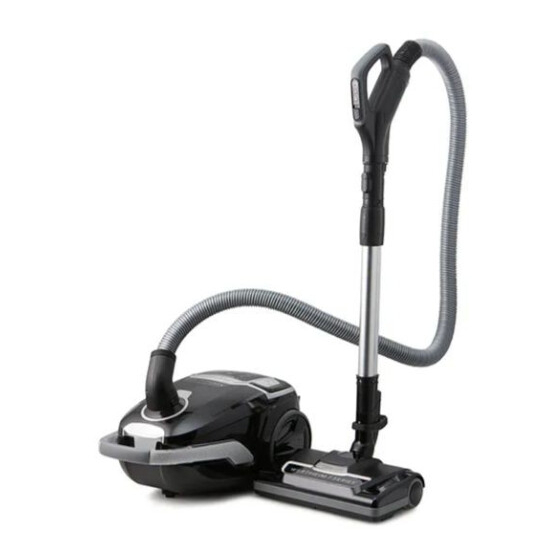
- Page 2 Features Control Handle Handle On/Off Button Handle Suction Control Buttons Handle On/Off Button (Powerhead) Dust Bag Cover Latch Air Inlet Accessory Cover Release Button Dust Bag Indicator 10. Standby On/Off Button 11. Exhaust Filter Release Button 12. Digital Power Control Display 13.
-
Page 3: Specifications
INTRODUCTION Congratulations on the purchase of your new Wertheim 7 Series Vacuum Cleaner. There are many useful features built into your vacuum cleaner. We recommend that you carefully read this instruction manual for the best results. Specifications Max power cleaner: 1300W (1500W with Powerhead) Dust bag capacity: 2.5L... -
Page 4: Before You Begin
BEFORE YOU BEGIN This cleaner must be operated in accordance with these instructions and used only for domestic household cleaning to remove DRY dirt and dust from household carpets, flooring, walls and fabrics. This cleaner is not fit to be used as an industrial cleaner and will void the manufacturer’s warranty if used inappropriately. -
Page 5: Safety Instructions
SAFETY INSTRUCTIONS IMPORTANT! Always switch off the cleaner and remove the power plug from the electricity power supply before cleaning your appliance, when not in use or attempting any maintenance task. The cleaner must only be connected to an AC power supply at the voltage shown on the rating label. This cleaner should only be used for its intended purpose as described in this instruction manual. - Page 6 Do not handle or operate the appliance If connection cables, electrical hoses, with wet hands. Follow electrical safety electrical contacts and electric tubes are precautions at all times. damaged, have them replaced immediately. To prevent electrical shock, do not immerse Never attempt to make any modifications to the appliance, power cord or power plug into the vacuum cleaner.
-
Page 7: Assembling The Vacuum Cleaner
ASSEMBLING THE VACUUM CLEANER IMPORTANT! Always remove the power plug from the power supply before fitting or removing accessories! 1. Flexible Hose Fitting: Insert the flexible hose into the air inlet of the vacuum. Press until it clicks into position. Removing: Press the two buttons and gentle pull to release the flexible hose. - Page 8 ACCESSORIES Powerhead Whirlwind Power Pulse technology deeply cleans carpets by effectively lifting and removing deeply embedded dust and dirt. Note: Not recommended for use on hard floors. Tip: The Powerhead Belt Window can be used to check the health of powerhead belt or whether the agitator bar is rotating.
- Page 9 3-in-1 Cleaning Tool Combines a crevice tool, upholstery tool & dusting brush all in the one tool for convenient cleaning. To use the 3-in-1 Cleaning Tool as an upholstery tool or as a dusting brush simply remove the crevice tool and insert the crevice tool into the opposite end of the tool you would like to use.
- Page 10 DIGITAL POWER CONTROL The suction power can be regulated by using the Digital Power Control to achieve optimal cleaning results. To change the suction power to suit a particular cleaning task, press the Power Increase Button to increase the suction power, and to reduce the suction power, press the Power Decrease Button.
-
Page 11: Instructions For Use
INSTRUCTIONS FOR USE Using the Cable Rewind Button and Standby On/Off Button Standby On/Off Button Unwind a sufficient length of cable. The yellow mark on the power cable shows the ideal cable length. DO NOT extend the cable beyond the red mark. - Page 12 WIRELESS CONTROL HANDLE To switch on or off the vacuum cleaner press button. HANDLE ON/OFF BUTTON To manually increase or decrease the suction power level, press the + or – buttons. SUCTION LEVEL To switch on the powerhead, slide the On/ Off Button (Powerhead) button forward.
- Page 13 SYNCHRONISING THE WIRELESS CONTROL HANDLE IMPORTANT! If the cleaner is unresponsive after placing the cleaner into standby mode and switching on the cleaner via the Control Handle, please follow the below steps to synchronise the handle to the vacuum. Press the Standby On/Off Button. The cleaner will be in standby mode.
- Page 14 Note: The genuine Wertheim 7 Series dust bag has been designed with a self closing seal to prevent dust and debris from escaping when the...
- Page 15 Gently close the cover, you will hear a ‘click’ when closed properly. Note: Please ensure that the dust bag is fully inserted into the dust bag bracket before closing the cover to avoid dust leaking from the dust bag. Pre-Motor Filter Replacement WARNING! Ensure the cleaner is disconnected from the power supply before performing any maintenance procedures.
- Page 16 Exhaust HEPA Filter Replacement WARNING! Ensure that the cleaner is disconnected from the power supply before performing any maintenance procedures. The Exhaust HEPA filter is installed behind the air outlet grill. This filter is washable. When dust or dirt is visible on the surface of the HEPA filter, the filter should be replaced or washed with warm water to maintain optimal performance.
- Page 17 Cleaning the Motorised Powerhead WARNING! Ensure that the cleaner is disconnected from the power supply and the powerhead is disconnected from the rod before performing any maintenance procedures. The agitator bar must be free of debris for effective cleaning and for maximum suction.
- Page 18 Replacing the Powerhead Agitator Bar & Drive Belt WARNING! Ensure that the cleaner is disconnected from the power supply and the powerhead is disconnected from the rod before performing any maintenance procedures. Depending on frequency of use, the powerhead agitator bar & drive belt will occasionally require changing.
- Page 19 Cleaning the Hard Floor Turbo Tool WARNING! Ensure that the cleaner is disconnected from the power supply before performing any maintenance procedures. The rotating brush must be free of debris for effective cleaning and for maximum suction. Disconnect the Hard Floor Turbo Tool LOCKING SWITCH from the vacuum rod and turn it over to inspect the rotating brush.
-
Page 20: Troubleshooting
Service problems that appear to be major can often be solved easily. You can be your own troubleshooter by reviewing this guide. All other servicing should be performed by an authorised service agent or qualified technician. Contact Wertheim Customer Service for your nearest authorised service agent on 1800 815 270. Fault... - Page 21 Fault Solutions Powerhead not Check that the on/off button is in the “ON” position. working. Check the installation of the powerhead is correct. Remove the power brush and clean any big objects trapped around the roller bar. Check there is no object pressing the top of the powerhead.
-
Page 22: Spare Parts
SPARE PARTS Powerhead 11400172 3-in-1 Cleaning Tool 31155286 Agitator Bar 31155290 Combination Floor Tool 31155288 Filter Set 32201461 Hard Floor Turbo Tool 31155311 Dust Bags - 4pk 32440443... - Page 23 Waverley Victoria 3150, AUS: 1800 815 270, quality and the failure does not amount to a NZ: (09) 263 7573, Monday – Friday, 9am-5pm major failure.” EST. Email: enquiries@wertheim.net.au SAVE TIME, REGISTER WARRANTY ONLINE! www.wertheimcleaning.com.au and www.wertheim.co.nz...
- Page 24 Electrical Home-Aids Pty Ltd. ACN 119 462 798 Ground Level, Building 3, Brandon Business Park 530 Springvale Road, Glen Waverley, Victoria 3150 www.wertheimcleaning.com.au www.wertheim.co.nz enquiries@wertheim.net.au V2 08/2017...
Need help?
Do you have a question about the 7 Series and is the answer not in the manual?
Questions and answers
What's the motor details
Got a new hose and handle, and pole Now power head light won’t turn on, but have power to the powerhead
Series 7 lid locked up