Advertisement
Advertisement
Table of Contents

Related Manuals for WERTHEIM Evolution


Summary of Contents for WERTHEIM Evolution
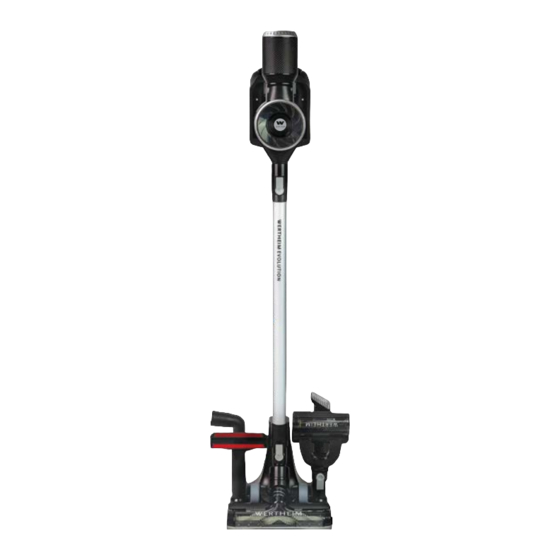
- Page 1 Evolution...
- Page 2 Features Boost Button Charging Dock Powerhead Dust Bin Filter...
- Page 3 On/Off Button Cyclone Separator 2 x 21.6v Li-Ion Batteries Dust Bin Charging Stand Charger Base Angle Attachment Upholstery Tool Mini Motorised Pet Brush 3-in-1 Cleaning Tool Charger Adapter...
-
Page 4: Specifications
INTRODUCTION Congratulations on the purchase of your new Wertheim Evolution Handstick. There are many useful features built into your handstick. We recommend that you carefully read this instruction manual to take the best advantage of these features. Specifications • Battery Voltage: 21.6V •... -
Page 5: Before You Begin
BEFORE YOU BEGIN This cleaner must be operated in accordance with these instructions and used only for domestic household cleaning to remove DRY dirt and dust from household carpets, flooring, walls and fabrics. This cleaner is not fit to be used as an industrial cleaner and will void the manufacturer’s warranty if used inappropriately. - Page 6 Precautionary measures: Do not operate the vacuum cleaner too close to heaters, radiators or other hot surfaces. Before inserting the plug into the wall, make sure your hands are dry. Before turning on the vacuum cleaner, safely remove any large objects from the floor or cleaning surface in order to prevent damage to the filter.
-
Page 7: Safety Instructions
SAFETY INSTRUCTIONS IMPORTANT! Always switch off the cleaner before cleaning, when not in use or attempting any maintenance task. The charger must only be connected to an AC power supply at the voltage shown on the rating label. This cleaner should only be used for its intended purpose as described in this instruction manual. - Page 8 in areas where such substances battery and charger indoors in a cool and items may be present. and dry place. 12. Do not use the appliance to pick 22. Do not use the vacuum to pick up up toxic materials (i.e. chlorine, water or liquids.
- Page 9 Battery use and care The appliance is only to be used with the charger provided with the appliance. Only charge the battery inside the cleaner or the charging dock. Only use the specifically designated charger to charge the product. When the appliance is not in use, keep it away from other metal objects, like paper clips, coins, keys, nails, screws or other small metal objects that can make a connection from one terminal to another.
-
Page 10: Charging Stand
ASSEMBLY IMPORTANT: ALWAYS REMOVE THE POWER PLUG FROM THE POWER SUPPLY BEFORE ASSEMBLY. CHARGING STAND 1. Insert the charging stand rod into the charger base. Ensure that the rod is inserted securely into the charger base (A). 2. Insert the charging dock (B) onto the top of the charging stand rod. - Page 11 IMPORTANT! ALWAYS REMOVE THE BATTERY FROM THE APPLIANCE BEFORE FITTING OR REMOVING ACCESSORIES. HANDSTICK 1. Insert the powerhead into the rod (D). You will hear an audible “click” sound when it is securely in place. 2. Insert the opposite end of the rod into the air inlet of the cleaner (E).
-
Page 12: On/Off Button
INSTRUCTIONS FOR USE ON/OFF BUTTON 1. Press the On/Off Button to turn the cleaner On or Off. 2. The light on the battery will illuminate blue while the cleaner is in operation. BOOST MODE 1. Boost Mode increases the suction performance when activated. - Page 13 CHARGING VIA THE CHARGING DOCK 1. Ensure that the charger adapter is plugged into the charging dock (G). 2. Insert the cleaner onto the charging dock. To charge the second battery insert the battery into the charging dock, as shown (H). Battery on handstick Spare battery in dock...
- Page 14 CAUTION! DO NOT TRY TO OPEN THE BATTERY AND REPAIR IT YOURSELF. NOTE: AS A SAFETY PRECAUTION, THE VACUUM CANNOT BE SWITCHED ON WHILE THE VACUUM IS CHARGING. WARNING! THE CHARGER HAS BEEN SPECIALLY DESIGNED TO CHARGE THE WERTHEIM EVOLUTION HANDSTICK. DO NOT USE ANY OTHER CHARGER.
- Page 15 ACCESSORIES IMPORTANT! ENSURE THAT THE CLEANER IS SWITCHED OFF BEFORE FITTING OR REMOVING ACCESSORIES. POWERHEAD Ideal for daily cleaning on carpets and hard floors. Carpet Carpet Hard Floors UPHOLSTERY BRUSH The upholstery brush can be used for cleaning furniture and upholstery.
- Page 16 ANGLE ATTACHMENT The 3-in-1 Cleaning Tool or the upholstery brush can be connected onto the Angle Attachment for cleaning in awkward, hard to reach places. MINI MOTORISED PET BRUSH Ideal for picking up pet hair from furniture and upholstery. Safety Precautions: 1.
-
Page 17: Maintenance
MAINTENANCE IMPORTANT! ALWAYS REMOVE THE BATTERY FROM THE CLEANER BEFORE PREFORMING ANY MAINTENANCE. EMPTYING THE DUST BIN 1. Disconnect the rod and the powerhead from the cleaner. 2. Hold the cleaner over a rubbish bin and press the Dust Bin Lid Release to open and empty the dust bin. -
Page 18: Cleaning The Cyclone Separator
CLEANING THE CYCLONE SEPARATOR 1. Use the metal handle, as shown, to remove the cyclone separator from the cleaner. “LIFT” NOTE: THE CYCLONE SEPARATOR CAN BE WASHED USING LUKEWARM WATER. THE CYCLONE SEPARATOR NEEDS TO FULLY AIR DRY BEFORE REINSTALLING. CLEANING OR REPLACING THE AGITATOR BAR 1. - Page 19 4. Lift out the agitator bar from the powerhead. 5. If a build-up of debris is wound around the agitator bar, remove by carefully cutting with scissors. Avoid damaging or cutting the bristles. 6. To replace, reverse steps 2 - 4. Ensure the agitator bar “clicks”...
- Page 20 CLEANING OR REPLACING THE MINI MOTORISED PET ROLLER BRUSH 1. Ensure that the Mini Motorised “LOCK” Pet Brush is disconnected from the cleaner. “UNLOCK” 2. To release the roller brush from the motorised brush, use a flat head screwdriver (not supplied) and turn to unlock the cover.
-
Page 21: Troubleshooting
You can be your own troubleshooter by reviewing this guide. All other servicing should be performed by an authorised service agent or qualified technician. Contact Wertheim Customer Service for your nearest authorised service agent on 1800 815 270 (AUS), 0800 282 288 (NZ). FAULT... - Page 22 SPARE PARTS Agitator Bar 31155489 Filter Set 32201664 Battery 33201682 Charger Adapter 33201685...
- Page 23 Ltd decide to repair or replace the cleaner, it will do so at its own cost. Your Wertheim cleaner, in the case of domestic Electrical Home-Aids Pty Ltd is unable to use, has a two year parts and labour warranty...
- Page 24 Electrical Home-Aids Pty Ltd. ABN: 62 007 539 577 Ground Level, Building 3, Brandon Business Park 530 Springvale Road, Glen Waverley, Victoria 3150 www.wertheimcleaning.com.au www.wertheim.co.nz enquiries@wertheim.net.au 04/19...
Need help?
Do you have a question about the Evolution and is the answer not in the manual?
Questions and answers