Advertisement
Available languages
Available languages
Quick Links
Advertisement
Chapters

Related Manuals for Sentiotec IHS 1


Summary of Contents for Sentiotec IHS 1
- Page 1 Infrarot-Steuerung IHS 1 / IHF 1 Montageanweisung Gebrauchsanweisung select...
-
Page 2: Table Of Contents
Inhaltsverzeichnis Teil 1 Montageanweisung nur für Fachpersonal Allgemeine Sicherheitshinweise ......................... 3 Netzteil montieren ..........................4 Bedienteil montieren ..........................4 Innenraumtemperatur-Fühler montieren ..................... 5 Folientemperatur-Fühler montieren ..................... 5 Teil 2 Gebrauchsanweisung für den Benutzer Allgemeine Sicherheitshinweise ......................... 6 Einstellungen und Bereiche ......................... 7 Zu Ihrer Sicherheit .......................... -
Page 3: Allgemeine Sicherheitshinweise
Montageanweisung nur für Fachpersonal Sehr geehrter Monteur Allgemeine Sicherheitshinweise • Die Montage darf nur durch einen Elektrofachmann Beachten Sie auch die speziellen Sicherheitshin- oder einer vergleichsweise qualifizierten Person aus- weise der einzelnen Kapitel. geführt werden. • Lesen Sie diese Montageanweisung sorgfältig vor Bestimmungsgemäßer Gebrauch: der Montage der Infrarot-Steuerung. -
Page 4: Netzteil Montieren
Montageanweisung nur für Fachpersonal Netzteil montieren Bedienteil montieren Abbildung 1 Abbildung 2 Das Netzteil wird auf die Kabinendecke oder die Ka- Das Bedienteil der Infrarot-Steuerung wird an der Ka- binenwand oder gemäß der Herstellerempfehlung binenaussenwand im maximalen Abstand von 3 Me- montiert. -
Page 5: Innenraumtemperatur-Fühler Montieren
Montageanweisung nur für Fachpersonal Innenraumtemperatur-Fühler Folientemperatur-Fühler montieren - Abbildung 3 montieren - Abbildung 4 Der Innenraumtemperatur-Fühler wird in der Sauna- Der Folientemperatur-Fühler wird direkt an die Infra- kabine circa 30 cm unterhalb der Decke, oder nach rot-Heizfolie montiert und mit einer Zugsicherung fixiert. Angaben des Kabinen-Herstellers montiert. -
Page 6: Allgemeine Sicherheitshinweise
Gebrauchsanweisung für den Anwender Sehr geehrter Anwender Allgemeine Sicherheitshinweise • Lesen Sie diese Gebrauchsanweisung sorgfältig vor Beachten Sie auch die speziellen Sicherheitshin- dem Gebrauch der Infrarot-Steuerung. Damit nut- weise der einzelnen Kapitel. zen Sie alle Vorteile, die das Gerät bietet und beu- WARNUNG - Feuergefahr: gen Schäden vor. -
Page 7: Einstellungen Und Bereiche
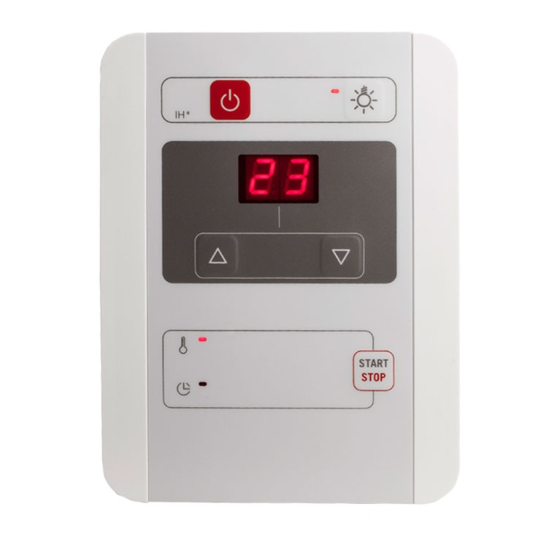
Gebrauchsanweisung für den Anwender- Abbildung 5 Einstellungen und Bereiche Bedienung Was kann ich einstellen ? Die Infrarot-Steuerung einschalten • Die Innenraumtemperatur in Grad Celsius. WARNUNG - Feuergefahr: • Die Heizzeit in Minuten. Vor dem Einschalten der Infrarot-Steuerung Welche Einstellbereiche habe ich ? ist sicher zu stellen, dass keine brennbaren Gegenstände auf oder vor den IR-Heizstrah- •... -
Page 8: Bei Längeren Betriebspausen
Gebrauchsanweisung für den Anwender- Abbildung 5 Bedienung (Fortsetzung) Technische Daten Die Heizzeit einstellen Umgebungstemperatur: -10 °C bis + 40 °C Lagertemperatur: -25 °C bis + 70 °C 1. Wahltaster SELECT 5 drücken, bis die Leuch- tanzeige HEIZZEIT 6 aufleuchtet. Netzteil: In der Anzeige 3 erscheint 00. - Page 9 ENGLISH Infrared Control Unit IHS 1 / IHF 1 Assembling Instructions Operating instructions select...
- Page 10 Table of Contents Part 1 Assembling Instructions for Specialist Staff Only General Safety Information ........................11 Mounting the power supply ........................ 12 Mounting the infrared control ......................12 Mounting the inside temperature sensor ................... 13 Mounting the foil temperature sensor ....................13 Part 2 Operating instructions for the User General Safety Information ........................
-
Page 11: Part 1 Assembling Instructions For Specialist Staff Only
Assembling Instructions for Specialist Staff Only Dear Assembler General safety information • Assembling may be performed by an electrician or Follow the special safety information of each chap- a comparatively qualified person only. ter. • Read the assembling instructions carefully, before assembling the infrared control unit. -
Page 12: Mounting The Power Supply
Assembling Instructions for Specialist Staff Only Mounting the power supply Mounting the infrared control Figure 1 Figure 2 Mount the power supply to the cabin ceiling or wall or Mount the infrared control to the outer cabin wall while in accordance with manufacturer’s recommendations. keeping a maximum distance of 3 meters to the power A power supply cord with an earthing pin plug (not supply unit. -
Page 13: Mounting The Inside Temperature Sensor
Assembling Instructions for Specialist Staff Only Mounting the inside temperature Mounting the foil temperature sensor - Figure 3 sensor - Figure 4 Mount the inside temperature sensor in the sauna ca- Mount the foil temperature sensor directly to the infra- bin, about 30 cm below the ceiling, or in accordance red foil heating and fasten with a pull protection. -
Page 14: Part 2 Operating Instructions For The User
Operating instructions for the user Dear User General safety information • Carefully read the operating instructions before Follow the special safety information of each using the infrared control unit.By doing so you will chapter. utilize all the benefits of the device and you will WARNING - Fire hazard: prevent damages. -
Page 15: Settings And Ranges
Operating instructions for the user - Figure 5 Settings and ranges Operation What can I adjust ? Turn on the infrared control unit • The inside temperature, measured in degrees of WARNING - Fire hazard: Celsius. Prior to turning on the sauna control make •... -
Page 16: Pausing Operation For A Longer Time Period
Operating instructions for the user - Figure 5 Operation (Continued) Technical Data Ambient temperature: -10°C to + 40°C How to set the heating time Storage temperature: -25°C to + 70°C 1. Press option key SELECT 5, until the LED dis- play HEATING 6 lights up. - Page 17 FRANÇAIS Commande à infrarouge IHS 1 / IHF 1 Instructions de montage Instructions d’utilisation select...
- Page 18 Table des matières Partie 1 Instructions de montage pour les installateurs professionnels Consignes de sécurité générales ......................19 Montage du bloc d’alimentation ......................20 Montage du module de commande à infrarouge ................20 Montage de la sonde de température intérieure ................21 Montage de la sonde de température d’écran ..................
-
Page 19: Instructions De Montage Pour Les Installateurs Professionnels
Instructions de montage pour les installateurs professionnels Cher Installateur, Consignes de sécurité générales • L’installation ne peut être réalisée que par un élec- Veuillez respecter les consignes de sécurité spé- tricien ou toute autre personne disposant des qua- cifiques de chaque chapitre. lifications similaires. -
Page 20: Montage Du Bloc D'alimentation
Instructions de montage pour les installateurs professionnels Montage du bloc d’alimentation - Montage du module de comman- Illustrations 1 de - Illustration 2 Le bloc d’alimentation doit être monté sur le plafond ou Le module de commande à infrarouge doit être monté la cloison de la cabine, ou suivant les instructions du fa- sur la cloison extérieure de la cabine à... -
Page 21: Montage De La Sonde De Température Intérieure
Instructions de montage pour les installateurs professionnels Montage de la sonde de tempéra- Montage de la sonde de tempéra- ture intérieure - Illustration 3 ture d’écran chauffant - Illustration 4 La sonde de température intérieure doit être montée à l’intérieur de la cabine de sauna à environ 30 cm sous La sonde de température d’écran chauffant doit être le plafond, ou conformément aux instructions du fab- montée directement sur l’écran chauffant à... -
Page 22: Instructions D'utilisation Pour L'utilisateur
Instructions d’utilisation pour l’utilisateur Cher Utilisateur, Consignes de sécurité générales • Veuillez lire attentivement les instructions d’utilisation Veuillez respecter les consignes de sécurité spé- avant d’employer la commande à infrarouge. Vous cifiques de chaque chapitre. pourrez ainsi tirer parti de tous les avantages de AVERTISSEMENT - Risque d’incendie: l’appareil et éviter de l’endommager. -
Page 23: Réglages Et Plages De Réglage
Instructions d’utilisation pour l’utilisateur - Illustration 5 Réglages et plages de réglage Utilisation Que puis-je régler? Mise sous tension de la commande à infra- rouge • La température intérieure en degrés Celsius. • Le temps de chauffage en minutes. AVERTISSEMENT - Risque d’incendie: Quelles sont les plages de réglages utilisab- Avant la mise sous tension de la comman- les? -
Page 24: Commande
Instructions d’utilisation pour l’utilisateur - Illustration 5 Utilisation Spécifications techniques Température ambiante: -10 à + 40 °C Réglage du temps de chauffage Température de stockage: -25 à + 70 °C 1. Appuyer sur le sélecteur SELECT 5 jusqu’à ce que le témoin TEMPS DE CHAUFFAGE 6 Bloc d’alimentation: s’allume. - Page 25 ITALIANO Controllo a infrarossi IHS 1 / IHF 1 Istruzioni per il montaggio Istruzioni per l’uso select...
- Page 26 Indice Parte 1 Istruzioni per il montaggio solo per il personale specializzato Indicazioni generali sulla sicurezza ......................27 Montare l’alimentatore ........................28 Montare il sensore della temperatura all’interno della sauna ............28 Montare il sensore della temperatura del foglio ................29 Parte 2 Istruzioni per l’uso per l’utente Indicazioni generali sulla sicurezza ......................
-
Page 27: Indicazioni Generali Sulla Sicurezza
Istruzioni per il montaggio solo per il personale specializzato Caro montatore, Indicazioni generali sulla sicurezza • Il montaggio può essere eseguito solo da un elet- Osservare anche le indicazioni speciali sulla sicu- tricista specializzato o da una persona con una qua- rezza dei singoli capitoli. -
Page 28: Montare L'alimentatore
Istruzioni per il montaggio solo per il personale specializzato Montare l'alimentatore Montare l'unità di controllo Figura 1 Figura 2 Montare l’alimentatore sul soffitto della cabina o sulla Montare l’unità di controllo del controllo a infrarossi parete della cabina o secondo le indicazioni del costruttore. sulla parete esterna della cabina ad una distanza L’alimentazione elettrica ha luogo con una linea di allac- massima di 3 metri dall’alimentatore. -
Page 29: Montare Il Sensore Della Temperatura Del Foglio
Istruzioni per il montaggio solo per il personale specializzato Montare il sensore della tempera- Montare il sensore della tempera- tura del foglio - Figura 4 tura all'interno della sauna - Figura 3 Il sensore della temperatura del foglio viene montato direttamente sul foglio di riscaldamento a infrarossi e Il sensore della temperatura all’interno della sauna fissato con una protezione. -
Page 30: Indicazioni Generali Sulla Sicurezza
Istruzioni per l'uso per l'utente Caro utente Indicazioni generali sulla sicurezza • Legga queste istruzioni per l’uso con cura, prima di Osservare anche le indicazioni speciali sulla sicu- utilizzare il controllo a infrarossi. Così facendo sarà rezza dei singoli capitoli. possibile usufruire di tutti i vantaggi che AVVERTIMENTO - Pericolo d'incendio: l’apparecchio offre ed evitare danni. -
Page 31: Impostazioni E Intervalli
Istruzioni per l'uso per l'utente - Figura 4 Impostazioni e intervalli Che cosa posso impostare? Accendere il controllo a infrarossi • La temperatura all’interno della sauna in gradi AVVERTIMENTO - Pericolo d'incendio: Celsius. Prima di accendere il controllo a infrarossi •... -
Page 32: Pause Prolungate Di Funzionamento
Istruzioni per l'uso per l'utente - Figura 5 Uso (continua) Dati tecnici Temperatura ambiente: da -10°C a + 40°C Impostare il tempo di riscaldamento. Temperatura d’immagazzinamento: da -25°C a + 70°C 1. Premere il tasto di scelta SELECT 5, finchè la spia luminosa TEMPO DI RISCALDAMENTO 6 Alimentatore: si accende. - Page 33 NEDERLANDS Infraroodbesturing IHS 1 / IHF 1 Installatiehandleiding Gebruiksaanwijzing select...
- Page 34 Inhoud Deel 1 Installatiehandleiding enkel voor vaklui Algemene veiligheidsvoorschriften ......................35 Installatie van de voedingseenheid ....................36 Installatie van het bedieningselement ....................36 Installatie van de binnentemperatuursensor ..................37 Installatie van de folietemperatuursensor ..................37 Deel 2 Gebruiksaanwijzing voor de gebruiker Algemene veiligheidsvoorschriften ......................
-
Page 35: Algemene Veiligheidsvoorschriften
Installatiehandleiding enkel voor vaklui Beste installateur, Algemene veiligheidsvoorschriften • Deze besturing mag enkel geïnstalleerd worden Gelieve ook de speciale veiligheidsvoorschriften door een elektricien of door een persoon die over per hoofdstuk te lezen. een vergelijkbare kennis beschikt. • Lees deze installatierichtlijnen zorgvuldig door voo- Reglementair gebruik: raleer de infraroodbesturing te installeren. -
Page 36: Installatie Van De Voedingseenheid
Installatiehandleiding enkel voor vaklui Installatie van de voedingseen- Installatie van het bedieningsele- heid - afbeelding 1 ment - afbeelding 2 De voedingseenheid wordt geïnstalleerd aan het plafond Het bedieningselement van de infraroodbesturing wordt of tegen de wand van de cabine of volgens de richtlijnen geïnstalleerd aan de buitenwand van de cabine op een van de fabrikant. -
Page 37: Installatie Van De Binnentemperatuursensor
Installatiehandleiding enkel voor vaklui Installatie van de binnentempera- Installatie van de folietemperatu- tuursensor - afbeelding 3 ursensor - afbeelding 4 De binnentemperatuursensor wordt in de saunacabine De folietemperatuursensor wordt rechtstreeks op de ongeveer 30 cm onder het plafond gemonteerd of vol- infrarood verwarmingsfolie gemonteerd en met een gens de richtlijnen van de cabinefabrikant. -
Page 38: Algemene Veiligheidsvoorschriften
Gebruiksaanwijzing voor de gebruiker Beste gebruiker, Algemene veiligheidsvoorschriften • Lees deze gebruiksaanwijzing zorgvuldig door voo- Gelieve ook de speciale veiligheidsvoorschriften raleer de infraroodbesturing te gebruiken. Op die per hoofdstuk te lezen. manier benut u alle voordelen van dit apparaat en WAARSCHUWING - Brandgevaar: vermijdt u eventuele schade. -
Page 39: Instellingen En Niveaus
Gebruiksaanwijzing voor de gebruiker - afbeelding 5 Instellingen en niveaus Bediening Wat kan ik instellen? De infraroodbesturing inschakelen • De binnentemperatuur in graden Celsius. WAARSCHUWING - Brandgevaar: • De verwarmingstijd in minuten. Vooraleer u de infraroodbesturing inscha- Wat zijn de mogelijke instelniveaus? kelt, moet u erop letten dat er zich op of vlak voor de verwarmingselementen geen brand- •... -
Page 40: Bij Langdurig Niet-Gebruik
Gebruiksaanwijzing voor de gebruiker - afbeelding 5 Bediening Technische gegevens Omgevingstemperatuur: -10 °C tot +40 °C De opwarmingstijd instellen Opslagtemperatuur: -25 °C tot +70 °C 1. SELECT-toets 5 indrukken tot het verklikkerlichtje OPWARMINGSTIJD 6 oplicht. Voedingseenheid: In het display 3 verschijnt de waarde 00. Afmetingen (B x H x D): 209 x 239 x 57 mm 2.
Need help?
Do you have a question about the IHS 1 and is the answer not in the manual?
Questions and answers