
Related Manuals for Sentiotec CV 41


Summary of Contents for Sentiotec CV 41
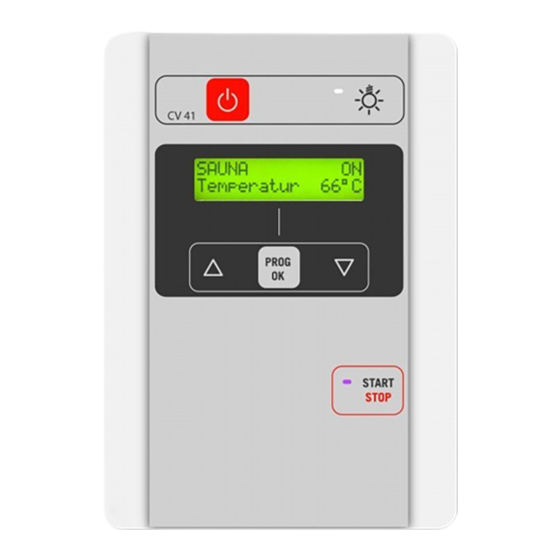
- Page 1 S a u n a s t e u e r u n g CV 41 O-CV41 MONTAGE- UND GEBRAUCHSANWEISUNG Deutsch SAUNA Temperatur 74°C PROG START STOP Version 04/19 Ident-Nr. 1-021-765...
-
Page 2: Table Of Contents
Inhaltsverzeichnis 1. Zu dieser Anleitung 2. Wichtige Hinweise zu Ihrer Sicherheit 2.1. Bestimmungsgemäßer Gebrauch 2.2. Sicherheitshinweise für den Monteur 2.3. Sicherheitshinweise für den Anwender 3. Produktbeschreibung 3.1. Lieferumfang 3.2. Optionales Zubehör 3.3. Produktfunktionen 4. Montage 4.1. Leistungsteil montieren 4.2. Bedienteil montieren 4.3. - Page 3 Inhaltsverzeichnis 7. Inbetriebnahme 7.1. Uhrzeit eingeben [00:00 - 24:00] 7.2. Sprache auswählen 7.3. Heizzeitbegrenzung einstellen 8. Bedienung 8.1. Licht einschalten 8.2. Einstellmöglichkeiten 8.3. Sauna - Betrieb: Manueller Betrieb - Schnell-Start 8.4. Sauna - Betrieb: Automatik-Betrieb 8.5. Bei längeren Betriebspausen 9. Problemlösung 9.1.
-
Page 4: Zu Dieser Anleitung
Nähe der Saunasteuerung auf. So können Sie jederzeit Informationen zu Ihrer Sicherheit und zur Bedienung nachlesen. Sie finden diese Montage- und Gebrauchsanweisung auch im Download- bereich unserer Webseite auf www.sentiotec.com/downloads. Symbole in Warnhinweisen In dieser Montage- und Gebrauchsanweisung ist vor Tätigkeiten, von denen eine Gefahr ausgeht, ein Warnhinweis angebracht. -
Page 5: Wichtige Hinweise Zu Ihrer Sicherheit
2.1. Bestimmungsgemäßer Gebrauch Die Saunasteuerung CV 41 dient ausschließlich zum Steuern und Regeln der Funktionen gemäß den technischen Daten. Die Saunasteuerung CV 41 darf nur zum Steuern und Regeln von 3 Heizkreisen mit maximal 3,5 kW Heizleistung pro Heizkreis ein- gesetzt werden. -
Page 6: Sicherheitshinweise Für Den Monteur
Montage- und Gebrauchsanweisung S. 6/34 2.2. Sicherheitshinweise für den Monteur ● Die Montage darf nur durch eine Elektrofachkraft oder eine ver- gleichsweise qualifizierte Person ausgeführt werden. ● Arbeiten an der Saunasteuerung dürfen nur im spannungsfreien Zustand durchgeführt werden. ● Es ist bauseits eine allpolige Trennvorrichtung mit voller Abschal- tung entsprechend der Überspannungskategorie III vorzusehen. -
Page 7: Sicherheitshinweise Für Den Anwender
Montage- und Gebrauchsanweisung S. 7/34 2.3. Sicherheitshinweise für den Anwender ● Die Saunasteuerung darf nicht von Kindern unter 8 Jahren ver- wendet werden. ● Die Saunasteuerung darf von Kindern über 8 Jahren, von Perso- nen mit verringerten psychischen, sensorischen oder mentalen Fähigkeiten und von Personen mit Mangel an Erfahrung und Wissen unter folgenden Bedingungen verwendet werden: –... -
Page 8: Produktbeschreibung
● Leistungserweiterung (Artikelnummer: O-S2-18 / O-S2-30) ● Sicherheitsabschaltung (Artikelnummer: HT-SWL) 3.3. Produktfunktionen Die Saunasteuerung CV 41 verfügt über folgende Funktionen: ● Regeln von Saunaöfen mit einer Heizleistung bis 10,5 kW. ● Mit einer Leistungserweiterung kann die maximale Schaltleistung von 10,5 kW auf 18 kW oder 30 kW erhöht werden. -
Page 9: Montage
Montage- und Gebrauchsanweisung S. 9/34 4. Montage ACHTUNG! Schäden am Gerät Die Saunasteuerung ist spritzwassergeschützt, trotzdem kann direkter Kontakt mit Wasser das Gerät beschädigen. ● Montieren Sie die Saunasteuerung an einem trockenen Ort, an dem eine maximale Luftfeuchte von 95% nicht überschritten wird. ACHTUNG! Störquellen beeinträchtigen die Signalübertragung ●... -
Page 10: Leistungsteil Montieren
Montage- und Gebrauchsanweisung S. 10/34 4.1. Leistungsteil montieren Beachten Sie Abb.1 (Kapitel Abbildungen) Das Leistungsteil der Sauna-Steuerung wird außerhalb der Saunakabine oder gemäß der Kabinenhersteller-Empfehlung montiert. Die elektrische Versorgung erfolgt als Festanschluss. 1. Verriegelung 5 leicht eindrücken und die Gehäuseabdeckung 6 abnehmen. 2. -
Page 11: Ofenfühler F1 Mit Übertemperatur-Sicherung Montieren
Montage- und Gebrauchsanweisung S. 11/34 4.3. Ofenfühler F1 mit Übertemperatur-Sicherung montieren Beachten Sie Abb.4 (Kapitel Abbildungen) ● Der Ofenfühler ist an der Ofen-Rückwand oberhalb der Mitte des Saunaofens zu montieren. Dabei ist ein Abstand von zirka 15 cm zur Kabinendecke ein- zuhalten. -
Page 12: Bankfühler F2 (Optional) Montieren
Montage- und Gebrauchsanweisung S. 12/34 4.4. Bankfühler F2 (optional) montieren Beachten Sie Abb.5 (Kapitel Abbildungen) Der Bankfühler ist an der Kabinenwand oberhalb der hinteren Sitzbank zu mon- tieren. Dabei ist ein Abstand von zirka 15 cm zur Kabinendecke einzuhalten. 1. Verlegen Sie die 2-polige Bankfühler-Leitung in der Wand der Saunakabine zum Montageort des Bankfühlers und fixieren Sie die Bankfühler-Leitungen mit Leitungsschellen. -
Page 13: Elektrischer Anschluss
Montage- und Gebrauchsanweisung S. 13/34 5. Elektrischer Anschluss Beachten Sie die Abb. 2 und Abb. 6 (Kapitel Abbildungen) ACHTUNG! Schäden am Gerät ● Die Saunasteuerung darf nur zum Steuern und Regeln von 3 Heizkreisen mit einer Heizleistung von max. 3,5 kW pro Heizkreis eingesetzt werden. Optional kann mit einem Zusatz-Leistungsteil die Schaltleistung von 10,5 kW auf 18 kW / 30 kW erhöht werden. -
Page 14: Licht Anschließen
Montage- und Gebrauchsanweisung S. 14/34 5.2. Licht anschließen ● Lichtleitungen durch die Montageöffnung J (Anschlussbereich für 230 V / 400 V K) in das Gehäuseunterteil 1 führen und gemäß dem Schaltplan (Abb.6) an der Anschlussklemme m (wie in den Unterpunkten unter 3. beschrieben) anschließen. -
Page 15: Bedienteil Anschließen
Montageanweisung – nur für Fachpersonal S. 15/34 5.7. Bedienteil anschließen ● Führen Sie das Anschlusskabel des Bedienteils durch die Kabeldurchführung 9 in den Anschlussbereich für Kleinspannung 5. ● Stecken Sie den Stecker des Flachbandkabels in die Anschlussbuchse 2 5.8. Installation abschließen ●... -
Page 16: Prüfungen Durchführen
Montageanweisung – nur für Fachpersonal S. 16/34 6. Prüfungen durchführen Die folgenden Prüfungen müssen von einem zugelassenen Elektroinstallateur durchgeführt werden. 1. Prüfen Sie den Kontakt der Erdungsleitungen an der Schutzleiterklemme. 2. Prüfen Sie die Übertemperatur-Sicherung des Ofenfühlers F1. a. Schalten Sie die Saunasteuerung ein. b. -
Page 17: Inbetriebnahme
Montageanweisung – nur für Fachpersonal S. 17/34 7. Inbetriebnahme Beachten Sie die Abb. 7 (Kapitel Abbildungen) Das Saunasteuergerät wird durch den Betriebsschalter komplett vom Strom- netz getrennt. Die gespeicherten Einstellungen und die Uhrzeit wird durch eine interne Batterie aufrechterhalten. Bei der Erstinbetriebnahme der Saunasteuerung muss die aktuelle Uhrzeit eingestellt werden. -
Page 18: Sprache Auswählen
Montageanweisung – nur für Fachpersonal S. 18/34 7.2. Sprache auswählen Das Bedienteile lässt sich auf folgende Sprachen umstellen: Englisch Französisch Italienisch 1. Hauptschalter einschalten und warten bis das Bedienteil betriebsbereit ist. 2. Mit der Ein/Aus-Taste am Bedienteil die Steuerung auf Standby schalten. 3. -
Page 19: Bedienung
Gebrauchsanweisung für den Anwender S. 19/34 8. Bedienung Beachten Sie die Abb. 7 (Kapitel Abbildungen) WARNUNG! Brandgefahr Brennbare Gegenstände, die auf dem heißen Saunaofen liegen, können sich entzünden und Brände verursachen. ● Legen Sie NIEMALS brennbare Gegenstände auf den Saunaofen. ●... - Page 20 Gebrauchsanweisung für den Anwender S. 20/34 2. Automatik- Betrieb Der Betrieb wird mit programmierten Einstellungen gestartet (siehe Kapitel 6 bzw. 12) 1. Automatik: zum Aktivieren des Automatik-Betriebes 2. Heizbeginn: zum Einstellen des automatischen Heizbeginnes von 0 - 24 Uhr, z.B. [18:00] Uhr 3.
-
Page 21: Sauna - Betrieb: Manueller Betrieb - Schnell-Start
Gebrauchsanweisung für den Anwender S. 21/34 8.3. Sauna - Betrieb: Manueller Betrieb - Schnell-Start 1. Saunasteuerung einschalten Betriebsschalter drücken. EIN/AUS - Taster drücken. ● In der Anzeige erscheint der vor dem Einschalten letzte dargestellte Zustand, z.B.: SAUNA Parameter Wert 2. Einstellen auf Sauna-Betrieb Taste A SAUNA betätigen. - Page 22 Gebrauchsanweisung für den Anwender S. 22/34 4. Saunasteuerung starten ● Taste STAR /STOP drücken: Die Saunasteuerung beginnt sofort mit den zuletzt eingestellten Werten zu heizen. In der Anzeige erscheint: SAUNA Heizdauer 02:30 Die Kontrollleuchten bei den Tastern und A leuchten. 5.
-
Page 23: Sauna - Betrieb: Automatik-Betrieb
Gebrauchsanweisung für den Anwender S. 23/34 8.4. Sauna - Betrieb: Automatik-Betrieb WARNUNG Brandgefahr Brennbare Gegenstände, die auf dem heißen Saunaofen liegen, können sich entzünden und Brände verursachen. ● Legen Sie NIEMALS brennbare Gegenstände auf den Saunaofen. ● Stellen Sie sicher, dass KEINE brennbaren Gegenstände auf dem Saunaofen liegen, bevor Sie den Automatik-Betrieb aktivieren. - Page 24 Gebrauchsanweisung für den Anwender S. 24/34 3. Heizbeginn wählen [00:00 - 23:59 Uhr] bis zur Anzeige Heizbeginn blättern ● Mit den UP/DOWN Tasten ● Taste PROG/OK drücken, in der Anzeige erscheint: SAUNA Heizdauer 00:00 oder der zuletzt eingestellte Wert. ● Mit den UP/DOWN Tasten den gewünschten Wert eingeben, z.
- Page 25 Gebrauchsanweisung für den Anwender S. 25/34 5. Temperatur einstellen (15 - 110 °C) bis zur Anzeige Temperatur blättern ● Mit den UP/DOWN Tasten ● Taste PROG/OK drücken, in der Anzeige erscheint: SAUNA Temperatur 90°C oder der zuletzt eingestellte Wert. ● Mit den UP/DOWN Tasten den gewünschten Wert eingeben, z.
- Page 26 Gebrauchsanweisung für den Anwender S. 26/34 7. Einstellungen ansehen / ändern Während des Sauna- Betriebes können Sie sämtliche Temperatur-, Heizdauer-, oder Lüfter-Einstellungen ansehen und ändern. a) Soll-Werte anzeigen ● Mit den UP/DOWN Tasten bis zum gewünschten Menüpunkt z.B. Temperatur blättern. Die aktuelle Temperatur wird angezeigt. ●...
-
Page 27: Bei Längeren Betriebspausen
Gebrauchsanweisung für den Anwender S. 27/34 8. Automatik-Betrieb aktivieren / deaktivieren a) Automatik-Betrieb aktivieren bis zur Anzeige Automatik blättern ● Mit den UP/DOWN Tasten ● Taste PROG/OK drücken, in der Anzeige erscheint: SAUNA SEND Automatik Nach ca. 1 Sekunde erscheint in der Anzeige: SAUNA AUTO Lüfter... -
Page 28: Problemlösung
Gebrauchsanweisung für den Anwender S. 28/34 9. Problemlösung 9.1. Innenraumbeleuchtung leuchtet nicht ● Betriebsschalter ausschalten. ● Lichtschalter ausschalten. ● Hauptsicherungen der Steuerung im Sicherungskasten ausschalten. ● Glühlampe austauschen. ● Steuerung wieder einschalten. 9.2. Batterie für Uhr wechseln 1. Gehäuseabdeckung des Leistungsteiles gemäß 4.1. Saunasteuerung montieren (Abb.1) auf Seite 12 abnehmen. -
Page 29: Fehlermeldungen
Gebrauchsanweisung für den Anwender S. 29/34 3. Sicherung für Innenraumbeleuchtung B (Feinsicherung 5 x 20 T2,0 A/ 250 V) oder Sicherung für die Elektronik des Gerätes A (Feinsicherung 5 x20 T630 mA/ 250 V) austauschen oder Sicherung für Lüfter 8 (Kleinstsicherung TR5 - T1,0A/250V)(Abb. -
Page 30: Meldungen In Der Anzeige
Gebrauchsanweisung für den Anwender S. 30/34 9.5. Meldungen in der Anzeige 1. LL in der Anzeige erscheint: LL In der Anzeige Innenraum-Temperatur ist unterhalb 10 °C. 2. HH in der Anzeige In der Anzeige erscheint: HH Die Innenraum-Temperatur ist oberhalb 115 °C. ●... -
Page 31: Reinigung
Gebrauchsanweisung für den Anwender S. 31/34 10. Reinigung VORSICHT - SCHÄDEN AM GERÄT: Die Steuerung sollte nicht mit Wasser übergossen oder sehr feucht gereinigt werden. Benutzen Sie zum Reinigen ein leicht angefeuchtetes Reinigungstuch, das mit etwas milder Seifenlauge (Spülmittel) versehen ist. 11. -
Page 32: Technische Daten
Montageanweisung – nur für Fachpersonal S. 32/34 13. Technische Daten Umgebungsbedingungen: Lagertemperatur: -25 °C bis + 70 °C Umgebungstemperatur: -10 °C bis + 40 °C Luftfeuchtigkeit: max. 95 % Steuerung Leistungsteil: Abmessungen: 245 x 220 x 85 mm Schaltspannung / dreiphasig 3N: 400 V Frequenz: 50 / 60 Hz... - Page 33 Montageanweisung – nur für Fachpersonal S. 33/34 Thermische Sicherheit: ● Ofen-Fühler mit Übertemperatur-Sicherung. (Abschalt-Temperatur 139 °C) ● Automatische Heizzeitbegrenzung nach max. 6 Stunden (bei privaten Anlagen). ● Zweifühlersystem mit Temperaturregelung über der Bank. Einstellbereiche: Temperatur Sauna-Betrieb: 15 - 110 °C am Bankfühler F2 Lüfter: 00 - 100 % Lüfterleistung Vorwahlzeit:...
- Page 34 NOTIZEN / APPUNTI / NOTES / NOTE / NOTITIES ………………………………………………….....………………………………………………………………... ……………………………………………………………..……………………………………………………………... …………………………………………………………….....………………………………………………………... …………………………………………………….....………………………………………………………………... ……………………………………………………………..……………………………………………………………... ……………………………………………………………..……………………………………………………………... ……………………………………………………………..…………………………………………………………... …………………………………………………………….....………………………………………………………... …………………………………………………………….....………………………………………………………... …………………………………………………………….....………………………………………………………... …………………………………………………………….....………………………………………………………... …………………………………………………………….....………………………………………………………..…………………………………………………………….....………………………………………………………... …………………………………………………………….....………………………………………………………... …………………………………………………………….....………………………………………………………... …………………………………………………………….....………………………………………………………... …………………………………………………………….....………………………………………………………... …………………………………………………………….....………………………………………………………... …………………………………………………………….....………………………………………………………...
- Page 35 Sauna control unit CV 41 O-CV41 INSTRUCTIONS FOR ASSEMBLY AND USE English SAUNA Temperature 74 °C PROG START STOP Version 04/19 ID no. 1-021-765...
- Page 36 Table of Contents 1. About this instruction manual 2. Important information for your safety 2.1. Intended use 2.2. Safety information for the installer 2.3. Safety information for the user 3. Product description 3.1. Scope of delivery 3.2. Optional accessories 3.3. Product functions 4.
- Page 37 Table of contents 7. Commissioning 7.1. Entering the time [00:00–24:00] 7.2. Selecting the language 7.3. Setting the heating period limit 8. Operation 8.1. Switching on the light 8.2. Setting options 8.3. Sauna operating mode: Manual operation – quick start 8.4. Sauna operating mode: Automatic mode 8.5.
-
Page 38: About This Instruction Manual
These installation and operating instructions can also be found in the downloads section of our website: www.sentiotec.com/downloads. Symbols used for warning notices In these instructions for installation and use, a warning notice located next to an activity indicates that this activity poses a risk. -
Page 39: Important Information For Your Safety
The CV 41 sauna control unit is used exclusively for operating and controlling the sauna functions in accordance with the technical data. The CV 41 sauna control units may only be used for operating and controlling 3 heating circuits with a maximum heating capacity of 3.5 kW per heating circuit. -
Page 40: Safety Information For The Installer
Instructions for installation and use p. 6/34 2.2. Safety information for the installer ● Installation may only be performed by a qualified electrician or similarly qualified person. ● Work on the sauna control unit may only be performed when the power has been disconnected. -
Page 41: Safety Information For The User
Instructions for installation and use p. 7/34 2.3. Safety information for the user ● The sauna control unit must not be used by children under 8 years old. ● The sauna control unit may be used by children above 8 years old, by persons with limited psychological, sensory or mental capabilities or by persons with lack of experience/knowledge only when:... -
Page 42: Product Description
● Safety shut-off (item number: HT-SWL) 3.3. Product functions The CV 41 sauna control unit features the following functions: ● Controls sauna heaters with a heating capacity of up to 10.5 kW. ● A power booster allows the maximum switching capacity to be increased from 10.5 kW to 18 kW or 30 kW. -
Page 43: Installation
Instructions for installation and use p. 9/34 4. Installation ATTENTION! Damage to the unit The sauna control unit is protected against splashing water, however direct contact with water could still damage the unit. ● Install the sauna control unit in a dry place at which a maximum humidity of 95% is not exceeded. -
Page 44: Installing The Power Supply Unit
Instructions for installation and use p. 10/34 4.1. Installing the power supply unit Note Fig. 1 (figures chapter) The power supply unit of the sauna control unit is installed outside the sauna cabin or according to the recommendation of the cabin manufacturer. The electrical power supply is a fixed connection. -
Page 45: Installing The Heater Sensor F1 With Overheat Cut-Out
Instructions for installation and use p. 11/34 4.3. Installing the heater sensor F1 with overheat cut-out Note Fig. 4 (figures chapter) ● The heater sensor must be installed on the rear of the heater, above the middle of the sauna heater. A clearance of approx. 15 cm from the ceiling of the sauna room must be maintained. -
Page 46: Installing Bench Sensor F2 (Optional)
Instructions for installation and use p. 12/34 4.4. Installing bench sensor F2 (optional) Note Fig. 5 (figures chapter) The bench sensor must be installed on the wall of the sauna room, above the rear bench seat. A clearance of approx. 15 cm from the roof of the sauna room must be maintained. -
Page 47: Electrical Connection
Instructions for installation and use p. 13/34 5. Electrical connection Note Fig. 2 and Fig. 6 (figures chapter) ATTENTION! Damage to the unit ● The sauna control unit may only be used for operating and controlling 3 heat- ing circuits with a maximum heating capacity of 3.5 kW per heating circuit. Optionally with an additional power module the switching capacity can be increased from 10.5 kW to 18 kW / 30 kW. -
Page 48: Connecting The Light
Instructions for installation and use p. 14/34 5.2. Connecting the light ● Guide the light lines through the installation opening J (connection area for 230 V / 400 V K) into the housing lower part 1 and connect according to the circuit diagram (Fig. -
Page 49: Connecting The Control Panel
Installation instructions, for professionals only p. 15/34 5.7. Connecting the control panel ● Guide the connection cable for the operating unit through the cable bushing 9 into the low-voltage connection area 5. ● Connect the plug of the ribbon cable to the connection socket 2. 5.8. -
Page 50: Performing Tests
Installation instructions, for professionals only p. 16/34 6. Performing tests The following tests must be performed by a certified electrical fitter. 1. Check the contact of the earth conductors on the earth conductor terminal. 2. Check the overheat cut-out on the heater sensor F1. a. -
Page 51: Commissioning
Installation instructions, for professionals only p. 17/34 7. Commissioning Note Fig. 7 (figures chapter). The sauna control unit is completely disconnected from the mains using the operation switch . The saved settings and the time are retained by an inter- nal battery. -
Page 52: Selecting The Language
Installation instructions, for professionals only p. 18/34 7.2. Selecting the language The control panel can be set to the following languages: English French Italian 1. Turn on the main switch and wait until the operating unit is ready for operation. 2. -
Page 53: Operation
Instructions for use for the user p. 19/34 8. Operation Note Fig. 7 (figures chapter). WARNING! Risk of fire Combustible objects that are placed on the sauna heater could ignite and cause fires. ● NEVER place combustible objects on the sauna heater. ●... - Page 54 Instructions for use for the user p. 20/34 1. Automatic: to activate the automatic mode 2. Start of heating: to set the automatic start of heating for a time from 0–24, e.g. [18:00] 3. Heating duration: to set the heating duration of 1 minute to 6 hours e.g.
-
Page 55: Sauna Operating Mode: Manual Operation - Quick Start
Instructions for use for the user p. 21/34 8.3. Sauna operating mode: Manual operation – quick start 1. Switching on the sauna control unit Press operating switch Press ON/OFF button ● In the display the last status displayed before switching on appears, e.g.: SAUNA Parameter... - Page 56 Instructions for use for the user p. 22/34 4. Starting the sauna control unit ● Press the START/STOP The sauna control unit begins to heat immediately with the last set values. The following appears in display SAUNA Heating duration 02:30 The control lamps on the and A buttons light up.
-
Page 57: Sauna Operating Mode: Automatic Mode
Instructions for use for the user p. 23/34 8.4. Sauna operating mode: Automatic mode WARNING Risk of fire Combustible objects that are placed on the sauna heater could ignite and cause fires. ● NEVER place combustible objects on the sauna heater. ●... - Page 58 Instructions for use for the user p. 24/34 3. Selecting the start of heating [00:00 - 23:59] to scroll to the Start of heating display ● Use the UP/DOWN buttons ● Press the PROG/OK button, in the display the following appears: SAUNA Heating duration 00:00 or the last set value.
- Page 59 Instructions for use for the user p. 25/34 5. Setting the temperature (15–110 °C) to scroll to the Temperature display ● Use the UP/DOWN buttons ● Press the PROG/OK button, in the display the following appears: SAUNA Temperature 90 °C or the last set value. ●...
- Page 60 Instructions for use for the user p. 26/34 7. Viewing/changing settings During sauna operation, you can view or change all temperature, heating dura- tion or fan settings. a) Viewing set values ● Use the UP/DOWN buttons to scroll to the required menu item e.g.
-
Page 61: For Longer Breaks In Operation
Instructions for use for the user p. 27/34 8. Activating/deactivating automatic mode A) Activating the automatic mode to scroll to the Automatic display ● Use the UP/DOWN buttons ● Press the PROG/OK button, in the display the following appears: SAUNA SEND Automatic After approx. -
Page 62: Troubleshooting
Instructions for use for the user p. 28/34 9. Troubleshooting 9.1. Interior lighting does not work ● Switch off the operating switch ● Switch off the light switch ● Turn off main fuses of the control unit in the fuse box. ●... -
Page 63: Error Messages
Instructions for use for the user p. 29/34 4. Insert tabs of the operating unit into the two lateral holders carefully press onto the housing lower part to the stop position. 5. Place the housing cover onto the housing lower part , swivel downward and press until it clicks audibly. -
Page 64: Messages In The Display
Instructions for use for the user p. 30/34 9.5. Messages in the display 1. LL in the display : LL The following appears in display Interior temperature is below 10 °C. 2. HH in the display The following appears in display : HH Interior temperature is above 115 °C. -
Page 65: Cleaning
Instructions for use for the user p. 31/34 10. Cleaning CAUTION – DAMAGE TO DEVICE: The control unit should not be doused with water or cleaned with too much moisture. For cleaning use a slightly damp cleaning cloth that has some mild soap solution (detergent). 11. -
Page 66: Technical Data
Installation instructions, for professionals only p. 32/34 13. Technical data Ambient conditions: Storage temperature: -25 °C to + 70 °C Ambient temperature: -10 °C to + 40 °C Relative humidity: max. 95% Power supply unit control: Dimensions: 245 x 220 x 85 mm Switched voltage / three-phase 3N: 400 V Frequency:... - Page 67 Installation instructions, for professionals only p. 33/34 Thermal safety: ● Heater sensor with overheat cut-out. (Shutdown temperature 139 °C) ● Automatic heat duration limit after max. 6 hours (for private systems). ● Two-sensor system with temperature control over the bench. Setting ranges: Temperature for sauna mode: 15–110 °C at bench sensor F2...
- Page 68 NOTIZEN / APPUNTI / NOTES / NOTE / NOTITIES ………………………………………………….....………………………………………………………………... ……………………………………………………………..……………………………………………………………... …………………………………………………………….....………………………………………………………... …………………………………………………….....………………………………………………………………... ……………………………………………………………..……………………………………………………………... ……………………………………………………………..……………………………………………………………... ……………………………………………………………..…………………………………………………………... …………………………………………………………….....………………………………………………………... …………………………………………………………….....………………………………………………………... …………………………………………………………….....………………………………………………………... …………………………………………………………….....………………………………………………………... …………………………………………………………….....………………………………………………………..…………………………………………………………….....………………………………………………………... …………………………………………………………….....………………………………………………………... …………………………………………………………….....………………………………………………………... …………………………………………………………….....………………………………………………………... …………………………………………………………….....………………………………………………………... …………………………………………………………….....………………………………………………………... …………………………………………………………….....………………………………………………………...
- Page 69 Montage- und Gebrauchsanweisung S. 1/4 Abbildungen: Abb. 1: Abb. 2: Detail Abb. 3: Abb. 4: 100 mm...
- Page 70 Montage- und Gebrauchsanweisung S. 2/4 Abb. 5: Abb. 5: Abb. 6: CV4 max. 10,5 kW CV3 max. 10,5 kW Elektronik/ Elektronik/ electronic electronic Regelrelais/ Regelrelais/ control relay control relay Lüfter/ Lüfter/ Licht/ 24V DC light 5V DC EIN/ AUS Licht/ 230V AC ON/ OFF 630mA...
- Page 71 Montage- und Gebrauchsanweisung S. 3/4 Abb. 6: CV 41 1 Betriebsschalter Ein/Aus 2 Lichtschalter 3 Ein/Aus - Taster 4 Licht - Taster 5 Anzeige SAUNA 6 PROG/OK - Taste Uhrzeit 11:55 7 UP/DOWN - Tasten 8 Start/Stop - Taste PROG...
- Page 72 GmbH | Division of Harvia Group | Oberregauer Straße 48, A-4844 Regau T +43 (0) 7672/22 900-50 | F -80 | info@sentiotec.com | www.sentiotec.com...
Need help?
Do you have a question about the CV 41 and is the answer not in the manual?
Questions and answers