Table of Contents
Advertisement
Quick Links
Advertisement
Table of Contents

Subscribe to Our Youtube Channel
Related Manuals for Keysight Technologies P9241A


Summary of Contents for Keysight Technologies P9241A
- Page 1 Keysight P9241/42/43A Oscilloscopes Startup Guide...
- Page 2 This product has been designed and tested Keysight Technologies, Inc. as governed by U.S. Government Rights in accordance with accepted industry United States and international copyright standards, and has been supplied in a safe laws.
-
Page 3: Table Of Contents
Contents 1 Introduction Follow the Startup Sequence / 7 Related Documentation / 8 2 Unpack and Inspect Inspect for Damage / 12 Return an Instrument for Service / 12 3 Verify Shipment Contents and Model Options P9241/42/43A Oscilloscope Shipment Contents / 13 4 Install the Software PC Requirements / 15 Software Installation Overview / 15... - Page 4 6 Verify Operation Power-On the Oscilloscope / 25 Open the P924xA Oscilloscope Soft Front Panel (SFP) / 26 If the oscilloscope is not listed in Keysight InfiniiVision Launcher / 27 Run the Oscilloscope's Hardware Self Test / 28 If there are communications problems / 29 7 Make a Measurement Connect Probes to the Oscilloscope / 31 Maximum input voltage at analog inputs / 31...
-
Page 5: Keysight P9241/42/43A Oscilloscopes Startup Guide
Measurement Category / 50 Oscilloscope Measurement Category / 50 Measurement Category Definitions / 50 Product Markings / 51 Index Keysight P9241/42/43A Oscilloscopes Startup Guide... - Page 6 Keysight P9241/42/43A Oscilloscopes Startup Guide...
-
Page 7: Introduction
The chapters in this guide cover the basics of setting up and configuring a USB oscilloscope system, as well as installing the required software. If you have any questions after reviewing this information, please contact your local Keysight Technologies representative or contact us through our website at www.keysight.com/find/usb-instruments. Follow the Startup Sequence Closely follow the startup process flow in this document. -
Page 8: Related Documentation
Installation is complete. Proceed to program your product through the API. See: Chapter 8, “Applications Programming Interface (API) Overview,” starting on page 41 Related Documentation To access documentation related to the Keysight P9241/42/43A oscilloscopes, go to www.keysight.com/manuals/P9241A. Document Description File name Format Startup Guide Includes procedures to help you to P924x_StartupGuide.pdf... - Page 9 LabVIEW G Driver API functions. Help Format) See Also The data sheet introduces the product and provides full product specifications. You can find the data sheet at: www.keysight.com/products/P9241A The Keysight P9241/42/43A Oscilloscopes Security Guide is available at www.keysight.com/find/security. Keysight P9241/42/43A Oscilloscopes Startup Guide...
- Page 10 Introduction Keysight P9241/42/43A Oscilloscopes Startup Guide...
-
Page 11: Unpack And Inspect
Keysight P9241/42/43A Oscilloscopes Startup Guide 2 Unpack and Inspect Inspect for Damage / 12 Return an Instrument for Service / 12 Electrostatic discharge (ESD) can damage or destroy electronic components. Use a static-safe work station to perform all work on electronic assemblies. The following figure shows a static-safe work station using two types of ESD protection: conductive table-mat and wriststrap combination, and conductive floor-mat and heelstrap combination. -
Page 12: Inspect For Damage
Unpack and Inspect DO NOT use these techniques for a static-safe work station when working on WARNING circuitry with a voltage potential greater than 500 volts. Inspect for Damage After unpacking an instrument, inspect it for any shipping damage. Report any damage to the shipping agent immediately, as such damage is not covered by the warranty. -
Page 13: Verify Shipment Contents And Model Options
P9241/42/43A Oscilloscope Shipment Contents Items included in your P9241/42/43A oscilloscope shipment: Keysight Part Number Description P9241A, P9242A, or 200 MHz, 500 MHz, or 1 GHz oscilloscope P9243A 0950-6128 Power Supply External AC-DC Adapter Switching 90W 1-Output 15V 6A Level 6 Class 1... - Page 14 Verify Shipment Contents and Model Options Model Number Description P9240AROA MIL-STD 1553 and ARINC 429 Serial Triggering and Analysis P9240VIDA Enhanced Video/TV Triggering Application Package P9240AWGA WaveGen 20 MHz Function/Arbitrary Waveform Generator P9240CMPA Computer Serial Triggering and Analysis (RS232/422/485/UART) P9240ATOA Automotive Serial Triggering and Analysis (CAN, CAN-dbc, CAN FD, LIN) P9240SNSA SENT (Single Edge Nibble Transmission) Triggering and Analysis...
-
Page 15: Install The Software
Keysight P9241/42/43A Oscilloscopes Startup Guide 4 Install the Software PC Requirements / 15 Software Installation Overview / 15 Updating Oscilloscope Firmware as New Oscilloscopes Are Connected / 17 Updating Chassis Firmware / 17 PC Requirements Item Requirements Operating system Windows 7 (64-bit) or Windows 10 (64-bit) Processor speed 1.5 GHz dual core (x64) minimum, 2.4 GHz recommended, no support for Itanium64 Available memory... - Page 16 Follow the installer prompts to install the IO libraries. Install the P924x InfiniiVision Oscilloscope software. This software is included with your shipment and is also available at www.keysight.com/products/P9241A. The install package for 64-bit Windows operating systems must be used with the N OTE P9241/42/43A oscilloscopes.
-
Page 17: Updating Oscilloscope Firmware As New Oscilloscopes Are Connected
Install the Software Updating Oscilloscope Firmware as New Oscilloscopes Are Connected The software installation process on the host PC includes FPGA updates to connected P924x oscilloscopes. Because you can connect new oscilloscopes after the main software installation, there is a way to perform FPGA updates separately: •... - Page 18 Install the Software The Keysight P600XA Chassis soft front panel will open. The chassis FPGA firmware update options are in the About tab: Keysight P9241/42/43A Oscilloscopes Startup Guide...
-
Page 19: Connecting The Oscilloscope
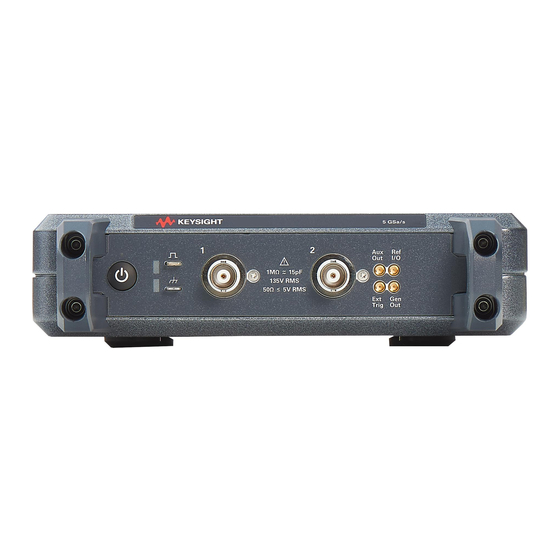
Keysight P9241/42/43A Oscilloscopes Startup Guide 5 Connecting the Oscilloscope Front Panel Features / 19 Cleaning the Instrument / 23 Front Panel Features This section describes the front panel features, that is, connectors and LEDs, for the P9241/42/43A oscilloscope. Auxiliary output WaveGen/Identify LED (trigger, mask, Probe Comp... -
Page 20: Led Operation
Connecting the Oscilloscope A voltage source should never be connected to the ground terminals of this WARNING instrument. If, for any reason, the Protective Conductor Terminal is disconnected or not functioning properly and a voltage source is connected to the equipment's ground terminals, the entire chassis will be at the voltage potential of the voltage source, and the operator or bystanders could receive an electric shock. -
Page 21: Maximum Voltage At Oscilloscope External Trigger Input
Connecting the Oscilloscope Ext Trig input Maximum voltage at oscilloscope external trigger input CAUTION 30 Vrms, 60 Vdc 1M ohm input: For steady-state sinusoidal waveforms derate at 20 dB/decade above 100 kHz to a minimum of 5 Vpk For information on using the Ext Trig input, see the Keysight P9241/42/43A Oscilloscopes Soft Front Panel (SFP) User's Guide. -
Page 22: Rear Panel Connectors
Connecting the Oscilloscope When used for the 10 MHz reference output signal, the amplitude is 5 Vpp into a high impedance or 2.5 Vpp into 50 Ohms. It is capable of driving into lower impedances, but the output will be reduced because of the 50 Ohm source impedance. -
Page 23: Cleaning The Instrument
Connecting the Oscilloscope A USB 3.0 (SuperSpeed) port on the host PC is required for connection to the P9241/42/43A N OTE oscilloscope. USB 2.0 ports will not work. Cleaning the Instrument Remove power from the instrument. Clean the external surfaces of the oscilloscope with a soft cloth dampened with a mixture of mild detergent and water. - Page 24 Connecting the Oscilloscope Keysight P9241/42/43A Oscilloscopes Startup Guide...
-
Page 25: Verify Operation
Keysight P9241/42/43A Oscilloscopes Startup Guide 6 Verify Operation Open the P924xA Oscilloscope Soft Front Panel (SFP) / 26 Run the Oscilloscope's Hardware Self Test / 28 If there are communications problems / 29 Power-On the Oscilloscope Power Line voltage, frequency, and power: Requirements •... -
Page 26: Open The P924Xa Oscilloscope Soft Front Panel (Sfp)
Verify Operation Press the power switch on the oscilloscope's front panel. The power switch is located on the left side of the front panel. The oscilloscope will perform a self-test and will be operational in a few seconds. Open the P924xA Oscilloscope Soft Front Panel (SFP) From the Windows operating system Start menu, choose Start >... -
Page 27: If The Oscilloscope Is Not Listed In Keysight Infiniivision Launcher
Verify Operation The Keysight InfiniiVision P924xA SFP has the same user interface as other standalone Keysight InfiniiVision oscilloscopes. If the oscilloscope is not listed in Keysight InfiniiVision Launcher If your P924xA oscilloscope is not recognized after being plugged into a USB port on your PC (that is, it does not show up in the Keysight InfiniiVision Launcher window): •... -
Page 28: Run The Oscilloscope's Hardware Self Test
Verify Operation Run the Oscilloscope's Hardware Self Test Keysight InfiniiVision P924xA SFP interface, click the top left blue menu icon, and choose Utilities > Service Menu. In the Service Menu, click Hardware Self Test. Keysight P9241/42/43A Oscilloscopes Startup Guide... -
Page 29: If There Are Communications Problems
Verify Operation Hardware Self Test performs a series of internal procedures to verify that the oscilloscope is operating properly. Successfully passing Hardware Self Test does not guarantee 100% of the oscilloscope's functionality. Hardware Self Test is designed to provide an 80% confidence level that the oscilloscope is operating properly. - Page 30 Verify Operation Keysight P9241/42/43A Oscilloscopes Startup Guide...
-
Page 31: Make A Measurement
Keysight P9241/42/43A Oscilloscopes Startup Guide 7 Make a Measurement Connect Probes to the Oscilloscope / 31 Input a Signal / 32 Using the Soft Front Panel (SFP) Interface / 32 Recall the Default Oscilloscope Setup / 33 Use Autoscale / 34 Compensate Passive Probes / 35 Turn On Measurements and Statistics / 36 Learn the Oscilloscope Display / 37... -
Page 32: Input A Signal
Make a Measurement Input a Signal The first signal to input to the oscilloscope is the Probe Comp signal. This signal is used for compensating probes. Connect an oscilloscope probe from channel 1 to the Probe Comp terminal on the front panel. Connect the probe's ground lead to the ground terminal (next to the Probe Comp terminal). -
Page 33: Select The User Interface Language
Make a Measurement Quick Help remains on the screen until you close the help dialog box or open another one. Select the User Interface Language Another benefit of having the same user interface as standalone InfiniiVision oscilloscopes is that you have a localized user interface and built-in quick help. To select the user interface language: Choose Main Menu >... -
Page 34: Use Autoscale
Make a Measurement Table 1 Default Configuration Settings Horizontal Normal mode, 100 µs/div scale, 0 s delay, center time reference. Vertical (Analog) Channel 1 on, 5 V/div scale, DC coupling, 0 V position, 1 MΩ impedance. Trigger Edge trigger, Auto trigger mode, 0 V level, channel 1 source, DC coupling, rising edge slope, 40 ns holdoff time. -
Page 35: Compensate Passive Probes
Make a Measurement If you want to return to the oscilloscope settings that existed before, click Undo Autoscale. If you want to enable "fast debug" autoscaling, change the channels autoscaled, or preserve the acquisition mode during autoscale, click Fast Debug, Channels, or Acq Mode. -
Page 36: Turn On Measurements And Statistics
Make a Measurement If necessary, use a nonmetallic tool (supplied with the probe) to adjust the trimmer capacitor on the probe for the flattest pulse possible. On N2894A probes, the trimmer capacitor is located on the probe BNC connector. Perfectly compensated Over compensated Under compensated Connect probes to all other oscilloscope channels (that is, channel 2 of a... -
Page 37: Learn The Oscilloscope Display
Make a Measurement Learn the Oscilloscope Display The oscilloscope display contains acquired waveforms, setup information, measurement results, and the softkey definitions. Keysight P9241/42/43A Oscilloscopes Startup Guide... - Page 38 Make a Measurement Analog channel Trigger point, Delay Time/ Run/Stop Trigger Trigger sensitivity time reference time status type source Trigger level Menu button Sidebar Status line information and controls area Trigger level Analog channels and ground levels Measurement Measurements statistics Menu line Cursors defining Softkey label...
- Page 39 Make a Measurement Menu line This line normally contains menu name or other information associated with the selected menu. Softkey labels These labels describe softkey functions. Typically, softkeys let you set up additional parameters for the selected mode or menu. At the top of the menu hierarchy, clicking the left-side up-arrow button turns off softkey labels and displays additional status information describing channel offset and other configuration parameters.
- Page 40 Make a Measurement Keysight P9241/42/43A Oscilloscopes Startup Guide...
-
Page 41: Applications Programming Interface (Api) Overview
Keysight P9241/42/43A Oscilloscopes Startup Guide 8 Applications Programming Interface (API) Overview IVI Drivers / 41 LabVIEW Driver / 42 SCPI Interface (P9241/42/43A Oscilloscope Only) / 42 Using the SFP and the Remote API at the Same Time / 45 When you have completed installation, you can use the oscilloscope Soft Front Panel (SFP) or program the instrument using the applications programming interface (API) for the supplied drivers. -
Page 42: Labview Driver
You can find the SCPI Programmer's Guide in these locations: • On the product CD. • On the website at: www.keysight.com/manuals/P9241A One quick way to test SCPI commands is by using the Interactive IO utility that comes with the Keysight IO Libraries Suite. -
Page 43: Launching Interactive Io From Connection Expert On The Host Pc
Applications Programming Interface (API) Overview Launching Interactive IO from Connection Expert on the Host PC The Interactive IO utility can be started on any controller PC that has the Keysight IO Libraries Suite installed. Typically, you click on the Keysight IO Control icon in the taskbar and choose Utilities >... - Page 44 Applications Programming Interface (API) Overview The oscilloscope appears under the LAN (TCPIP0) interface when the P9241/42/43A N OTE oscilloscope's driver is connected (see "Open the P924xA Oscilloscope Soft Front Panel (SFP)" on page 26). The oscilloscope also appears under the PXI (PXI0) interface, but trying to send SCPI commands through that interface gives an "Operation not supported"...
-
Page 45: Using The Sfp And The Remote Api At The Same Time
Applications Programming Interface (API) Overview To exit the Keysight Interactive IO application, choose Connect > Exit from the menu. Using the SFP and the Remote API at the Same Time In general, you can use the Soft Front Panel (SFP) and the remote applications programming interface (API) together, at the same time. -
Page 46: Sending A Device Clear To The Remote Interface
Applications Programming Interface (API) Overview Sending a Device Clear to the Remote Interface Every remote programming library gives you a way to send an IEEE 488.1-style Device Clear. For example, the IVI-COM library provides the System2.ClearIO method. Another easy way to send a Device Clear is through the IO Libraries Suite's Interactive IO application. - Page 47 Applications Programming Interface (API) Overview and the oscilloscope's PXI address is "PXI37::0::0::INSTR", the oscilloscope's HiSLIP address is "TCPIP0::10.112.93.141::hislip37-0.0::INSTR" (or "TCPIP0::lab-pxi-3.cos.is.keysight.com::hislip37-0.0::INSTR"). If you are running the Interactive IO application on the controller PC, you can use the "127.0.0.1" localhost IP address, for example, "TCPIP0::127.0.0.1::hislip37-0.0::INSTR".
- Page 48 Applications Programming Interface (API) Overview Keysight P9241/42/43A Oscilloscopes Startup Guide...
-
Page 49: Reference
Keysight P9241/42/43A Oscilloscopes Startup Guide 9 Reference Environmental Conditions / 49 Probes and Accessories / 50 Specifications and Characteristics / 50 Measurement Category / 50 Product Markings / 51 Environmental Conditions Environment Indoor use only. Weight 2.50 kg Dimensions 177 mm x 50 mm x 335 mm (W x H x D) Ambient Operating: 0 °C to +55 °C... -
Page 50: Probes And Accessories
Reference Probes and Accessories For a list of the probes and accessories that are compatible with the P9241/42/43A oscilloscopes, see the data sheet at: www.keysight.com/products/P9241A See Also For more information on probes and accessories, see www.keysight.com for: • Probes and Accessories Selection Guide (5989-6162EN) •... -
Page 51: Product Markings
Reference Measurement category II is for measurements performed on circuits directly connected to the low voltage installation. Examples are measurements on household appliances, portable tools and similar equipment. Measurement category III is for measurements performed in the building installation. Examples are measurements on distribution boards, circuit-breakers, wiring, including cables, bus-bars, junction boxes, switches, socket-outlets in the fixed installation, and equipment for industrial use and some other equipment, for example, stationary motors with permanent connection to the fixed installation. - Page 52 Reference Keysight P9241/42/43A Oscilloscopes Startup Guide...
- Page 53 Index Numerics display, status line, driver not connected, LED off, 10 MHz Ref I/O, Japanese user interface and Quick Help, English user interface and Quick Help, environmental characteristics, accessories, Keysight InfiniiVision Launcher, oscilloscope Ext Trig input, 19, airflow requirements, not listed in, altitude, Keysight Interactive IO application, API overview,...
- Page 54 Index passive probes, temperature, ambient, passive probes, compensating, Thai user interface and Quick Help, Polish user interface and Quick Help, Traditional Chinese user interface and Quick pollution degree, Help, pollution degree, definitions, training signals, Portuguese user interface and Quick Turkish user interface, Help, power consumption, power requirements,...
Need help?
Do you have a question about the P9241A and is the answer not in the manual?
Questions and answers