Premier Mounts CTM-MS1 Installation Instructions Manual
Tilting wall mount for 24? to 36? flat panels
Hide thumbs
Also See for CTM-MS1:
- Installation instructions manual (16 pages) ,
- Installation manual (10 pages) ,
- Specifications (2 pages)
Table of Contents
Advertisement
Quick Links
INSTALLATION INSTRUCTIONS
Tilting Wall Mount for 24˝ to 36˝ Flat Panels
NORTH AMERICA
1321 S. State College Blvd.
Fullerton, CA 92831 USA
USA and Canada
Phone: 1-800-368-9700
Fax: 1-800-832-4888
Other Locations
Phone: (001) 714-632-7100
Fax: (001) 714-632-1044
Model: CTM-MS1
Unit 3, The Moorings Business Park,
Channel Way, Longford,
Coventry, CV6 6RH, UK
Phone: +44 (0) 24 7664 4105
Fax: +44 (0) 24 7664 4165
9531-000-301-05
EUROPE
Advertisement
Table of Contents

Related Manuals for Premier Mounts CTM-MS1


Summary of Contents for Premier Mounts CTM-MS1
- Page 1 INSTALLATION INSTRUCTIONS Tilting Wall Mount for 24˝ to 36˝ Flat Panels Model: CTM-MS1 NORTH AMERICA EUROPE 1321 S. State College Blvd. Unit 3, The Moorings Business Park, Fullerton, CA 92831 USA Channel Way, Longford, USA and Canada Coventry, CV6 6RH, UK...
-
Page 2: Table Of Contents
PROPER SAFETY EQUIPMENT AND TOOLS FOR THE ASSEMBLY PROCEDURE TO PREVENT PERSONAL INJURY. PREMIER MOUNTS DOES NOT WARRANT AGAINST DAMAGE CAUSED BY THE USE OF ANY PREMIER MOUNTS PRODUCT FOR PURPOSES OTHER THAN THOSE FOR WHICH IT WAS DESIGNED OR DAMAGE CAUSED BY... -
Page 3: Installation Tools
Phillips Head Screwdriver Parts List Your Premier Mounts product is shipped with all proper installation hardware and components. Make sure that none of these parts are missing and/or damaged before beginning installation. If there are parts missing and/or damaged, please stop the installation and contact Premier Mounts at 1-800-368-9700. -
Page 4: Mounting Hardware
Nylon Spacers and Flat Washers You may stack the nylon spacers to achieve proper spacing. ˝ ½˝ Nylon Spacer (Large) Flat Washer (Metal) ¼˝ Nylon Spacer (Small) (Qty 6) (Qty 6) (Qty 6) Page 4 Installation Instructions Visit the Premier Mounts website at http://www.mounts.com... -
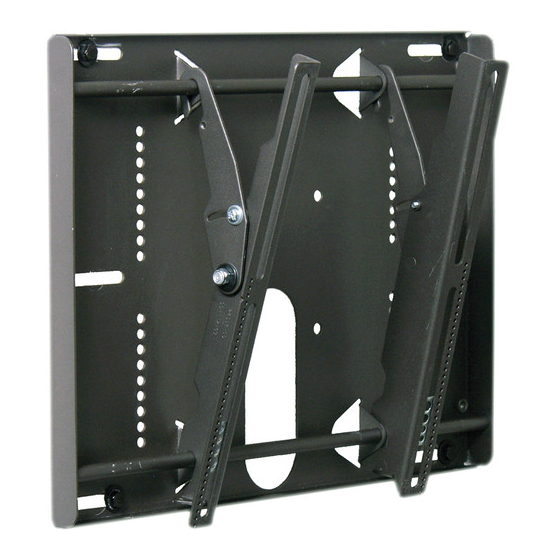
Page 5: Features
Mounting Rails Locking Safety Screws Allow lateral adjustments when mounting the flat panel. Prevent the flat panel from being removed or dislodged from the wall plate. Installation Instructions Page 5 Visit the Premier Mounts website at http://www.mounts.com... -
Page 6: Installing The Wall Plate
CTM-MS1 Installing the Wall Plate Introduction Directional Mounting Arrow The Directional Mounting Arrow stamped into the CTM-MS1 wall plate indicates which edge is the top. Mounting Safety Two people are recommended to install the wall plate. You must secure the wall plate to two (2) wall studs with six (6) lag bolts (3 lag bolts for each stud found). - Page 7 Do not overtighten the lag bolts when attaching the mount to the wall. Improper installation may result in personal injury or property damage. Proceed to the “Installing the Mounting Bracket” on page 8. Installation Instructions Page 7 Visit the Premier Mounts website at http://www.mounts.com...
-
Page 8: Installing The Mounting Brackets
Go to “Griplate™ Washer Installation” on page 9. Small Straw or Toothpick Small Straw Depth Plus 1/8” Allowance Small Straw Depth Plus 1/8” Allowance or Toothpick or Toothpick Mark Mark Page 8 Installation Instructions Visit the Premier Mounts website at http://www.mounts.com... -
Page 9: Griplate™ Washer Installation
Nylon Spacer Installation Flat Panel Premier Mounts’ nylon spacers allow you to attach the mounting bracket to flat panels which have recessed or uneven mounting points. Each nylon spacer will add distance between the mounting bracket and the flat panel. -
Page 10: Attaching The Mounting Brackets To The Flat Panel
Raise the flat panel past the top and bottom mounting rails on the wall panel. Slide the flat panel down slowly, keeping it close to the wall. Engage the top and bottom mounting brackets to the rails of the wall plate. Page 10 Installation Instructions Visit the Premier Mounts website at http://www.mounts.com... -
Page 11: Safety Knurl Knob Installation
Repeat to attach the remaining Panelock™. M6 x 12mm Security Head Proceed to “Tilt Adjustment” on Page 12. Screw Security Head Wrench Panelock™ Hook Security Head Wrench Installation Instructions Page 11 Visit the Premier Mounts website at http://www.mounts.com... -
Page 12: Locking Safety Screw Installation
Using the upper hand, gently push the top of the flat panel towards the wall while the lower hand gently pulls the bottom of the flat panel away from the wall. Page 12 Installation Instructions Visit the Premier Mounts website at http://www.mounts.com... -
Page 13: Technical Specifications
CTM-MS1 Technical Specifications All measurements are in inches [millimeters]. Installation Instructions Page 13 Visit the Premier Mounts website at http://www.mounts.com... -
Page 14: Warranty
Disclaimer Premier Mounts intends to make this manual accurate and complete. However, Premier Mounts makes no claim that the information contained herein covers all details, conditions or variations, nor does it provide for every possible contingency in connection with the installation or use of this product. The information contained in this document is subject to change without notice or obligation of any kind.
Need help?
Do you have a question about the CTM-MS1 and is the answer not in the manual?
Questions and answers