Premier Mounts CTM-MS1 Installation Manual
Tilting mount for flat-panels
Hide thumbs
Also See for CTM-MS1:
- Installation instructions manual (16 pages) ,
- Specifications (2 pages) ,
- Brochure & specs (2 pages)

Related Manuals for Premier Mounts CTM-MS1


Summary of Contents for Premier Mounts CTM-MS1
- Page 1 CTM-MS1 Installation Guide Tilting Mount for Flat-Panels premiermounts.com | p. 800.368.9700 | e. orders@premiermounts.com 500 W Central Ave, Suite A, Brea, CA 92821 USA...
- Page 2 LES SUPPORTS PREMIER MOUNTS NE GARANTISSENT PAS CONTRE LES DOMMAGES CAUSÉS PAR L’USAGE DU PRODUIT DE MONTAGE PREMIER MOUNTS À D’AUTRES FINS QUE CELLES POUR LESQUELLES IL A ÉTÉ CONÇU OU DES DOMMAGES CAUSÉS PAR DES ACCESSOIRES OU DES MODIFICATIONS NON AUTORISÉS, ET NOUS NE POUVONS PAS ÊTRE TENUS RESPONSABLES DES DOMMAGES, PLAINTES, RÉCLAMATIONS, POURSUITES, ACTIONS OU CAUSES D’ACTION DE N’IMPORTE...
-
Page 3: Included Components
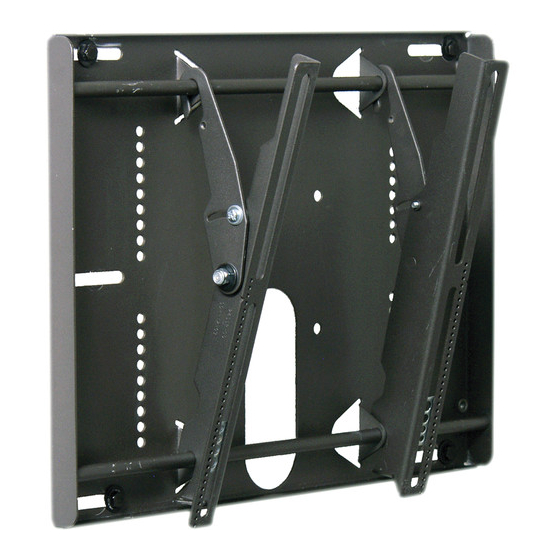
CTM-MS1 Installation Guide Included Components Wall Mount Bracket (Qty 1) (Qty 1 Pair) 5/16” Flat Washers Universal Spacers M6 Safety Knob Thread Depth Indicator Universal Washers (Qty 4) (Qty 8) (Qty 2) (Qty 1) (Qty 4) Finned Anchor 5/16” x 3” Lag Bolts... -
Page 4: Wood Stud Installation
CTM-MS1 Installation Guide Introduction Directional Mounting Arrow The Directional Mounting Arrow stamped into the CTM-MS1 wall plate indicates which edge is the top. Mounting Safety Two people are recommended for this step Il est requis deux personnes pour cette étape. - Page 5 CTM-MS1 Installation Guide Place the wall plate against the wall and align it with the pilot hole. Insert one (1) 5/16"x 3˝ lag bolt and one (1) 5/16" washer into the upper right pilot hole. Use a socket wrench and a 1/2" socket to tighten the lag bolt.
- Page 6 CTM-MS1 Installation Guide Concrete Installation Two people are recommended for this step: one person to level the wall plate and another person to mark the mounting locations. Il est recommandé deux personnes pour cette étape : une personne pour niveler la sablière et une autre personne pour marquer les emplacements de montage.
-
Page 7: Selecting The Mounting Hardware
Mark Mark Universal Washer Installation Premier Mounts’ Universal Washers are designed to accommodate the The Universal Washer must be installed between the head of the mounting screw and the mounting bracket as shown. premiermounts.com | p. 800.368.9700 | e. orders@premiermounts.com... -
Page 8: Universal Spacer Installation
CTM-MS1 Installation Guide Universal Spacer Installation Premier Mounts’ Universal Spacers allow you to attach the mounting bracket Mounting Screw panel. Universal Washer The Universal Spacers must be stacked and oriented as shown. Mounting Bracket The Universal Spacers must only be installed between the mounting... - Page 9 The Panelock™ is a theft deterrent device. It comes with security hardware that requires a special tool that is used to install and remove the security head screws. dislodged from the CTM-MS1. Les boutons de molette de sécurité maintiennent le panneau plat d'être accidentellement délogé du CTM-MS1.
-
Page 10: Locking Safety Screw Installation
Panelock™ Security Head Wrench Locking Safety Screw Installation dislodged from the CTM-MS1. Les boutons de molette de sécurité maintiennent le panneau plat d'être accidentellement délogé du CTM-MS1. M6 x 30mm Thread an M6 x 30mm locking safety screw at the bottom of one of the Locking Safety Screw mounting brackets.
Need help?
Do you have a question about the CTM-MS1 and is the answer not in the manual?
Questions and answers