Table of Contents
Advertisement
Quick Links
Advertisement
Table of Contents
Troubleshooting

Related Manuals for Fischer Panda AGT 6000 PVMV-N


Summary of Contents for Fischer Panda AGT 6000 PVMV-N
- Page 1 Panda AGT 6000 PVMV-N Super silent technology 24V / 6kW Fischer Panda GmbH...
-
Page 2: Current Revison Status
Duplication and change of the manual is permitted only in consultation with the manufacturer! Fischer Panda GmbH, 33104 Paderborn, reserves all rights regarding text and graphics. Details are given to the best of our knowledge. No liability is accepted for correctness. Technical modifications for improving the product without previous notice may be undertaken without notice. -
Page 3: Table Of Contents
B.5 Voltage Control System - see VCS datasheet ............. 48 B.6 The Battery Monitor - see battery monitor datasheet ..........49 B.7 The fan control - see fan control datasheet ..............49 B.8 Insulation test ......................... 50 8.4.08 AGT 6000 PVMV-N 12V_24V.R01 - Table of contents Page 1... - Page 4 Safety instructions for the voltage control ................ 103 Battery monitor in DIN-tracks housing (RE9517) ............105 A.1 Safety instructions ....................... 105 A.2 Brief description ......................106 A.3 Function ......................... 106 Page 2 AGT 6000 PVMV-N 12V_24V.R01 - Table of contents 8.4.08...
- Page 5 A.4 Technical data and settings ..................106 A.5 Additional products ..................... 107 Intelligent stepless automatic controller for DC-fan ..........109 A.1 Brief desciption ......................110 A.1.1 Function ........................... 110 A.1.2 Master - Slave - Operation ....................111 A.1.3 Function of the clamps for the Master-Slave-Operation ..........112 A.1.4 Remote controlled switching on and off of the fan controller ...........
- Page 7 3500 kW from the main machine) Fischer Panda GmbH, 33104 Paderborn, reserves all rights regarding text and graphics. Details are given to the best of our knowledge. No liability is accepted for correct- ness. Technical modifications for improving the product without previous notice may be undertaken without notice. Before installation, it must be ensured that the Pictures,...
-
Page 8: Safety First
Safety first These symbols are used throughout this manual and on labels on the maschine itself to warn of the possibility of per- sonal injutry. Read these instructions carefully. It is essential that you read the instructions and safety regulations before you attempt to assemble or use unit. -
Page 9: Tools
Tools This symbols are used throughout this manual to show which tool must be used at maintenance or installation. Spanners X = number of spanner Hook wrench for oil filter Screw driver, for slotted head screws and for recessed head screws Multimeter, multimeter with capacitor measuring Infrared temperature mesuring pistol Current clamp (DC for synchron generators;... - Page 10 Socket wrench set Hexagon wrench keys...
- Page 11 2. The installation certificate must be despatched within two weeks of use to Fischer Panda. 3. The official guaranty confirmation will be completed by Fischer Panda after receipt and sent to the customer. 4. A guaranty must be shown to make any claims.
-
Page 12: Safety Precautions
Safety Precautions The electrical Installations may only be carried out be trained and tested personnel! The generator may not be taken into use with the cover removed. The rotating parts (belt-pulley, belts, etc) must be so covered and protected do that there is no danger to life and body! If a sound insulation covering must be produced at the place of installation, then well-placed signs must show that the generator can only be switched on with a closed capsule. - Page 13 CAUTION! The AGT-generator is not allowed to be connected to an inverter (without batteries)! The Inverter generates voltage peaks, which can destroy the rectifier rectifiers of the generator! A battery must always be connected to the inverter as a capacity! ≥...
- Page 14 Measures to the fire protection. All construction units in the environment of energized parts, which carry more than 50 Amp., must be fire protection- moderately secured. All junction points at the energized parts must be examined regularly on heating up (infrared thermometers). Safety Instrictions for the Handling with Batteries These instructions must be noticed additionally to the instructions of the battery manufacturer: •...
-
Page 15: Safety Steps To Follow If Someone Is The Victim Of Electrical Shock
5 Safety steps to follow if someone is the victim of electrical shock Do not try to pull or grab the individual. Send for help as soon as possible. If possible, turn off the electrical power. If you cannot turn off the electrical power, pull, push, or lift the person to safety using a wooden pole, rope, or some nonconductive material. -
Page 16: When An Adult Stops Breathing
WHEN AN ADULT STOPS BREATHING WARNING DO NOT attempt to perform the rescue breathing techniques provided on this page, unless certified. Performance of these techniques by uncertified personnel could result in further injury or death to the victim. Does the Person Respond? Shout, "Help!"... -
Page 17: The Panda Generator
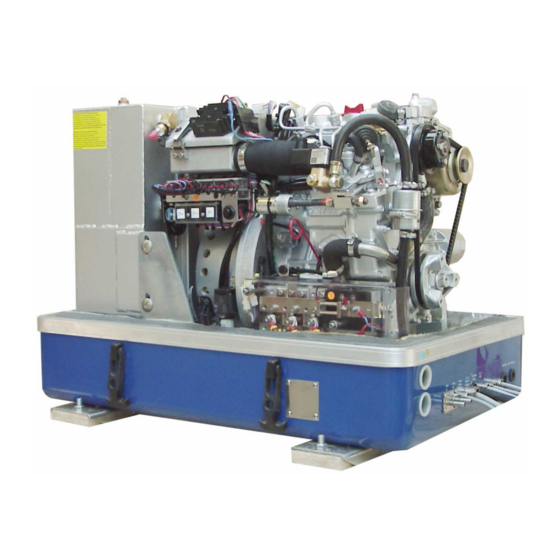
The Panda Generator A. The Panda Generator A.1 Type plate at the Generator Fig. A.1-1: Type plate Fig. A.1-2: Discription type plate AGT 6000 PVMV-N 12V_24V - Chapter A: The Panda Generator Page 15... -
Page 18: Description Of The Genset
14. Coolant output (to radiator) 07. Coolant hose for external expansion tank 15. Exhaust output 08. Water-cooled pre-silencer 16. Connection external expansion tank Fig. A.2.1-1: Right side view Page 16 AGT 6000 PVMV-N 12V_24V - Chapter A: The Panda Generator... -
Page 19: Left Side View
08. Fuel solenoid valve 18. Water-cooled diode plate 09. Pulley for internal cooling water pump and alternator 19. Fuel filter 10. Electrical fuses (blue=15A, white=25A) Fig. A.2.2-1: Left side view AGT 6000 PVMV-N 12V_24V - Chapter A: The Panda Generator Page 17... -
Page 20: Front View
10. Fuel output 22. Ventilation screw thermostat housing 11. Cable for fuel pump 23. Ventilation screw cooling water pump 12. Cable for remote control panel Fig. A.2.3-1: Front view Page 18 AGT 6000 PVMV-N 12V_24V - Chapter A: The Panda Generator... -
Page 21: View From Back Side
A.2.4 View from back side 01. Coolant hose for external expansion tank 03. Connection external expansion tank 02. Exhaust output 04. Water-cooled pre-silencer Fig. A.2.4-1: Back side view AGT 6000 PVMV-N 12V_24V - Chapter A: The Panda Generator Page 19... -
Page 22: View From Above
07. Ventilation screw thermostat housing 16. Ventilation screw cooling water pump 08. Ventilation screw pre-silencer 17. Engine oil filler neck 09. Thermoswitch at silencer Fig. A.2.5-1: Top view Page 20 AGT 6000 PVMV-N 12V_24V - Chapter A: The Panda Generator... -
Page 23: Detailed Views Of The Operation Units
The cooling water connection block cooles the diode plate. The cooling water connec- tion block consists of an aluminium alloy, which can behave like a sacrificial anode. Fig. A.3.2-2: Coolant connection block AGT 6000 PVMV-N 12V_24V - Chapter A: The Panda Generator Page 21... - Page 24 Ventilation screw thermostat housing The ventilation screw on the thermostat housing should occasionally be opened for control purposes. Standing machinery should principally carry out ventilating. Fig. A.3.2-5: Ventilation screw thermostat housing Page 22 AGT 6000 PVMV-N 12V_24V - Chapter A: The Panda Generator...
- Page 25 Fig. A.3.2-6: Water-cooled exhaust elbow Coolant pipe Coolant pipe from water-cooled exhaust silencer to the water-cooled pre-silencer. Fig. A.3.2-7: Coolant pipe Water-cooled pre-silencer Fig. A.3.2-8: Water-cooled pre-silencer AGT 6000 PVMV-N 12V_24V - Chapter A: The Panda Generator Page 23...
- Page 26 Fig. A.3.2-10: return flow expansion tank Schlauchanschlussstutzen für externes Aus- gleichsgefäß The external expansion tank is connected here. Fig. A.3.2-11: Connection external expansion tank Page 24 AGT 6000 PVMV-N 12V_24V - Chapter A: The Panda Generator...
-
Page 27: Components Of The Fuel System
Fig. A.3.3-1: External fuel pump 01. Fuel intake 02. Fuel output Fig. A.3.3-2: Fuel connections AGT 6000 PVMV-N 12V_24V - Chapter A: The Panda Generator Page 25... - Page 28 Fig. A.3.3-4: Fuel solenoid valve Injection nozzles If the engine does not start after the venti- lation, the fuel injection lines must be deaerated individually. Fig. A.3.3-5: Injection nozzles Page 26 AGT 6000 PVMV-N 12V_24V - Chapter A: The Panda Generator...
-
Page 29: Components Of The Combustion Air
(mini- mum distance 150 mm) Fig. A.3.4-1: Combustion air intake AGT 6000 PVMV-N 12V_24V - Chapter A: The Panda Generator Page 27... - Page 30 The air filter must be chek- ked, if this hose pulls together at operation. Fig. A.3.4-4: Combustion chamber intake elbow Page 28 AGT 6000 PVMV-N 12V_24V - Chapter A: The Panda Generator...
- Page 31 This part is because of the internal con- struction elastic and comensates vibrati- ons. Fig. A.3.4-6: Compensator under heat isolation Exhaust output Connect here a muffler. Fig. A.3.4-7: Exhaust output AGT 6000 PVMV-N 12V_24V - Chapter A: The Panda Generator Page 29...
-
Page 32: Components Of The Electrical System
2. Solenoid switch The Diesel engine is electrically started. On the back of the engine is accordingly the electrical starter with the solenoid switch. Fig. A.3.5-3: Starter motor Page 30 AGT 6000 PVMV-N 12V_24V - Chapter A: The Panda Generator... - Page 33 Fig. A.3.5-5: Speed sensor Stop solenoid for Motorstop Not at every genset; interrupts the fuel flow by activating the stop lever. Fig. A.3.5-6: Stop solenoid AGT 6000 PVMV-N 12V_24V - Chapter A: The Panda Generator Page 31...
- Page 34 The voltage regulator may not be covered from the outside. The surface must be accessible for the cooling. Fig. A.3.5-8: Charge control Diode plate Fig. A.3.5-9: Diode plate Page 32 AGT 6000 PVMV-N 12V_24V - Chapter A: The Panda Generator...
- Page 35 K3 relay for fuel pump Fig. A.3.5-10: Termianl block Time relay for stop solenoid Fig. A.3.5-11: Time relay for stop solenoid Electric starter control unit Fig. A.3.5-12: Electric starter control unit AGT 6000 PVMV-N 12V_24V - Chapter A: The Panda Generator Page 33...
-
Page 36: Sensors And Switches For Operating Surveillance
Fig. A.3.6-1: Thermoswitch at cylinder head Thermoswitch at exhaust elbow Fig. A.3.6-2: Thermoswitch at exhaust elbow Thermoswitch at silencer The coolant gets here the highest value. Fig. A.3.6-3: Thermoswitch at silencer Page 34 AGT 6000 PVMV-N 12V_24V - Chapter A: The Panda Generator... - Page 37 For the protection of the generator coil there are two thermo-switches inside the coil, which are for inserted parallel and safety's sake independently from each other. Fig. A.3.6-6: Thermoswitch coil AGT 6000 PVMV-N 12V_24V - Chapter A: The Panda Generator Page 35...
-
Page 38: Components Of The Oil Circuit
At the dipstick the permissible level is indi- cated by the markings "maximum" and "minimum". The engine oil should be never filled up beyond the maximum conditions. Fig. A.3.7-2: Oil dipstick Page 36 AGT 6000 PVMV-N 12V_24V - Chapter A: The Panda Generator... - Page 39 If this is not possible, an electrical oil drain pump must be installed. Note: Lubricating oil should be drained in the warm condition! Fig. A.3.7-4: Oil drain hose AGT 6000 PVMV-N 12V_24V - Chapter A: The Panda Generator Page 37...
-
Page 40: Externe Komponenten
The control printed board controls the signals which are given for the actuator for speed regulation. On the VCS board are also adjustment possibilities for the control parameters. Fig. A.3.8-2: VCS Page 38 AGT 6000 PVMV-N 12V_24V - Chapter A: The Panda Generator... -
Page 41: Operating Instructions
Tips regarding Starter Battery Fischer Panda recommends normal starter battery use. If an aggregate is required for extreme winter conditions, then the starter battery capacity should be doubled. It is recommended that the starter battery be regularly charged by a suitable battery-charging device (i.e., at least every 2 Months). -
Page 42: Daily Routine Checks Before Starting
Removing a cable end from the monitoring switch carries out this control test. The generator should then automat- ically switch off. Please adhere to the inspection timetable (see Checklist in the appendix). Page 40 AGT 6000 PVMV-N 12V_24V - Chapter A: The Panda Generator... -
Page 43: Starting Generator
3. Press „OFF“ button and switch off the generator. 4. Activate additonal switches (Battery switch, fuel stop valve etc.). AGT 6000 PVMV-N 12V_24V - Chapter A: The Panda Generator Page 41... -
Page 44: Starting The Generator By A „Failure Bypass Switch
(or even no voltage) since the stator windings do not have the chance to reach full excitation. Electrical units which are switched on in this condition could possibly be damaged (special caution should be practised with electric motors to avoid burnout). Page 42 AGT 6000 PVMV-N 12V_24V - Chapter A: The Panda Generator... -
Page 45: Installation Instructions
04. Connection fuel output 10. Cable for measuring voltage 05. Cable fuel pump (2x1,5mm²) 11. Battery minus (-) 06. Cable remote control panel (12x1mm²) 12. Battery plus (+) Fig. B.1.2-1: Connections AGT 6000 PVMV-N 12V_24V - Chapter B: Installation Instructions Page 43... -
Page 46: Fuel System Installation
The external electrical fuel pump is to be installed in the proximity of the tank. Connection of the fuel system 1. Generator 4. External fuel filter 2. Non return valve 5. Fuel tank 3. External fuel pump Fig. B.1.3-1: Fuel connection - Schema Page 44 AGT 6000 PVMV-N 12V_24V - Chapter B: Installation Instructions... -
Page 47: Generator Dc System-Installation
7. Starter battery 12V 3. Battery monitor 8. Fuse 4. Fuel pump 9. Battery switch 5. Remote control panel Fig. B.2.1-1: Installation Panda AGT 12 V System - Schema AGT 6000 PVMV-N 12V_24V - Chapter B: Installation Instructions Page 45... -
Page 48: Installation Panda Agt 24 V-System - Optional
7. Starter battery 12V 3. Battery monitor 8. Fuse 4. Fuel pump 9. Battery switch 5. Remote control panel Fig. B.2.2-1: Installation Panda AGT 24 V System - Schema Page 46 AGT 6000 PVMV-N 12V_24V - Chapter B: Installation Instructions... -
Page 49: Connection To Starter Battery-Block
If there is an automatic starting requirement and if the remote control panel is switched off, then this automatic starting requirement is ignored. Automatic starting is only possible if after switching on of the remote control panel the automatic starting requirement takes place. AGT 6000 PVMV-N 12V_24V - Chapter B: Installation Instructions Page 47... -
Page 50: Voltage Control System - See Vcs Datasheet
By the voltage drop between generator and battery the accurate voltage can only recieved direct at the battery. A false link can lead to damage the battery! Page 48 AGT 6000 PVMV-N 12V_24V - Chapter B: Installation Instructions... -
Page 51: The Battery Monitor - See Battery Monitor Datasheet
J1 open : Fan control only working if current flows to connection „ON”. The solder bridge J1 is located directly behind the circuit board fuse when viewed from the main connection. AGT 6000 PVMV-N 12V_24V - Chapter B: Installation Instructions Page 49... -
Page 52: Insulation Test
The relay has to be meet the required safety standard regulations. Page 50 AGT 6000 PVMV-N 12V_24V - Chapter B: Installation Instructions... - Page 53 Once the system has been installed and inspected, this test should also be performed with all electrical devices (i.e. voltage check bet- ween common and metallic housings) while the generator is running. AGT 6000 PVMV-N 12V_24V - Chapter B: Installation Instructions Page 51...
-
Page 54: Connection Of The External Radiator
The cooling system can also be assembled together with a normal commercial vehicle radiator. B.9.1 Connection of the external radiator 1. Generator 2. Radiatorr Fig. B.9.1-1: ERadiator connection - Schema Page 52 AGT 6000 PVMV-N 12V_24V - Chapter B: Installation Instructions... - Page 55 It should, however, be pointed out that the radia- tor possesses high safety levels. Tthe radiator is often manufactured too small. Fischer Panda also has various radiators available (for horizontal and vertical installation) as standard generator components.
- Page 56 The best result is achieved if the radiator is fitted vertically on the vehicle roof. Possible positioning of the external radiator 1. Radiator on the roof 3. Radiator under the vehicle 2. Radiator vertical Page 54 AGT 6000 PVMV-N 12V_24V - Chapter B: Installation Instructions...
- Page 57 Panda 12 - 20 kW ....Ø25mm (1") Panda 25 - 30 kW ....Ø32mm (1¼") Panda 40 - 50 kW ....Ø38mm (1½") Panda 50 - 60 kW ....Ø44mm (1¾") AGT 6000 PVMV-N 12V_24V - Chapter B: Installation Instructions Page 55...
- Page 58 (i.e. T-piece). Frequently a connection is provied on the radiator its- elf. The coolant expansion tank is not normally supplied by Fischer Panda. For this a standard vehicle expansion tank is the most suitable. Vehicle accessory range is the most suitable.
- Page 59 (see next page). In case of doubt, you should send a diagram of the required coolant system to Fischer Panda and let this be checked there.
- Page 60 2. Cooling water outlet It does not matter at which place the measurement is made. T-pieces for hose elements can be obtained from Fischer Panda into which the usual trade sensors can be installed. Monitoring of temperature: 1. Temperature at the cylinder head 2.
- Page 61 5. Vehicle combustion engine 2. Water-cooled pre-silencer 6. Vehicle radiator 3. Combustion motor 7. Fan for radiator 4. Coolant expansion tank Fig. B.9.1-3: Connection of the Generator to the Vehicle Cooling System AGT 6000 PVMV-N 12V_24V - Chapter B: Installation Instructions Page 59...
- Page 62 Fischer Panda will not accept any liability, if further units (i.e. vehicle motor) are damaged, when a part of the generator cooling system itself breaks down.
- Page 63 Decisive for the success of this procedure is that sufficient water enters to internal coolant pump, so that the coolant pump can function. The coolant pump cannot draw water as long as there is air in the casing. AGT 6000 PVMV-N 12V_24V - Chapter B: Installation Instructions Page 61...
- Page 64 09. Bucket with submerged pump 04. Ventilation screw 10. Water-cooled pre-silencer 05. Fan for radiator 11. Internal cooling water pump 06. Radiator Fig. B.9.1-4: Installation diagram for vertical radiator Page 62 AGT 6000 PVMV-N 12V_24V - Chapter B: Installation Instructions...
- Page 65 05. Dry silencer 12. Fan for radiator 06. Exhaust outlet 13. Bucket with submerged pump 07. Pipe with connection for Thermoswitch Fig. B.9.1-5: Installation diagram for underneath the vehicle AGT 6000 PVMV-N 12V_24V - Chapter B: Installation Instructions Page 63...
- Page 66 4. T-piece for Ventilation pipe 2. Radiator (horizontal) 5. External cooling water pump 3. Coolant expansion tank (integrated) 6. Bucket with submerged pump Fig. B.9.1-6: Installation diagram for radiator on the roof Page 64 AGT 6000 PVMV-N 12V_24V - Chapter B: Installation Instructions...
- Page 67 5. Exhaust output 2. Coolant expansion tank 6. Special air separartor 3. T-piece for coolant expabsion tank 7. Radiator 4. Water-cooled pre-silencer Fig. B.9.1-7: Installation diagram with special air separator AGT 6000 PVMV-N 12V_24V - Chapter B: Installation Instructions Page 65...
-
Page 68: Exhaust Installation
5. Shock absorber 2. Exhaust port 6. Connection pipe 3. Compensator 7. External silencer 4. External pre-silencer 8. Exhaust pipe Fig. B.10-2: Exhaust connection for mounting below the vehicle Page 66 AGT 6000 PVMV-N 12V_24V - Chapter B: Installation Instructions... -
Page 69: Maintenance Instructions
Page 99 An oil drainage hose is fitted in the sound cover for changing the oil. This is fed through the capsule to the outside. Fig. C.2-1: Oil drainage hose AGT 6000 PVMV-N 12V_24V - Chapter C: Maintenance Instructions Page 67... - Page 70 Afterwards the oil drain screw is closed again. Fig. C.2-3: Oil drain pump Oil filter change The oil filter can be loosen with an oil filter strap. Fig. C.2-4: Oil filter Page 68 AGT 6000 PVMV-N 12V_24V - Chapter C: Maintenance Instructions...
- Page 71 With the help of the engine oil dipstick the oil level is to examined. The prescribed fil- ling level may not exceed the „Max“ mar- king. We recommend 2/3 oil level. Fig. C.2-7: Oil dip stick AGT 6000 PVMV-N 12V_24V - Chapter C: Maintenance Instructions Page 69...
-
Page 72: De-Aerating The Fuel System
Now stop pushing the failure bypass switch. Fig. C.3-2: Fuel stop solonoid Page 70 AGT 6000 PVMV-N 12V_24V - Chapter C: Maintenance Instructions... - Page 73 The arrow on the filter housing indicates the direction of the fuel flow. A clogged filter causes a decreased power output of the generator. Fig. C.3-1: Fuel filter AGT 6000 PVMV-N 12V_24V - Chapter C: Maintenance Instructions Page 71...
-
Page 74: Ventilation Of The Coolant Circuit
This ventilation process has to be rerun- ned several times. Open ventilation screw at the internal coo- ling water pump. Fig. C.4-1: Ventilation screw Open ventilation screw at the thermostat housing. Fig. C.4-2: ventilation screw Page 72 AGT 6000 PVMV-N 12V_24V - Chapter C: Maintenance Instructions... - Page 75 The generator should operate up to 60 Seconds. Switch generator OFF. Open coolant filler cap again and the bleed screw at the same time. Pour in coolant again Fig. C.4-5: Cooling water filler neck AGT 6000 PVMV-N 12V_24V - Chapter C: Maintenance Instructions Page 73...
- Page 76 Fig. C.4-6: External expansion tank C.5 Exchange the air filter Open the closure at the housing front side. Fig. C.5-1: Air filter Page 74 AGT 6000 PVMV-N 12V_24V - Chapter C: Maintenance Instructions...
- Page 77 Therefore the control is needed in an inter- val of 100 operating hours. The v-belt ia a wearing part. It should be enough spare v-belts on board. We suggest to stand by the according service-packet. AGT 6000 PVMV-N 12V_24V - Chapter C: Maintenance Instructions Page 75...
- Page 78 10mm with the thumb. Tighten the fixing screws above and below the return pulley. Fig. C.1: V-Belt For all maintenance and service requirements see the checklist in the „Installation Inspec- tions“. Page 76 AGT 6000 PVMV-N 12V_24V - Chapter C: Maintenance Instructions...
-
Page 79: Generator Failure
100% if it is properly designed. If the inductive load (i.e. E-Motor) is more than 20% of the generator nominal power, a compensation is necessary. See also the information brochure "Special information for operation of Panda generators with inductive load". AGT 6000 PVMV-N 12V_24V - Chapter D: Generator Failure Page 77... -
Page 80: Automatic Voltage Monitoring And Auto-Shut Down
04. Spindle nut with rev regulator lever 05. Regulating nuts min. revolution Fig. D.1.2-1: Actuator During any operation at the generator all consumers have to be switched off to avoid damages at the equipments. Page 78 AGT 6000 PVMV-N 12V_24V - Chapter D: Generator Failure... -
Page 81: Adjustment Of The Maximum Upper Revolution
5V above the normal operating border. 01. Countering nut 02. Adjusting screw for upper limitation 03. Speed regulator lever This adjustment should not be chan- ged, otherwise the warranty expires. Fig. D.1.3-1: revolution AGT 6000 PVMV-N 12V_24V - Chapter D: Generator Failure Page 79... -
Page 82: Adjustment Of The Normal Rev Limitation
01. Adjusting nut for upper rev limitation 02. Adjusting nut for bottom rev limitation Fig. D.1.4-1: Normal rev setup If the adjustment is finished the plug of the actuator must be re-connect for operation. Page 80 AGT 6000 PVMV-N 12V_24V - Chapter D: Generator Failure... -
Page 83: Lubrication Of The Spiral Thread Spindle
Then the actuator has to be changed. Check firstly the electrical fuse on the control printed circuit board if the actuator will not turn at all. AGT 6000 PVMV-N 12V_24V - Chapter D: Generator Failure Page 81... - Page 84 4. If the motor reacts strongly to the manual turn (the motor can’t normally hold with the fingers) the drive will be working correctly. If the voltage control works faulty anyway there is a fault in the control VCS. Page 82 AGT 6000 PVMV-N 12V_24V - Chapter D: Generator Failure...
-
Page 85: Low Generator Output Voltage
If the generator does not produce any voltage while the diesel drive engine is running, the suspected cause lies outside the generator capsule. • electrical load not switched off prior to start • short circuit somewhere in electrical system • electrical overload AGT 6000 PVMV-N 12V_24V - Chapter D: Generator Failure Page 83... -
Page 86: Testing Generator Stator Windings
If this is not possible, the stator can be rewound by a qualified tradesper- son/technician. Winding diagrams can be obtained from Fischer Panda GmbH, Germany. This test, unfortunately, is carried out at very low voltage (9V) when a normal multimeter is used. - Page 87 Resistance measure between different windings. If the value is in the Giga ohm area, the coil is correct. If you find any anormality, when doing this test, please ask your Fischer Panda dealer. If strong deviations are measured in the individual coil windings, there is a coil short-cut in one coil.
-
Page 88: Measuring The Coil Inductive Resistance
2. All electrical wires in the power terminal box must be disconnected. 3. Reconnect the battery connections. 4. Start the generator. 5. Measure the voltages between the following terminals and compare for symmetry: U1-U2, V1-V2, W1-W2 Page 86 AGT 6000 PVMV-N 12V_24V - Chapter D: Generator Failure... -
Page 89: Starting Problems
The position is held by the stop solenoid as long as the generator is running. 01. Fuel solenoid valve 02. Fuel injector nozzles 03. Ventilation screw Fig. D.3.1-1: Fuel solonoid valve AGT 6000 PVMV-N 12V_24V - Chapter D: Generator Failure Page 87... -
Page 90: Failure Bypass Switch
This can last for several hours in certain cir- cumstances, since the generator is enclosed in a sound-insulated casing, which prevents heat loss. Failure bypass switch Fig. D.3.2-1: Failure bypass switch Page 88 AGT 6000 PVMV-N 12V_24V - Chapter D: Generator Failure... -
Page 91: Troubleshooting Table
Should the overheating alarm be set off, caused by heat accumulation, after the generator has been switched off, then this can also be bypassed using the switch. D.4 Troubleshooting Table Table E.3, “Troubleshooting,” on Page 94 For Troubleshooting see AGT 6000 PVMV-N 12V_24V - Chapter D: Generator Failure Page 89... - Page 92 Generator Failure Page 90 AGT 6000 PVMV-N 12V_24V - Chapter D: Generator Failure...
-
Page 93: Appendix
Engine speed (rpm) or frequency (Hz) Change of the fuel filter Change of the air filter Cooler fan under load at bridged temperature sensor/ temperature switch Uptake of the ambient temperature AGT 6000 PVMV-N 12V_24V - Chapter E: Appendix Page 91... -
Page 94: Operating Resources
The second letter is for the quality of the oil. The more highly the letter in the alphabet, the better the C für Diesel- motoren. Examples for diesel engine oil: API CC Engine oil for small demands API CG Engine oil for highest demands, turbo-tested Fischer Panda recommend the API-class CF ! Page 92 AGT 6000 PVMV-N 12V_24V - Chapter E: Appendix... -
Page 95: Coolant Specification
Use a mixture of water and antifreeze. The antifreeze needs to be suitable for aluminium. The antifreeze concen- tration must be regularly checked in the interests of safety. Fischer Panda recommend to use the product: GLYSANTIN PROTECT PLUS/G 48 Engine coolant automotive industry Product description Product name GLYSANTIN ®... -
Page 96: Troubleshooting
The voltage of full batteries fall to a maximum of 11V. The wiring is severed if the voltage does not drop. The battery is discharged if the voltage drops further. Page 94 AGT 6000 PVMV-N 12V_24V - Chapter E: Appendix... - Page 97 Have the centrifugal governor inspected by a Kubota- Service technician. Too much air in fuel lines. Bleed air from fuel system. DROP IN THE SPEED OF THE MOTOR Cause Solution Too much oil. Drain oil. AGT 6000 PVMV-N 12V_24V - Chapter E: Appendix Page 95...
- Page 98 Solution Generator is overloaded. Check electrical load and switch off unnecessary con- sumers. Insufficient intake air. Check intake air filter; clean if necessary. Fuel injector nozzles faulty. Replace injector nozzles. Page 96 AGT 6000 PVMV-N 12V_24V - Chapter E: Appendix...
- Page 99 If the VCS electronics are faulty, the generator can still run by over-riding the system. To override the VCS, dis- connect the plug and jumper the contacts. Loosen the connecting rods motor from the injection pump regulator and turn screw to a max. voltage of 33V. AGT 6000 PVMV-N 12V_24V - Chapter E: Appendix Page 97...
- Page 100 Appendix Page 98 AGT 6000 PVMV-N 12V_24V - Chapter E: Appendix...
-
Page 101: Technical Data Engine
Permanent output power 6 kW , 3000mtr alt., 50°C Output voltage 24 V Output current 200 A Frequency 2800 UpM Stator Da 240 mm Stator Di 170 mm Rotor Lfe 40 mm AGT 6000 PVMV-N 12V_24V - Chapter E: Page 99... -
Page 102: Capsule Measurements
E.6 Capsule Measurements Page 100 AGT 6000 PVMV-N 12V_24V - Chapter E:... -
Page 103: Vcs-Agt-U/I
VCS-AGT-U/I Fischer Panda Datasheet A. VCS-AGT-U/I A.1 VCS-AGT-U/I Versions Art. Nr. Set point Art. Name F1RORE9627-012-212 VCS-AGT-U/I 12V= @60mV F1RORE9627-024-212 VCS-AGT-U/I 24V= @60mV F1RORE9627-036 VCS-AGT-U/I 36V= @60mV F1RORE9627-048 VCS-AGT-U/I 48V= @60mV F1RORE9627-012-212 VCS-AGT-U/I 72V= @60mV F1RORE9627-012-212 VCS-AGT-U/I 80V= @60mV auf Anfrage / on request... -
Page 104: Gerneral Working Of The Vcs
VCS-AGT-U/I Fischer Panda Datasheet 1. Clamp 9/10 2. Potentiometer for the Current The VCS control is used for the adjustment of the number of revolutions of the engine and thus the voltage of the generator. It belongs to the accessories and is externally attached. -
Page 105: Safety Instructions For The Voltage Control
VCS-AGT-U/I Fischer Panda Datasheet A.2.2 Safety instructions for the voltage control -A broken Cable in the mesurement line will be notice by the VCS and the generator will slow down and stop. -A short circiut in the mesurement line or a wrong pol connection is not noticed by the VCS (its like that there is no voltage). - Page 106 VCS-AGT-U/I Fischer Panda Datasheet blank Page 104 - Chapter A: VCS-AGT-U/I VCS-AGT-UI_eng.fm...
-
Page 107: Battery Monitor In Din-Tracks Housing (Re9517)
Battery monitor in DIN-tracks housing (RE9517) Fischer Panda Datenblatt/Datasheet Battery monitor in DIN-tracks housing (RE9517) Art Nr. see technical data Bez. Batterymonitor Document Hardware Software Actual: Rev.2.0_05.06.2007 Rev.1.2_24.02.2004 Replace: Rev.1.0_24.02.2004 Rev.1.2_24.02.2004 Replaced by: -------------------------- -------------------------- -------------------------- Fig. A.1: Battery monitor A.1 Safety instructions... -
Page 108: Brief Description
Battery monitor in DIN-tracks housing (RE9517) Fischer Panda Datenblatt/Datasheet A.2 Brief description Automatic monitoring of a battery voltage. If the adjusted threshold for battery undervoltage is fallen below, then (e.g. over the AGT panel RE9513) a battery charge generator is started. If the adjusted threshold for charge voltage is crossed, then the generator - at expiration of an adjustable deceleration time - is stopped. -
Page 109: Additional Products
The cable connection between battery monitor and control panel must be implemented as twisted or shielded cable. A.5 Additional products Relay switch RE0003 for Batterymonitor Fischer Panda Art.No.: F1RORE0003 Ad-on for the Batterymonitor RE9517 (with transistor out) to get a Relayswitch If the Batterymonitor recognice Bat-Low (LED turn on) the Relay switch close. - Page 110 Battery monitor in DIN-tracks housing (RE9517) Fischer Panda Datenblatt/Datasheet Seite/Page 108 - Kapitel/Chapter A: Battery monitor in DIN-tracks housing (RE9517) Anleitung_RE9517_eng.fm...
-
Page 111: Intelligent Stepless Automatic Controller For Dc-Fan
Intelligent stepless automatic controller for DC-fan Fischer Panda Datenblatt/Datasheet A. Intelligent stepless automatic controller for DC-fan Art Nr. F1RORE0201V11 Bez. Intelligent stepless automatic controller for DC-fan Document Hardware Software Actual: Rev.2.1_23.04.2007 Replace: Rev.01_07.04.2004 -------------------------- -------------------------- 23.04.2007: New layout of the Datasheet RE0201_V1_UserDoc_r10_eng.fm... -
Page 112: Brief Desciption
Intelligent stepless automatic controller for DC-fan Fischer Panda Datenblatt/Datasheet A.1 Brief desciption Temperature-dependent continuous speed controlling device for one or two DC-fans. A.1.1 Function The speed regulation of the fan is made by pulse tracing modulation (PWM) of the operating voltage. Pulse/no pulse ratio becomes over an external temperature sensor (NTC resistance to attach at clamp 7 and 8) dependent on the coolant temperature. -
Page 113: Master - Slave - Operation
Intelligent stepless automatic controller for DC-fan Fischer Panda Datenblatt/Datasheet intern: Over this temperature sensor the temperature of the output stage is colleted. If the tempera- ture of the output stage rises over 85° C, the PWM r atio, independently of the coolant tempera- ture, is set to 100%, in order to avoid the switching losses and cool the output stage down again. -
Page 114: Function Of The Clamps For The Master-Slave-Operation
Intelligent stepless automatic controller for DC-fan Fischer Panda Datenblatt/Datasheet A.1.3 Function of the clamps for the Master-Slave-Operation Clamp 11+12: Control input for slave operation. Clamp 11 is the positive input. Clamp 12 is the negative input. The input is floating, so that via this input connected fan controllers of the same source can be supplied, without a ground loop develops. -
Page 115: 24V - Operation
Intelligent stepless automatic controller for DC-fan Fischer Panda Datenblatt/Datasheet A.1.5 12V / 24V - Operation For 12V and/or 24V-operation the pre-resistor for the operating voltage of control electronics must be adapted. This pre-resistor consists of two resistances, which are connected in series. For 12V-operation one of these resi- stances is short circuit with the solder joint J102. - Page 116 Intelligent stepless automatic controller for DC-fan Fischer Panda Datenblatt/Datasheet nominal load operating voltage (continuity) 18 VDC - 28.0 VDC load operating voltage (15min) - 28.8 VDC maximum load operating voltage (3 sec) 30 VDC idle speed voltage (continuity) 34 VDC...
- Page 117 Intelligent stepless automatic controller for DC-fan Fischer Panda Datenblatt/Datasheet Configuration at delivery for 24V-operation: - solder joint J101 closed - solder joint J102 open - main fuse 30A installed - output fuse 20A installed For 12V-operation the installed fuses must be exchanged against the provided fuses, as described above.
- Page 118 Intelligent stepless automatic controller for DC-fan Fischer Panda Datenblatt/Datasheet Seite/Page 116 - Kapitel/Chapter A: Intelligent stepless automatic controller for DC-fan RE0201_V1_UserDoc_r10_eng.fm...
-
Page 119: Remote Control Panda 6-50
Remote Control Panda 6-50 Fischer Panda Datasheet A. Remote Control Panda 6-50 Art Nr. F1WT1-95E730 Bez. Remote Control Panel for Panda 6-50 Dokument Hardware Software Aktuell: R02 02.07.2007 -------------------------- Replace: R1 15.05.07 -------------------------- Fig. A.0-1: Remote control panel F1WT1-95E730 Panda 6-50 Fernbedienpanel_eng.fm... -
Page 120: Cleaning And Replacement Of Parts At The Generator
Remote Control Panda 6-50 Fischer Panda Datasheet A.1 Cleaning and replacement of parts at the generator The battery must always be disconnected, if work on the generator or electrical system is to be carried out, so that the generator cannot be unintentionally started. -
Page 121: Operation Instructions
Remote Control Panda 6-50 Fischer Panda Datasheet Automatic Start Option An automatic start option is available as an accessory. This includes a separate control board, which is connected to the main remote control board panel. The Automatic Start Option allows the generator to be started by means of an external signal (i.e Battery Monitor). -
Page 122: Daily Routine Checks Before Starting
Remote Control Panda 6-50 Fischer Panda Datasheet A.3.2 Daily routine checks before starting 1. Oil level control (ideal level: 2/3 of maximum level) AtTTENTION! OIL PRESSURE CONTROL! True, the diesel motor automatically switches off when there is a lack of oil, but it is very damaging for the motor, if the oil level drops to the lowest limit. -
Page 123: Starting Generator
Remote Control Panda 6-50 Fischer Panda Datasheet A.3.3 Starting Generator 1. If necessary, open the fuel valve. 2. If necessary, close the main battery switch. 3. Check if all the load has been switched off. The load is switched off, before the generator is switched off. The generator is not to be started with load connected. If necessary, the main switch or fuse should be switched off or the load should be individually switched off. -
Page 124: Stopping The Generator
Remote Control Panda 6-50 Fischer Panda Datasheet A.3.4 Stopping the Generator 1. Switch off load. 2. If the load is higher than 70% of the nominal load, the generator temperatures should be stabilised by swit- ching off the load for at least 5 minutes. -
Page 125: Installation Of The Remote Control Panel
The generator switches on again after the contact has opened. A starter safeguard lock is absolutely necessary for operating the automatic feature. This can either be an integral part, or the complete component can be ordered from Fischer Panda GmbH. - Page 126 Remote Control Panda 6-50 Fischer Panda Datasheet Automatic Feature Assembly The following elements are necessary to operate the automatic feature: - Standard remote control panel - Board with electronic control - Rev sensor - Starter safeguard lock Should a starter safeguard lock have already been installed, then it simply suffices to fit the automatic feature to the remote control panel.
-
Page 127: Mounting Of The Circuit Board On The Remote Control Panel
Remote Control Panda 6-50 Fischer Panda Datasheet A.3.9 Mounting of the circuit board on the remote control panel 1. Standard plug on the remote control panel 2. Standard socket on the automatic feature 3. Screw connections for contact Fig. A.3.9-1: Mounting automatic start kit Important information! The generator can only be re-started after 45 sec., if... -
Page 128: The Speed Sensor
Remote Control Panda 6-50 Fischer Panda Datasheet A.3.10 The speed sensor Speed sensor mounting hole example Panda 8000 Fig. A.3.10-1: Speed sensor Installation of the speed sensor The speed sensor tip must have between 0.3 to 0.8mm of clearance (air gap) from the gear tooth tips. In order to achieve this clearance: the speed sensor tip should be aligned with the tip of a gear tooth and screwed in until it touches the tip of the tooth. -
Page 129: Requirement For Automatic Start
A.5 Slave panel and automatik start togther - optional To use the automatik start option together with the Slave Panel option, you must use the Combo adapter board Fischer Panda Art. Nr. 21.02.02.01H. It is the combinied adapter board of both options. -
Page 130: Wiring Diagrams
Remote Control Panda 6-50 Fischer Panda Datasheet A.6 Wiring diagrams Fig. A.6-1: Wiring diagram Seite/Page 128 - Kapitel/Chapter A: Remote Control Panda 6-50 F1WT1-95E730 Panda 6-50 Fernbedienpanel_eng.fm... - Page 131 Remote Control Panda 6-50 Fischer Panda Datasheet Fig. A.6-2: Wiring diagram F1WT1-95E730 Panda 6-50 Fernbedienpanel_eng.fm Kapitel/ChapterA: Remote Control Panda 6-50 - Seite/Page 129...
- Page 132 Remote Control Panda 6-50 Fischer Panda Datasheet Intentionally Blank Seite/Page 130 - Kapitel/Chapter A: Remote Control Panda 6-50 F1WT1-95E730 Panda 6-50 Fernbedienpanel_eng.fm...
Need help?
Do you have a question about the AGT 6000 PVMV-N and is the answer not in the manual?
Questions and answers