Table of Contents
Advertisement
Quick Links
Clean Water Made Easy
www.cleanwaterstore.com
Terminator Iron Filter Installation & Start-Up Guide
For Terminator Iron Filters with Fleck 2510 Control Valve & 8x44 Air Tank with Honeywell Air Vent
Thank you for purchasing a Clean Water System! With proper installation and a little routine maintenance
your system will be providing iron free water for many years.
Please review this start-up guide entirely before beginning to install your system and follow the steps
outlined for best results.
TERMINATOR FILTER MEDIA CONTAINS DUST.
USE PAPER MASK AND VENTILATE TO AVOID BREATHING DUST.
Questions?
Call us toll-free: 1-888-600-5426 or 1-831-462-8500
Email us:
support@cleanwaterstore.com
See more information on our website:
www.cleanwaterstore.com/resources
Advertisement
Table of Contents

Related Manuals for Clean Water Systems Terminator


Summary of Contents for Clean Water Systems Terminator
- Page 1 Terminator Iron Filter Installation & Start-Up Guide For Terminator Iron Filters with Fleck 2510 Control Valve & 8x44 Air Tank with Honeywell Air Vent Thank you for purchasing a Clean Water System! With proper installation and a little routine maintenance your system will be providing iron free water for many years.
-
Page 2: Table Of Contents
Fig 6 Fleck 2510 Timer ........................10 Maintaining Your Terminator iron filter System ....................13 Troubleshooting the Fleck 2510 Terminator iron filter ..................14 What to Do If Your Filter Tank Does Not Sit Level on the Floor ............. 15... -
Page 3: Packing List
Air mix tank 8” x 44” Waterite “Micronizer” Air injector – blue 1” inlet and outlet Media funnel 12 lbs Gravel Cubic Feet of Terminator Media - (Birm & Filter Ag) 1.5 Cubic Foot Terminator Description Fleck 2510 Backwash Control Valve Pipe connector kit (either 1”or ¾”) -
Page 4: Pre-Installation
3. Make sure there is a working gate or ball valve before the Fleck 2510 Terminator iron filter and also one after as shown in the diagram Fig 1. The pressure gauges are optional and perhaps not necessary but a hose bib (which is a faucet that you can attach a garden hose to) is strongly recommended after the Terminator iron filter before the second ball valve. -
Page 5: How Your Terminator Works
Terminator Iron Filter Installation & Startup Guide How Your Terminator Works Fig 1 – Piping Flow Diagram Page 5 www.cleanwaterstore.com Rev 042414... -
Page 6: The Waterite W-988 Air Injector
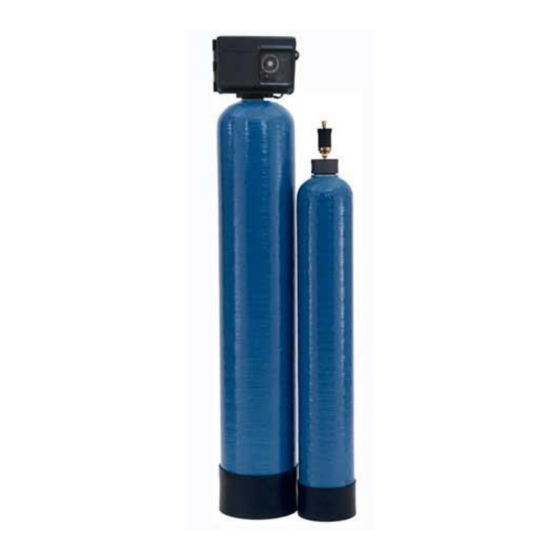
3. Iron filter tank with Fleck 2510 auto-backwash control valve The Waterite W-988 Air Injector - This is the standard air injector included with all Terminator systems. This plastic air injector features plumbing connections of the 1” Male Threads and a flow range for effective air draw of 3.8-16 gallons per minute. -
Page 7: Fig 4 Iron Filter Tank
The air injection allows the Terminator filter media to remove iron by increasing the dissolved oxygen content of the water and converting the iron to a form that can be filtered out by the Terminator filter media. Fig 4 Iron Filter Tank... -
Page 8: Assembly And Installation Instructions
You do not want gravel or filter media to go down the distributor tube. 2. Add filter gravel supplied first, using the funnel sent with the Terminator iron filter. Do not allow any parts of the media bag or other foreign material to enter tank when adding media. -
Page 9: Fig 5
Terminator Iron Filter Installation & Startup Guide pipe-joint compound, Teflon tape, or Vaseline or other petroleum greases to lubricate tank threads. Please Note: When installing Fleck 2510 backwash control-timer valve on to the top of the filter tank, do not over-tighten. Tighten by hand. -
Page 10: Fig 6 Fleck 2510 Timer
It is OK to run the drain line up and over the Fleck 2510 Terminator iron filter up to 4 feet above the top of the tank. If the drain line will be more than 20 feet, use larger diameter tubing such as ¾”... - Page 11 Terminator Iron Filter Installation & Startup Guide Page 11 www.cleanwaterstore.com Rev 042414...
- Page 12 18. There should be no media coming out of the drain line, but the water will be black or dirty looking. At this point the Terminator iron filter will be in a backwash mode, which is the first of two cycles it goes through during backwash (also called regeneration”).
-
Page 13: Maintaining Your Terminator Iron Filter System
Every 3 – 5 years the Terminator media can be removed and replaced. This is easily done by putting the filter on bypass, removing the control valve, and laying the tank on its side. Using a garden hose, flush out the media on a tarp, clean the tank and refill with new media. -
Page 14: Troubleshooting The Fleck 2510 Terminator Iron Filter
One problem that may occur is if you do not have enough backwash flow rate to properly clean the Terminator iron filter. You can verify the backwash flow rate by running the drain line into a bucket and timing it when the Fleck 2510 is in Cycle 1 or backwash. -
Page 15: What To Do If Your Filter Tank Does Not Sit Level On The Floor
Terminator Iron Filter Installation & Startup Guide What to Do If Your Filter Tank Does Not Sit Level on the Floor Your black filter tank base is not glued to the bottom of your tank. Occasionally tank bases will become crooked during shipment.
Need help?
Do you have a question about the Terminator and is the answer not in the manual?
Questions and answers