
Related Manuals for AES Prime 6E


Summary of Contents for AES Prime 6E
- Page 1 ..PROFESSIONAL INSTALL ONLY.. Do NOT give this manual to the end user / home owner 6E Module Manual Scan the QR code below to install the INSTALLER App P a g e...
-
Page 2: Table Of Contents
Contents …………….Pg 3 Overview of System …………….Pg 3 Site Survey …………….Pg 3 SIM card …………….Pg 3 Power …………….Pg 4 Installation …………….Pg 4 Architectural & Hooded panels …………….Pg 4 Flush Panels …………….Pg 4 Inserting the SIM card …………….Pg 5 Call Station and Power Connections …………….Pg 5 Main External Connections …………….Pg 6... -
Page 3: Overview Of System
Overview of System Please read this entire manual before attempting to install this system. This system should only be installed by a professional automatic gate installer or access control specialist dealer. It is recommended that the system be set up, configured, commissioned and tested on a workshop bench before taken to site for installation. -
Page 4: Architectural & Hooded Panels
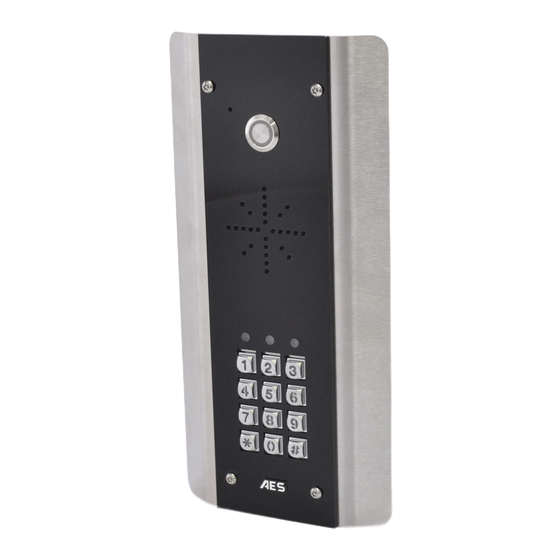
Architectural & Hooded Panels Loosen top 2 screws only Hinge front door Side View Flush Panels Call Button Optional keypad module Remove Side View Flush with surface Tip: Use appropriate fixings to ensure the intercom cannot be removed from the wall. Inserting the SIM card Please ensure the SIM card is a 2G compatible Micro SIM card. -
Page 5: Call Station And Power Connections
Call Station and Power Connections Call Station Use Screened CAT5 for audio & + - + - connect screen wire to 0V! +12v +24V +24v DC IN 0v DC IN Slave IN KPAD/PROX Module Main External Connections Separate Other power device, e.g. -
Page 6: Connecting Of Slave Devices
Other External Connections Exit Button Limit Switch input Connecting of Slave Devices CAT5 (10m max) Optional Slave 100m if device powered separately Keypad 1 2 3 24v Optional To next Keypad device 1 2 3 24v 1 2 3 24v To next device Optional... -
Page 7: Powering Up
Powering Up Perform a final check of wiring and ensure the antenna is connected before switching on the power. Once the power is switched on, the power LED should illuminate. TIPS: My GSM LED is still searching… Power LED -Check the SIM card is registered and can make a GSM LED call in a phone. -
Page 8: Installing Programmers App For First Time
Installing the Programmer APP for the first time 1. For android or apple devices you can download the AES programming app called “Cellcom Prime Programmer” (or scan QR code below). 2. Open the app and allow all permissions (Android users). -
Page 9: Programming A Brand New Install
Programming a Brand-New Install Press SETTINGS to reveal the screen shown. This screen will store details for the client. Enter name or site name for customer. Enter INTERCOM SIM phone number. Default Engineer’s and user`s pass codes. These can be changed later. Now you are ready to begin programming! Programming an EXISTING Install 1.Go to MORE>CLIENT LIST to reveal the screen shown. -
Page 10: Programming
Programming Now that you have either entered a new client, or selected an existing client from the client list, you are now ready to begin programming. Step 1: Check Reception Go to MORE>INFO & press the reception check button. On Android the app will automatically send a SMS string (*20#) to the intercom. -
Page 11: Programming Dial Out Numbers
Step2: Programming Numbers for the intercom to call on button press. 1.Press the SINGLE home icon for a 1 button system, or MULTI for a 10 button system. 2. Simply enter cell phone numbers and/or landline phones which the intercom is to call when the call button is pressed. (10 button model please enter button number). -
Page 12: Program Caller Id Numbers
Step3: Programming Caller ID access numbers (100 max). 1.Press the CALLER ID button. 2. Simply enter cell phone numbers of visitors whom should have access with caller ID (up to 8 at a time). 3. Press SAVE. Note: iphone users will be taken to their SMS screen to confirm the SMS string (press send). -
Page 13: Programming Additional Features
Programming Additional Features The intercom should now be able to call users and have some basic Caller ID access. Now you may wish to program additional features for the client, including keypad codes, dialling times (to avoid voicemail on un-answered calls, auto-trigger times etc. Avoid voicemail Mic &... -
Page 14: Volumes
1.Volumes Adjust speaker and microphone volumes. Enter required level (1-9) for optimum speech. TIP: Set as low as possible for good acoustics. Default = 5 Press SAVE. TIP: Iphone users will be taken to SMS screen to confirm message. Android devices will automatically send the SMS. -
Page 15: Service Calls
3.Service Calls This feature is normally only used on intercoms which are seldom used and only for SIM cards which are likely to be de-activated by the network due to inactivity. It can be programmed to make a chargeable outgoing call or SMS to a number of your choice using this screen. - Page 16 SIGNAL STRENTH Will reply with signal range 1-31 Should be higher than 10. STORED NUMBERS O=Dial out number. I=Dial IN Caller ID number. STORED CODES NORM=Permanent codes. TEMP=Temporary codes. PLAN=Time restricted codes. RELAY STATUS OPEN – Shows status of the input terminals called STATUS on the intercom, can be used with a limit switch.
-
Page 17: Pass Codes
5. Pass Codes CAUTION: Take care when changing pass codes. There are 2 levels of 4-digit code (both must be different): 1. Engineers/Programmers code (default 9999) 2. Access/user code (default 1234) You may wish to change both from their defaults for security. Restore the app to using default codes (does not restore the intercom) Enter new programmers code (default 9999) -
Page 18: Notifications
7.Notifications This feature is commonly used to allow one home user to receive SMS alerts each time the INTERCOM is used to trigger the gates and grant access. Quick Enable / disable this feature Enter the phone number to receive the SMS alert and press SAVE Enter text which you want the user to receive when access is granted, then press SAVE... - Page 19 Permanent Keypad Code Stores up to 200 codes, all of which can be used to gain access 24/7. Enter 4 digit code Choose Relay 1 or Relay 2 Enter activation time. (0-9999 seconds) Use 1 second for gate trigger. Use approx. 5 secs for magnetic locks. Use 0 for latching or toggle code.
- Page 20 Temporary Code Stores up to 30 codes at any time which will auto expire after a pre-set countdown time (1-168 hours) (Relay 1 only) Enter 4 digit code Enter countdown time in hours (1-168 hrs) SMS String for temporary code: 9999#82#hours#code# 4 digit code Pass code...
-
Page 21: Auto Relay Trigger Times
9. Auto Relay Trigger Times Create up to 40 automatic time clock events to trigger or latch/unlatch gates (depending on gate system setup). For auto closing gates, send latch command at the desired opening time, followed by a separate unlatch event to close at the desired closing time. -
Page 22: Client List On Android
10. Client list on android The client list allows you to save sim phone number, customer name and pass codes for all your installs. Press & HOLD to select Client Press to save changes Press to load details & begin programming On any previous install, you can load the customer and then re- program their intercom. -
Page 23: Daylight Saving
11b. Daylight Saving For regions where there is a 1 hour time shift for daylight saving, it can be useful to have the intercom send itself a SMS every set number of days to re-synchronise the internal clock. The intercom will do this anyway each time a SMS is received. -
Page 24: After Hours / Out Of Hours
12b. After Hours / Out of Hours If you have activated the do not disturb feature, the push button will not call anyone after the pre-set time threshold. However, sometimes it is useful to have the intercom call a different number after hours. For example, in commercial premises it can call the office phones during business hours, and then call a security guard after hours. -
Page 25: Proximity Card & Tag Programming
13. Programming Proximity Cards Select which unit you have Up to 200 Prox cards or (2G/3G OR 4G) tags (2G/3G board) or 500 cards or tags (4G board) Time restricted Prox cards or tags (20) Temporary Prox cards or tags (30) Delete cards or tags 13a. - Page 26 13b. Time Restricted card/tag Add up to 20 cards or tags for time restricted access for certain times or days of the week (relay 1 only). 1.Enter serial number of card (last 6 digits). 2.Enter start time (24hr format, no colon or spaces) 3.
- Page 27 13d. Deleting cards This screen allows any known card ID to be deleted (by serial number), and it will also show the last stored cards for each type of card. Delete the last stored temporary card. Delete the last stored time restricted card. Delete any known card ID.
-
Page 28: Complete List Of Parameters
Complete list of parameters The table below show the complete list of features. Changing pass codes 9999#01????# Change programming password 9999 Change access control password (SMS control of relays, or 9999#02????# non-stored numbers can call intercom & enter code to 1234 activate output 1). - Page 29 9999# Delete caller ID number. 73number# 9999#73*# Delete all caller ID numbers Service & diagnostic messages (no passcode required for some of these!) *20# Check reception level 1-31 (no passcode needed) Check stored numbers. O = dial out number. I = dial in *21# number.
- Page 30 1234*X# Delete ALL automatic trigger times. Clock Sync - Auto Time Calibration after Power Fail 9999#86XXX# X=telephone number of SIM inside the intercom. 9999#86*# Delete the phone number. Summer Daylight Auto Correct ?? = number of days between SMS calibration SMS should 9999#87??# be sent.
-
Page 31: Troubleshooting
Troubleshooting Please see faults in order of most common… 1: Not detecting network (blue light flashing 5 times in search mode, no green CPU light). A: SIM card not detected. Power off, remove, clean sim contacts and re-insert and power on again. -
Page 32: Change History
Change History Key: P = Panel version H = Hardware PCB version S = Software version Version Reason for change First version. Power chip upgraded to work on 24v dc (24v adaptor in kits). Software feature added for call log to show last 25 caller ID calls. Main capacitor, regulator &... - Page 33 P a g e | 33...
- Page 34 EU-RED Declaration of Conformity Manufacturer: Advanced Electronic Solutions Global Ltd Address: Unit 4C, Kilcronagh Business Park, Cookstown, Co Tyrone, BT809HJ, United Kingdom We/I declare, that the following equipment (GSM Cellular Intercom System), part numbers: Multiple Model kit part numbers: GSM-5AB, GSM-5ABK, GSM-5HB, GSM-5HBK, GSM-5IMP, GSM-5IMPK, GSM-FB, GSM-5FBK. Complies with the following essential requirements for 2014/53/EU: ETSI draft EN 301 489-1 V2.1.1 (2017-02) (Electromagnetic compatibility) ETSI draft EN 301 489-52 (2016-11) (Electromagnetic compatibility, specific to cellular)
Need help?
Do you have a question about the Prime 6E and is the answer not in the manual?
Questions and answers