Advertisement
Quick Links
1200 keypad manual
Installation
Side View
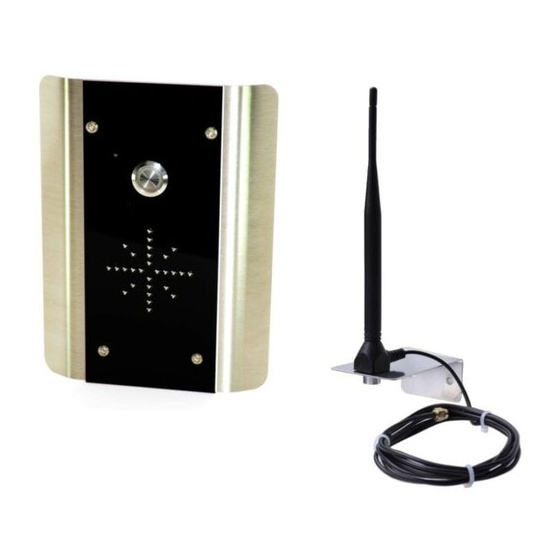
Speech
Unit
Keep antenna high as
possible, and above
electronics + audio
4-5 feet
equipment to
Entrance
minimum
eliminate interference
Pillar
IMPORTANT:
Do NOT drill
Intercom
holes in the top
or near the top
Transmitter
of the enclosure.
Do NOT use
GSM 800
silicone
sealants!
Keep short as possible, 8 meters max
Wiring
Antenna connector.
Finger tighten only!
Relay 1
Press
*
Momentary
# Latch
1 Unlatch
Relay 2
Press
7 Momentary
8 Latch
9 Unlatch
Gate Status
Reset
Button
PWR
-
IN
+
Solid core of shield connected to 0V on
PCB above for better audio quality.
12v or 15v
d.c. ONLY
NOTE:
Power supply must be less
than 2 meters away.
Installing SIM card
Before installing SIM card, switch
been registered, activated, and has some calling credit. Check it works in a
mobile phone first. Ensure it has the pin code request disabled, and is a
GSM SIM card operating on 850 / 900 / 1800 or 1900 MHz.
IMPORTANT:
The SIM card holder is FRAGILE.
Do NOT force. Do NOT use a
screwdriver.
Please allow 20-30 seconds for the unit to boot up and detect the network.
Once successful connection has been made, the unit will sound a
confirmation tone and the status LED will begin flashing. If there is a fault or
problem, the unit will emit a series of bleeps or warning tones.
Installation Manual
GSM-800/AB Wireless GSM Intercom System
Fig.1.
Rear View
Transmitter
Module
to gate panel
Fig.2.
Remove only
the top screws
for access.
The front plate
is hinged and
will open
downwards.
Button 2
12v out
4
+
-
6
8
SPK
vol
-
+
Button8
Button7
Button6
Tamper
N/C
OUT3
+ -
12-24v
OUT1 OUT2
dc
OFF POWER,
ensure that the card has
WARNING:
Installing or removing the SIM card
without first switching off the power will
cause damage to this unit!
for
Programming
Programming is carried out by sending SMS texts to the unit.
Antenna
1) First check reception. Send the following SMS to the unit... *20#
The unit should reply SIGNAL LEVEL = ?
Where ? will be between 1 and 31
Below 14 can cause problems with relay
operation, or no voice from the gate to the
house. Take action to improve reception.
2) Program the numbers you wish the unit to dial when the call button is
pressed, up to a maximum of 3 numbers. Each SMS must start with the pass
code, default 1234, in the following format *12*1234#, followed immediately
by a command. E.g to program the telephone number 987654321, enter the
following SMS..
*12*1234#111987654321#
Pass code
Function code
Note: If using more than 1 button panels, further dialling out numbers can be
programmed as follows.. With this format being used up to 8 buttons.
Button 1
Button 2..
121 = Telephone number 1
3
122 = Telephone number 2
123 = Telephone number 3
5
3) It is recommended to change the "no answer" time if there is more than 1
7
number stored. This stops the unit ringing a number after a set time, and
can be used to prevent voicemail answering the call. Send the following
ac/dc
SMS..
12v
+ -
*12*1234#52??#
Single
button
Caller ID access control Programming
The unit can allow up to 100 telephone numbers to be stored, for users to
be able to ring the system for automatic entry. This uses caller ID like a
Shield can be
phone to determine the identity of the caller. When a recognised number
connected to
chassis
calls the unit, it will trigger output 1 or 2 and hang up without answering
the call.
INT Lock
First, the unit must know what country it is operating in.
O/P1 inhib
1) Program the country code as follows..
Sense
(-)GND
DU out
*12*1234#71??#
N/O
K or A
COM
N/C
2) Enter the telephone numbers required to have access control. Do not
enter country code, just the complete number as you would dial it, as
follows..
Programming telephone number 987654321 to have access by caller ID...
*12*1234#
Pass code
Function code
USA customers – For some networks, you may need to enter the numbers with the long distance 1
before area code, then the number. Try with and without this to see which method works for your
network.
E.g. 1-702-555-1234
Please note: Even if the unit has been programmed to dial out to a number, and you also
want this number to have access by caller ID, then you must also enter it again under the 72
feature as described above.
Up to 3 numbers can be sent together in a single SMS as
follows..
*12*1234#111tel.number1#112tel.number2#113tel.number3#
111 = Telephone number 1
Data
112 = Telephone number 2
113 = Telephone number 3
Button 3..
131 = Telephone number 1
132 = Telephone number 2
133 = Telephone number 3
(?? can be 2 digits from 10-99 seconds, default is 20).
Where ?? can be 1-3 digits long. For USA, enter 1 as the country
code. For UK, enter 44 and so on. Do not use any leading zeros.
Up to 3 numbers can be sent together in the same SMS.
72
1
987654321#
Just add 72 then the number of the relay,1 or 2, then the
phone number followed by # each time. The pass code
only needs to be put at the beginning of each new
Data
message.
Relay
1-12
13-20
21-31
Poor
Medium
Good
Advertisement

Related Manuals for AES GSM-800/AB


Summary of Contents for AES GSM-800/AB
- Page 1 Installation Manual 1200 keypad manual GSM-800/AB Wireless GSM Intercom System Installation Programming Programming is carried out by sending SMS texts to the unit. Fig.1. Rear View Side View Antenna 1) First check reception. Send the following SMS to the unit... *20#...
- Page 2 Fault finding and FAQ’s Additional Programming Parameters Code Description Default Q. The unit will not power up. No LEDs on. A. Check power supply voltage is within 11.5V-15.5V DC. Change programming password. 1234 01????# Change access control password (allows users not in caller ID list Q.
- Page 3 Keypad Programming (only ABK models) Restoring defaults LED indicators While in programming mode, enter the following to delete all codes and settings apart from the ON when incorrect codes entered and outputs are locked out. Master code.. (this can take up to 2.5 minutes)... GREEN when output 1 activated.
-
Page 4: User Manual
User Manual For GSM-3AB / GSM800E V2.1/ ABK / HB / HBK Wireless Intercom This GSM intercom system will call up to 3 telephone numbers in sequence when the call button is pressed. There are several modes of operation depending on how the unit has been programmed by your installer. The following instructions will assume default programming.
Need help?
Do you have a question about the GSM-800/AB and is the answer not in the manual?
Questions and answers