Table of Contents
Advertisement
Advertisement
Table of Contents

Subscribe to Our Youtube Channel
Related Manuals for AES WiFi Predator


Summary of Contents for AES WiFi Predator
-
Page 1: Installation Instructions
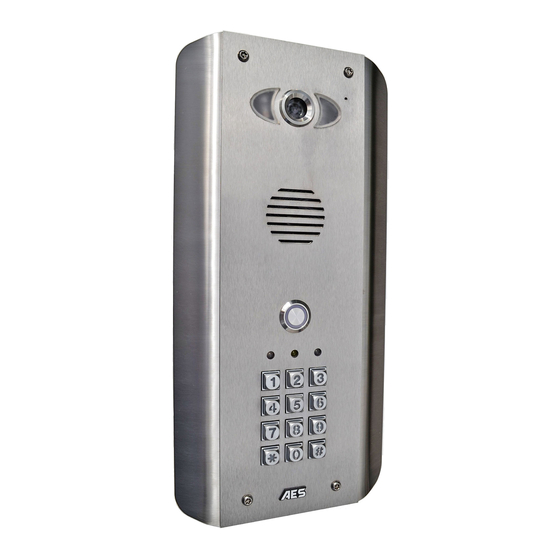
Installation Instructions WiFi-Predator P a g e... -
Page 2: Table Of Contents
Index Section Pages Android Configuration iphone Configuration 7-11 Range and range testing 12-13 Installation Power Supply Wiring Relay Output Keypad Overview Basic Keypad Programming Full Keypad Programming Using the Keypad Adding Additional Smart Phones & Devices 19-20 Using the Intercom on Android Using the Intercom on iphone Other options Fault Finding... -
Page 3: Android Configuration
Android Configuration Step 1 Using one of the homeowners’ Android phones, search for “Predator WiFi” app on the Google Play store. Look for the icon shown. Then download and install to the users phone. Step 2 Open top screws only User phone Existing internet router Locate the intercom on a bench or table beside the home router, along... - Page 4 Step 5 Step 6 Enter the following password… Enter settings on the phone, select WiFi and scan for networks. The 123456789. phone should detect the intercom. The network name will be BELL- XXXXX) Step 7 Step 8 Now open the WiFi-Predator App on On the next screen, select search as the phone and select as shown to add shown.
- Page 5 Step 9 Step 10 The phone should then find the On the next screen the intercom should device. Select it as shown. be showing online status. Select the settings button. Step 11 Step 12 Enter WiFi settings as shown. Select option to manage wifi networks and the intercom will now scan networks in the area.
- Page 6 Step 13 Step 14 Enter the home owner’s WiFi password Select the network which the home owner is normally using. and press DONE. The intercom should now re-boot and the phone should then re-connect to the normal wifi network. 2 mins… Step 15 Step 16 Wait 2 minutes for the intercom to...
-
Page 7: Iphone Configuration
I-phone Configuration Step 1 Using one of the homeowners’ iphones, search for “Predator-WiFi” app on the Apple Store. Look for the icon shown. Then download and install to the users phone. Step 2 Open top screws only User phone Existing internet router Locate the intercom on a bench or table beside the home router, along with the user phone. - Page 8 Step 5 Step 6 Enter the following password… Enter settings on the phone, select WiFi and scan for networks. The 123456789. Now the iphone is directly phone should detect the intercom. connected to the intercom. The network name will be BELL- XXXXX) Step 7 Step 8...
- Page 9 Step 9 Step 10 The intercom should now have been Now the app should show the bell ID, detected. Select as shown. default username & password details. Press DONE as shown. Step 11 Step 12 Enter Settings as shown. Select option to manage wifi networks and the intercom will now scan networks in the area.
- Page 10 Step 13 Step 14 Enter the home owner’s WiFi Select the network which the home owner is normally using. Note the password and press JOIN. The scan button at top if the iphone does intercom should now re-boot. not automatically scan for networks. 2 mins…...
- Page 11 1. Swipe & unlock. 2. App screen appears. 3. Ringing screen appears Note: If the phone does not receive a notification message when the app is running in background mode or when the screen is locked, please follow the steps below and try again…...
- Page 12 Range Test Before fully installing this product, it is strongly recommended to temporarily power the intercom at the gate and position the antenna to check that it is within range of the WiFi router. The manufacturer will not give a full refund for a product which is not returned in brand new condition.
- Page 13 TIP: Antenna beam width is approximately 40 degrees. For short range door intercoms, ask your distributor or dealer for an omni-pole type antenna with 360 degree beam angle. 3. For longer range applications, check if the router is, or can be located at the front of the building, preferably near a window or glass, as this will greatly extend range as shown.
-
Page 14: Installation
5. For even greater range, you can alternatively connect home plug power line adaptors to the LAN socket on the intercom and on the home router. Installation Assuming satisfactory operation at full range, you are ready to fully install the product. Mount the intercom at the desired height for pedestrian or car users. -
Page 15: Wiring
Wiring Connect power as shown. Please use only the power adaptor provided. Depending on your requirements, the intercom and keypad have both normally closed and normally open output contacts for connection to existing electric locks or gate automation controllers. Note: The manufacturer can only support the use, operation and functionality of the intercom and keypad themselves. -
Page 16: Relay Output
Relay output The app has an option to switch the relay output from normally open to normally closed. This is not normally needed because the relay output terminals already have hard connections for N/O and N/C contacts as standard. The relay time may need changed to suit lock applications. It is adjustable from 1-9 seconds as shown.. -
Page 17: Basic Keypad Programming
Basic Keypad Programming For most installs, it is sufficient to simply enter a single user code as follows.. Quick start guide 1) Enter programming mode (amber LED should be ON) 2) Enter a new user code... 3) Exit programming mode 4) Enter the new user code to check the relay clicks. -
Page 18: Using The Keypad
Programming relay output times and modes… 0 = start / stop toggle mode (latching) 51=relay1 Validate 1-99999 = seconds momentary operation 52=relay2 53=relay3 Delete a user code even if you don’t know the code… 10=relay1 Delete code ID location to be deleted Validate 20=relay2 30=relay3... - Page 19 Adding Additional Smartphones or Devices Step 1 Step 2 Go to settings on the app screen Select add user settings. for the existing phone or device. Step 3 Step 4 Select ADD to create a new user. Create a new username and password for that user.
- Page 20 Step 5 Step 6 On the new phone, open the app Enter the BELL ID (Copy from the existing and press to ADD Intercom. connected device) or press search to find the device, enter new user name and passcode, and press DONE. The new device should now be added.
-
Page 21: Using The Intercom On Android
Using the Intercom on Android When the intercom calls your phone, answer the call and note the options shown.. Other options… 21 | P a g e... -
Page 22: Using The Intercom On Iphone
Using the Intercom on iPhone When the intercom calls your phone, answer the call and note the options shown. Note: Because of restrictions by Apple, your iphone will receive a notification message first. If your screen is locked, you must swipe the notification banner, then unlock the screen before the intercom app can begin calling the phone in full. -
Page 23: Other Options
Other options… You may view live video from the intercom at any time as shown below. 23 | P a g e... -
Page 24: Fault Finding
Fault Finding The 3 most common cause of failures on the wifi intercom are as follows… 1. Unstable wifi network or excessive network traffic. 2. Range too long causing wifi drop out intermittently. 3. Excessively long power cable run from the 24v dc adaptor to the intercom causing poor range, no video, long connection times, or unstable operation. -
Page 25: Revision Changes
Revision Changes Hardware Firmware version IOS version Android Version V1.1 – Improved V3.24.4.12 – Relay V1.0 – Custom V3.0 – Customised ring speaker amplifier for default set to N/O. ring tones added, tones added, relay louder volume. relay defaulted to defaulted to 1 second. - Page 26 26 | P a g e...
- Page 27 27 | P a g e...
- Page 28 28 | P a g e...
Need help?
Do you have a question about the WiFi Predator and is the answer not in the manual?
Questions and answers