Table of Contents
Advertisement
Quick Links
Advertisement
Table of Contents

Related Manuals for Bartscher 900004


Summary of Contents for Bartscher 900004
- Page 1 900004 Original-Gebrauchsanleitung V1/1115...
-
Page 2: Table Of Contents
GB/UK ENGLISH Table of contents 1.Safety ........................28 1.1 Safety instructions ....................28 1.2 Key to symbols ..................... 31 1.3 Proper use ......................32 2. General information ....................33 2.1 Liability and Warrantees ..................33 2.2 Copyright protection ..................... 33 2.3 Declaration of conformity .................. -
Page 3: Safety
Read this instruction manual before using and keep them available at all times! This instruction manual contains information about the installation, operation and maintenance of the device and should be consulted as an important source of information and reference guide. Awareness of the safety instructions and instructions for use in this manual will ensure the safe and correct use of the device. - Page 4 The supply cable must not be bent, crushed, tangled, it must be always completely unwound. Do not place the device or other objects on the supply cable. Do not place the supply cable on carpets or other flammable materials.
- Page 5 The housing and lid of the device become very hot during the operation. Burn hazard! In order to avoid burns of fingers and hands do not touch hot parts of the device! During operation touch only handles and switches designed for such purpose. ...
-
Page 6: Key To Symbols
Never leave the operating device without supervision. The device is not designed for operation with external timer switch or remote control. The device is designed for indoor use only. 1.2 Key to symbols In this manual, symbols are used to highlight important safety instructions and any advice relating to the device. -
Page 7: Proper Use
1.3 Proper use The operational safety of the device is assured only in case of proper use, according to the operation manual. All technical activities like installation and maintenance must be performed by the qualified service personnel only. The chocolate dispenser is not designed for continuous operation in industrial applications. -
Page 8: General Information
2. General information 2.1 Liability and Warrantees All the information and instructions in this manual take into account standard safety regulations, current levels of technical engineering as well as the expertise and experience we have developed over the years. The instruction manual was translated with all due care and attention. However, we do not accept liability for any translation errors. -
Page 9: Transport, Packaging And Storage
3. Transport, packaging and storage 3.1 Delivery check Please check the delivery upon completeness and transport damage immediately after receipt. In case of visible damage do not accept or accept the delivery with reservation only. Note the extent of damage on the carrier’s bill of delivery. Trigger off the complaint. Hidden damages should be reclaimed immediately after notice, as claims for damages can only be asserted within the effective period for complaints. -
Page 10: Technical Data
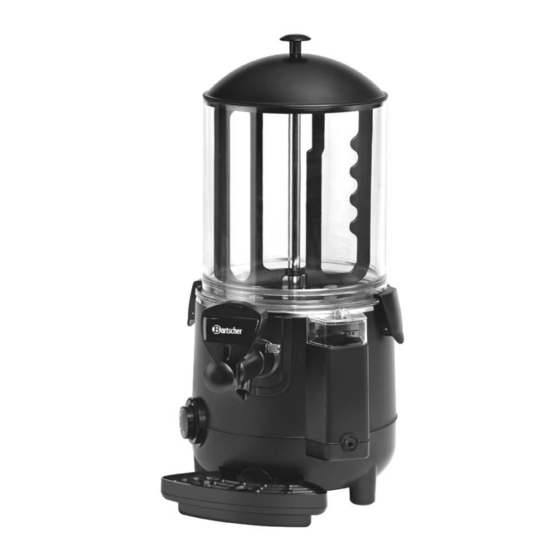
4. Technical data 4.1 Overview of parts Fig. 1 1 Container lid handle 9 Drain screw 2 Container lid 10 Feet (5) 3 Stirrer 11 Tank 4 Stirring blade 12 Outlet tap 5 Bowl 13 ON/OFF switch with indicator light 6 Container fixing clamps 14 Temperature controller knob 7 Base unit... -
Page 11: Technical Specification
4.2 Technical specification Name Chocolate dispenser 9.5L 900004 Art. no.: heating via water bath principle cup height: max. 10 cm drip tray with filling level sensor Realization: removable outlet tap stainless steel boiler with overheating protection ... -
Page 12: Operation
Connection DANGER! Electric shock hazard! The device can cause injuries due to improper installation! Before installation and connecting the local power grid specification should be compared with that of the device (see rating plate). Connect the device only in case of compliance! Connect the device only to properly installed single socket with protective terminal. - Page 13 Fill the water tank up to MAX mark, observe the filling indicator. Caution: Pour water slowly to make sure that MAX mark is not exceeded. The first complete filling of water tank requires approx. 3.25 litres of water. Fig. 3 CAUTION! Never start the device without water in the tank in order to avoid the heater damage.
- Page 14 In order to heat the drink set the required temperature with use of temperature control knob in range of 0 °C – 85 °C. Fig. 8 Receiving drinks WARNING! The outlet tap releases very hot liquid. There is the burn hazard! ...
-
Page 15: Cleaning And Maintenance
6. Cleaning and maintenance 6.1 Cleaning instructions CAUTION! Before cleaning and maintenance turn the device off (the power indicator in the switch is off) and disconnect it from the power supply (pull the plug!). Let the device cool down. Do not use the pressurized jet for cleaning the device! Protect the device from the water penetration. -
Page 16: Cleaning And Disinfection
6.2 Cleaning and disinfection Cleaning and disinfection are performed in the following way: Empty the container, (section 6.2.1) Remove the container from the device, (section 6.2.2) Remove the outlet tap from the device, (section 6.2.3) Clean the bowl and outlet pipe, (section 6.2.4) ... -
Page 17: Container Disassembly
6.2.2 Container disassembly CAUTION! Before disassembling turn the device off with ON/OFF switch, disconnect the power supply (pull the plug!) and wait for the device to cool down. It is forbidden to disassemble the device with drink or other liquid in the container. -
Page 18: Removing Of Outlet Tap
Fig. 17 Fig. 16 Remove the container from the bottom: Lift the container with both hands. press the stirrer (A) with two fingers upwards and catch the external edge of container (B) with other fingers. Carefully pull the container from its seat in the bottom. -
Page 19: Cleaning Of The Bowl
6.2.4 Cleaning of the bowl Remove all parts fixed to the bowl. Empty the container, (section 6.2.1); Remove the container from the device, (section 6.2.2) Disconnect the outlet tap from the device, (section 6.2.3) Fig. 23 Fig. 22 ... -
Page 20: Cleaning And Disinfection Of Parts
Fig. 27 Fig. 28 Disconnect the handle (E) by Pull the stem (G) and spring (F) rotating it counterclockwise and from the outlet tap body (pin/seal holding the stem. element (I) will slide out with the stem). Fig. 29 Fig. -
Page 21: Reinstallation Of Cleaned Parts
6.2.7 Reinstallation of cleaned parts All cleaned and disinfected parts should be carefully assembled and reinstalled to the device. Follow the instructions below for the individual parts. Container assembly and installation WARNING! Before reinstalling the container on the device make sure that seal is correctly installed, otherwise the liquid may escape and cause burns! Fig. - Page 22 Fig. 36 Fig. 37 Use clamps to fix the container to the Place the stirrer in its seat. device bottom. Place the stirring blade in its holder by reversing operations described in section 6.2.2. Fig. 38 Assembly of outlet tap ...
-
Page 23: Disinfection Of Internal Parts
6.2.8 Disinfection of internal parts CAUTION! Make sure that the device is turned off. ON/OFF switch in OFF position. Disinfection process: prepare the disinfecting solution, (section 6.2.6); fill the container with the disinfecting solution; leave for approx. 30 minutes; empty the container;... -
Page 24: Emptying Of Water Tank
6.2.11 Emptying of water tank CAUTION! Before emptying the water tank disconnect the device from the power supply (pull the plug!). Empty the water tank only when the container is empty and the device is cooled down. Remove the plug from the socket. ... -
Page 25: Maintenance
Empty the water tank, (section 6.2.11). Thoroughly rinse the tank by filling it with water and draining for a few times (section 6.2.11). 6.2.13 Maintenance CAUTION! The device must be periodically (at least once a year) inspected by the qualified technician. - Page 26 Problem Possible reason Solution Too high temperature Set lower temperature Damaged seal of the Contact the service company Water leaks water tank from the water tank Water level exceeds Wait for the device to cool down MAX mark and drain water excess to obtain its correct level The container is not Empty the container, remove it and...
-
Page 27: Waste Disposal
CAUTION! For the disposal of the device please consider and act according to the national and local rules and regulations. Bartscher GmbH Franz-Kleine-Str. 28 D-33154 Salzkotten phone: +49 (0) 5258 971-0 Germany...
Need help?
Do you have a question about the 900004 and is the answer not in the manual?
Questions and answers