Table of Contents
Advertisement
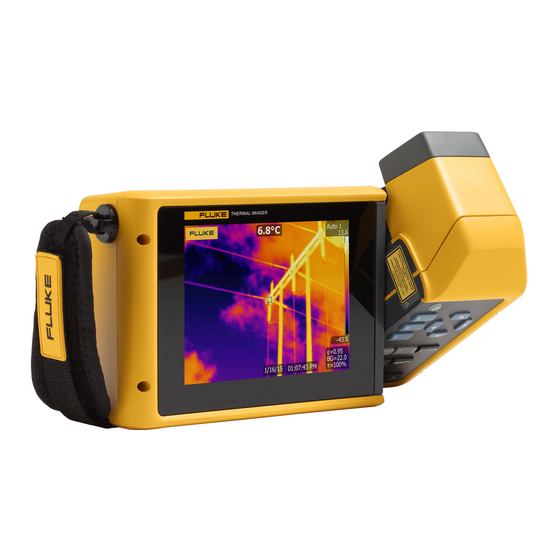
TiX500, TiX520, TiX560, TiX580
Expert Series Thermal Imagers
Users Manual
February 2015, Rev. 1, 11/16
© 2015-2016 Fluke Corporation. All rights reserved. Specifications are subject to change without notice.
All product names are trademarks of their respective companies.
MyFlukeStore
1.888.610.7664
www.
.com
Shop for Fluke products online at:
Advertisement
Table of Contents

Related Manuals for Fluke Expert Series


Summary of Contents for Fluke Expert Series
- Page 1 TiX500, TiX520, TiX560, TiX580 Expert Series Thermal Imagers Users Manual February 2015, Rev. 1, 11/16 © 2015-2016 Fluke Corporation. All rights reserved. Specifications are subject to change without notice. All product names are trademarks of their respective companies. MyFlukeStore 1.888.610.7664 www.
- Page 2 Fluke authorized resellers shall extend this warranty on new and unused products to end-user customers only but have no authority to extend a greater or different warranty on behalf of Fluke. Warranty support is available only if product is purchased through a Fluke authorized sales outlet or Buyer has paid the applicable international price.
-
Page 3: Table Of Contents
Table of Contents Title Page Introduction ..................1 How to Contact Fluke ................ 1 Safety Information................2 Product Familiarization ..............6 Features ..................6 Controls ..................7 Touch Screen ................10 Control Panel................. 11 Basic Operation ................. 11 Turn On and Off the Imager ............11 Focus..................... - Page 4 Enable the Radio................40 Streaming Video (Remote Display) ........... 41 Stream Live to a PC ..............41 Stream Live with Fluke Connect Software ........42 Stream Live to an HDMI Device ............ 42 Remote Control of Imager ..............43 Accessories ..................44 Optional Lenses ................
-
Page 5: Introduction
Introduction The Fluke TiX500, TiX520, TiX560, and TiX580 Expert Series Thermal Imagers (the Product or Imager) are handheld, infrared imaging cameras for use in many applications. These applications include equipment troubleshooting, preventive and predictive maintenance, building diagnostics, and research and development. -
Page 6: Safety Information
Remove batteries to prevent battery leakage and damage to the • Product if it is not used for an extended period. Connect the battery charger to the mains power outlet before the • charger. MyFlukeStore 1.888.610.7664 www. .com Shop for Fluke products online at:... - Page 7 Expert Series Thermal Imagers Safety Information Use only Fluke approved power adapters to charge the battery. • Keep cells and battery packs clean and dry. Clean dirty • connectors with a dry, clean cloth. Batteries contain hazardous chemicals that can cause burns or •...
- Page 8 Storage and/or continual operation of the Imager in extreme ambient temperature conditions can result in temporary interruption of operation. If this occurs, let the Imager stabilize (cool down or warm up) before you resume operation. MyFlukeStore 1.888.610.7664 www. .com Shop for Fluke products online at:...
- Page 9 This Product contains a lithium-ion battery. Do not mix with the solid waste stream. Spent batteries should be disposed of by a qualified recycler or hazardous materials handler per local regulations. Contact your authorized Fluke Service Center for recycling information. This product complies with the WEEE Directive marking requirements. The affixed label indicates that you must not discard this electrical/electronic product in domestic household waste.
-
Page 10: Product Familiarization
Fluke Connect HDMI connectivity SmartView software Stream video (remote display) Remote operation of Imager MyFlukeStore 1.888.610.7664 www. .com Shop for Fluke products online at:... -
Page 11: Controls
Lithium-ion Smart Battery Anchor for Neck Strap Smart Battery Port 2-Bay Battery Charging Base Micro SD Memory Card Slot AC Power Supply with Universal Adapters Tripod Mount MyFlukeStore 1.888.610.7664 www. .com Shop for Fluke products online at:... - Page 12 Laser Pointer/Distance Finder USB Cable Connection Visual Light Camera Lens USB Storage Device Connection Laser Distance Finder Button HDMI Connection Image Capture Button LED Torch/Flashlight MyFlukeStore 1.888.610.7664 www. .com Shop for Fluke products online at:...
- Page 13 Expert Series Thermal Imagers Product Familiarization Table 5 shows the back of the Product. Table 5. Back Item Description Item Description LCD Touch Screen (display) Control Panel MyFlukeStore 1.888.610.7664 www. .com Shop for Fluke products online at:...
-
Page 14: Touch Screen
Opens the Temperature Unit menu Opens the Measurement menu Toggles Manual/Auto Level and Opens the Date menu Span Opens the Palette menu Opens the Time menu MyFlukeStore 1.888.610.7664 www. .com Shop for Fluke products online at:... -
Page 15: Control Panel
Push to Zoom In/Zoom Out Push to open the Fluke Connect Menu Push to automatically rescale the level and span for objects in the thermal field of view. Use to operate the Imager in a semi-automatic mode if manual fine adjustment ... -
Page 16: Focus
The image is in the memory buffer for you to save or edit the image. 2. Push to save the image as a file and go back to the live view. MyFlukeStore 1.888.610.7664 www. .com Shop for Fluke products online at:... -
Page 17: Menus
Camera Set options for secondary camera features. Memory Select to review and delete captured images and videos. Select to pair the Imager to the Fluke Connect app on a mobile device or to other Fluke Connect tools. Fluke Connect Note The Fluke Connect system is not available in all countries. -
Page 18: Measurement Menu
Background <options> accuracy of the measurement. Note If Display is set to Display All, the background temperature shows as BG = xx.x on the display. MyFlukeStore 1.888.610.7664 www. .com Shop for Fluke products online at:... - Page 19 With Spot Box set to On, changes the size of the Spot Spot Box Set Size Box. See Spot Box. With Spot Box set to On, changes the position of the Spot Set Position Box. See Spot Box. MyFlukeStore 1.888.610.7664 www. .com Shop for Fluke products online at:...
-
Page 20: Level/Span
When the Range of the Imager is set to one the preset measurement ranges and Level/Span is set to Manual, the level setting moves the thermal span up or down within the total temperature range. MyFlukeStore 1.888.610.7664 www. .com Shop for Fluke products online at:... -
Page 21: Emissivity Adjustment
These objects pose a burn hazard. Set emissivity as a direct value or from a list of emissivity values for some common materials. If the emissivity value is <0.60, a caution shows on the display. MyFlukeStore 1.888.610.7664 www. .com Shop for Fluke products online at:... -
Page 22: Spot Markers
(MAX), average (AVG), and minimum (MIN) temperature measurement in that area. Note When using the Spot Box, the level and span of the Imager adjusts to the thermal scene within the Spot Box. MyFlukeStore 1.888.610.7664 www. .com Shop for Fluke products online at:... - Page 23 3. When you are satisfied with the position of the Spot Box, push to set the change and exit the menus or push to set the change and go back to the previous menu. MyFlukeStore 1.888.610.7664 www. .com Shop for Fluke products online at:...
-
Page 24: Image Menu
IR-Fusion <options> Note The visible image and infrared image can be customized or separated in SmartView and Fluke Connect Software when you use the .is2 or .is3 file format. See File Format. MyFlukeStore 1.888.610.7664 www. .com Shop for Fluke products online at:... - Page 25 Shows color isotherms, or infrared information, inside of a set of both high and low limits. Requires High Alarm and Inside Low Alarm to be on and temperature levels for both alarms to be set. MyFlukeStore 1.888.610.7664 www. .com Shop for Fluke products online at:...
- Page 26 Sets the advanced image enhancement features of the <options> Enhancement Imager. See Image Enhancement. Turns on/off the Fluke logo on the display. Logo With SmartView software, upload a custom logo to the Custom Imager from your PC through the USB connection.
-
Page 27: Image Enhancement
In SuperResolution (in PC only) mode, the image is not processed on the PC Only) Imager so you cannot view the image on the Imager. Use SmartView software to view the image on your PC. MyFlukeStore 1.888.610.7664 www. .com Shop for Fluke products online at:... - Page 28 Some targets have abnormal thermal characteristics that can cause the MultiSharp Focus algorithm to fail. If MultiSharp Focus mode does not capture a clear image, use LaserSharp Auto Focus or Advanced manual focus. MyFlukeStore 1.888.610.7664 www. .com Shop for Fluke products online at:...
-
Page 29: Distance
Do not open the Product. The laser beam is dangerous to eyes. • Have the Product repaired only through an approved technical site. MyFlukeStore 1.888.610.7664 www. .com Shop for Fluke products online at:... -
Page 30: Camera Menu
(audio) recording. This feature Video may not be available in all regions. Video ONLY Select to record video only. Record Video Select to start recording a video. See Video. MyFlukeStore 1.888.610.7664 www. .com Shop for Fluke products online at:... - Page 31 Uses the Imager to create a wireless Hotspot when no WiFi WiFi Hotspot Wireless network exists. See Wireless Connectivity. Connects the Imager to a WiFi network so you can sign into your WiFi Network Fluke Connect account on the Imager. See Wireless Connectivity. MyFlukeStore 1.888.610.7664 www. .com...
-
Page 32: Lasersharp Auto Focus System
It can be easier to use your eyes to locate the visible laser pointer on the target not on the display. MyFlukeStore 1.888.610.7664 www. .com Shop for Fluke products online at:... -
Page 33: Video
4. Push to start the playback. During playback, push for fast forward and rewind. Push to continue normal playback. 5. Push to exit the playback mode. MyFlukeStore 1.888.610.7664 www. .com Shop for Fluke products online at:... -
Page 34: Wireless Connectivity
Use the Imager to create a wireless Hotspot when no WiFi network exists. You can use the Hotspot to download saved pictures or stream live images from the Imager to a PC with SmartView software or to a mobile device with the Fluke Connect app. See Stream Live to a ... - Page 35 Instant Upload, the images you take with the Imager automatically upload to your Fluke Connect account in the Fluke Cloud. You can view the images saved in the Fluke Cloud on the Fluke Connect app or the Fluke Connect website without the mobile device and Imager connected to each other.
-
Page 36: Fluke Connect Wireless System
Fluke Connect Wireless System The Imager supports the Fluke Connect Wireless System. The Fluke Connect system wirelessly connects your Fluke test tools with an app on a mobile device. It shows images from the Imager on your mobile device. Note The Fluke Connect system is not available in all countries. -
Page 37: Memory Menu
3. Select Menu > Fluke Connect > Pair to Fluke Connect Tools. 4. Push to set selection. The Fluke Connect button on the wireless tool starts to flash. The Imager starts to scan and presents a list with the ID and name of available tools found within 20 m without obstructions (open air) or within 6.5 m with obstructions (sheetrock wall). -
Page 38: Review Image
1. Open the Memory menu. 2. Select a file to view. All files with IR-PhotoNotes annotations show with the preview file. 3. Push to view the photo annotations. MyFlukeStore 1.888.610.7664 www. .com Shop for Fluke products online at:... - Page 39 6. Push again to pause the file 7. Push to append audio to the end of the file, or push to replace the audio file. 8. Do the steps to add an audio file. MyFlukeStore 1.888.610.7664 www. .com Shop for Fluke products online at:...
-
Page 40: Delete Image
2. Push to open the Edit menu to review the file. 3. Select All Images. Delete all files The Imager prompts you to continue or cancel. 4. Push to delete all the files from the memory. MyFlukeStore 1.888.610.7664 www. .com Shop for Fluke products online at:... -
Page 41: Settings Menu
Defaults default settings. View information about the version, certificates, and Open Imager Info Source Software Licenses of the Imager Fine-tunes the parallax adjustment to precisely align the Adjust Parallax image. MyFlukeStore 1.888.610.7664 www. .com Shop for Fluke products online at:... -
Page 42: File Format
Choose the .is3 video format when video modification and maximum resolution is needed. To edit the .is3 video file, use SmartView software or the Fluke Connect app. Saves videos as an .avi file with .mpeg encoding. Choose the .avi video format when video modification is not required. The file retains the video settings at the time the video was captured and saved. -
Page 43: Date
Review IR-PhotoNotes, audio, and text annotations. • Export IR and visible images. • Edit .is2 image files and .is3 video files. • Enable Bluetooth, WiFi, and Fluke Connect functions. • Update the firmware for new Imager feature MyFlukeStore 1.888.610.7664 www. -
Page 44: Download Smartview Software
In countries with laws and regulations that permit wireless communications, wireless communication protocols are available to expand the capabilities of the Imager. All Imagers ship from the factory with the radios disabled. To enable the radio: 1. On the Imager, select Camera > Fluke Connect. MyFlukeStore 1.888.610.7664 www. -
Page 45: Streaming Video (Remote Display)
If the radio is authorized in your country, an authorization code appears on the web page. Note If the radio is not yet authorized in your country, Fluke will contact you when the radio is authorized for use in your country. -
Page 46: Stream Live With Fluke Connect Software
From the networks screen, select Fluke-Camera. Note Fluke-Camera is the default name of the Imager. If you changed the name of the Imager, select the new name of the Imager from the networks on the PC. b. Open the SmartView software. -
Page 47: Remote Control Of Imager
Expert Series Thermal Imagers Remote Control of Imager Remote Control of Imager Use SmartView software on a PC or the Fluke Connect app on a mobile device to remotely control the Imager. To remotely control the Imager with a PC: 1. -
Page 48: Accessories
4613365 BOOK-ITP Introduction to Thermography Principles 3413459 FLK-LENS/TELE2 2X Telephoto Infrared Lens 4335377 FLK-LENS/WIDE2 Wide-Angle Infrared Lens 4335361 FLK-LENS/4XTELE2 4X Telephoto Infrared Lens 4607058 FLK-LENS/25MAC2 25-Micron Macro Infrared Lens 4607064 MyFlukeStore 1.888.610.7664 www. .com Shop for Fluke products online at:... -
Page 49: Optional Lenses
Expert Series Thermal Imagers Accessories Optional Lenses Use optional telephoto and wide-angle lenses for more applications of infrared inspection work. Figure 2 shows how to install a lens. Figure 2. Optional Lens Installation MyFlukeStore 1.888.610.7664 www. .com Shop for Fluke products online at:... -
Page 50: Neck Strap
Warning To prevent eye damage and personal injury, do not open the Product. The laser beam is dangerous to eyes. Have the Product repaired only through an approved technical site. MyFlukeStore 1.888.610.7664 www. .com Shop for Fluke products online at:... -
Page 51: Clean The Product
Product if it is not used for an extended period. Connect the battery charger to the mains power outlet before the • charger. Use only Fluke approved power adapters to charge the battery. • Keep cells and battery packs clean and dry. Clean dirty •... -
Page 52: Charge Batteries
Imager from the charger before a full charge shows, it can have a reduced run- time. Note When the battery is connected to ac power or the unit is in video mode, the Sleep Mode/Auto Off feature is disabled automatically. MyFlukeStore 1.888.610.7664 www. .com Shop for Fluke products online at:... -
Page 53: Optional 12 V Vehicle Charger
• Do not attempt to charge the batteries in extreme cold environments. Caution Do not incinerate the Product and/or battery. Go to Fluke’s website for recycling information. Radio Frequency Data See Table 14 for instructions on how to access digital copies of the Certificate IDs on the Imager. - Page 54 2 years (assumes normal operation and normal aging) Czech, Dutch, English, Finnish, French, German, Hungarian, Italian, Japanese, Korean, Supported Languages Polish, Portuguese, Russian, Simplified Chinese, Spanish, Swedish, Traditional Chinese, and Turkish MyFlukeStore 1.888.610.7664 www. .com Shop for Fluke products online at:...
-
Page 55: Detailed Specifications
Optional 4X telephoto smart lens 6.0 ° x 4.5 ° Field of View (H X V) Spatial Resolution (IFOV) 0.33 mRad Minimum Focus Distance 1.5 m (∼5 ft) IR-Fusion blending Picture-in-Picture and Full screen MyFlukeStore 1.888.610.7664 www. .com Shop for Fluke products online at:... - Page 56 PhotoNotes images each with 60 sec voice annotations or 5000 basic (.bmp, .jpg) files. Note Micro SD Memory Card Fluke recommends the memory card that is supplied with the Imager or available from Fluke. Fluke does not warrant the use or reliability of aftermarket memory cards of different brands or capacities.
- Page 57 Bluetooth headset available, but not required. Text Annotation Streaming Video (Remote Display) SmartView Software on PC USB, WiFi Hotspot, or WiFi Network Mobile Device Fluke Connect app with WiFi Hotspot TV Monitor HDMI Remote Control Operation SmartView software or Fluke Connect app ...
Need help?
Do you have a question about the Expert Series and is the answer not in the manual?
Questions and answers