Fluke ii900 User Manual
Acoustic imager
Hide thumbs
Also See for ii900:
- User manual (20 pages) ,
- User manual (2 pages) ,
- Field upgrade instructions (2 pages)

Related Manuals for Fluke ii900


Summary of Contents for Fluke ii900
- Page 1 Acoustic Imager Users Manual April 2019 Rev. 1, 9/20 ©2019-2020 Fluke Corporation. All rights reserved. All product names are trademarks of their respective companies.
- Page 2 LIMITED WARRANTY AND LIMITATION OF LIABILITY This Fluke product will be free from defects in material and workmanship for two years from the date of purchase. This warranty does not cover fuses, disposable batteries, or damage from accident, neglect, misuse, alteration, contamination, or abnormal conditions of operation or handling.
-
Page 3: Table Of Contents
Contact Fluke ........ - Page 4 Users Manual Acoustics ................. . . 13 Show dB Scale: On or Off .
-
Page 5: Introduction
Introduction Contact Fluke The Fluke ii900/ii910 is an Acoustic Imager (the Product or Fluke Corporation operates worldwide. For local contact Imager) that detects and locates an acoustic signature. These information, go to our website: www.fluke.com. signatures can indicate leaks in compressed air, compressed gas, To register your product, view, print, or download the latest manual and vacuum systems. -
Page 6: Before You Start
Table 1 is a list of items included with the Imager. Use the part numbers to order additional accessories. Table 1. Standard Equipment Item Model Number Description Part Number ii900 or ii910 Acoustic Imager BP291 Rechargeable Lithium-ion Battery Pack (x2) 3894688 ... -
Page 7: Terms To Know
Acoustic Imager Before You Start Terms to Know Frequency / Spectrum Graph. A graphic chart on the display shows the level of sound detected in all frequency ranges. Use this section to familiarize yourself with these terms that are unique to this Imager and sound pressure measurements. Frequency Spike. -
Page 8: Power On/Off
The battery charges on the 2-bay charging base. The power outlet before the charger. supply powers the charging base. Country-specific adapters are • Use only Fluke approved power adapters to included. charge the battery. The battery is tested in accordance with and complies to: •... - Page 9 Acoustic Imager Before You Start The battery has an indicator with four LEDs (25 %, 50 %, 75 %, Figure 1. Battery and 100 % charge) and a test button. To check the battery charge, push . The LEDs light to show the battery charge level. If all four LEDs are on, the battery charge is at 100 % of available capacity.
-
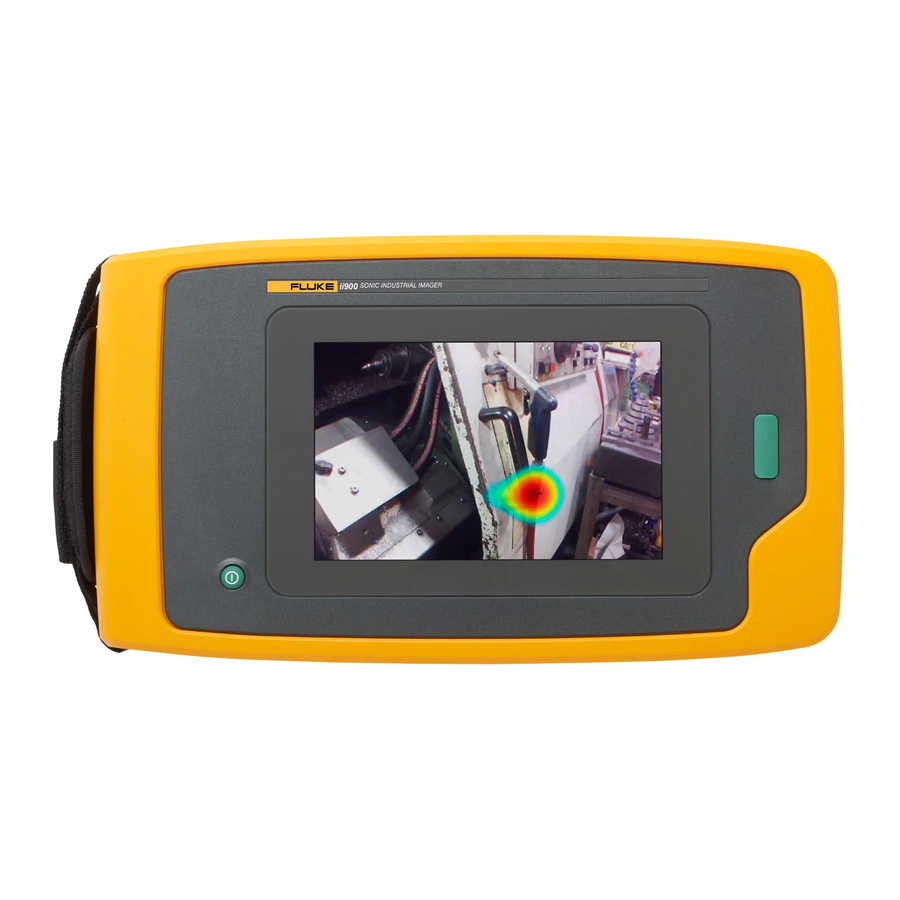
Page 10: Features/Buttons
Users Manual Features/Buttons Table 2 is a list of the Imager features. Table 2. Feature/Control Descriptions Button Function Button Function Power On/Off Acoustic Sensor Hand Strap Battery Compartment Touchscreen Display USB-C Connector ... -
Page 11: Hand Strap/Neck Strap
Acoustic Imager Hand Strap/Neck Strap Hand Strap/Neck Strap Table 3. Touchscreen The Imager includes a hand strap and a neck strap that makes it easy to hold and operate as you take measurements. See Figure 2 for information about setup. Figure 2. -
Page 12: Menus
Users Manual Menus Image Image mode captures a still photo of the scene with overlapping To view the tool menu, tap your finger on the display. This action sound image and saves it in a .PNG or .JPG format. -
Page 13: Capture Analysis Mode
LeakQ and PDQ modes. For more To input the distance manually: information, go to: Tap on the message to open a numeric screen and enter https://www.fluke.com/en-us/learn/tools-calculators. the distance. The Imager uses the entered distance to calculate the LeakQ values. -
Page 14: Pdq Mode™ (Ii910)
Users Manual Press Capture button or Save in the menu. PDQ Mode™ (ii910) The Imager saves the still photo of the scene with PDQ Mode™ captures data from a Partial Discharge (PD) that overlapping sound image and values in .PNG or .JPG enables further analysis such as type of discharge and format. -
Page 15: Memory
Acoustic Imager Menus Memory Annotations The Memory menu shows an overview of all saved files with a You have 2 methods to access the annotation menu: thumbnail image. Each thumbnail includes an icon to indicate the • after a capture (image or video), tap on the small thumbnail file type: that shows on the bottom left corner ... -
Page 16: Photo Note
Users Manual Photo Note Tag Note A Photo Note is an additional photo attached to the file. Examples A Tag Note is a set of predefined fields attached to a file. These include a photo of a label or location that adds additional fields store data about the file that is useful for comparison and information about the file. -
Page 17: Acoustics
Acoustic Imager Menus Acoustics Single Source/Multiple Sources The Single Source mode shows less noise and reflection on the The Acoustics menu shows all the available settings for display. Smaller leaks or partial discharges do not show when they adjustment. are close together with larger leaks or PD in the same field of view. Show dB Scale: On or Off The Multiple Sources mode will not mask smaller leaks or partial You can choose to show or hide the dB scale. -
Page 18: Palette
File format Save Diagnostic Information • set image format (JPEG or PNG) • use at request of Fluke Customer Service to save diagnostic • set video format (MP4 format) information Date & Time Note •... -
Page 19: Basic Operation
SoundMap. In this case, scan around for the source of sound. Adjust low end: Touch lower edge of box until arrows show. Slide edge down to change low end of the frequency range. Maximum Frequency Range: ii900 ...52 kHz ii910 ...100 kHz... -
Page 20: File Transfer
Use the provided USB cable to connect the Imager to a PC For more information about how to view the images in memory, with the current version of Fluke Connect Desktop software see Memory. installed. Fluke Connect Desktop software detects the connected Imager, checks the firmware version, and updates the Imager if a newer firmware version is available. -
Page 21: Maintenance
Acoustic Imager Maintenance Maintenance To update with a .swu file: Download the firmware update (.swu file) from the Fluke The Imager does not require routine maintenance. website to a PC. W Caution Use the provided USB cable to connect the Imager to the PC The optical surfaces of the lens are equipped with with the new firmware update file. -
Page 22: Environmental
Contact Fluke for more information. Service An authorized Fluke Calibration service center should service the Imager at two-year intervals to maintain optimum performance. Contact your equipment distributor or authorized Fluke Calibration Service Center for any equipment performance failure or to schedule regular maintenance service.
Need help?
Do you have a question about the ii900 and is the answer not in the manual?
Questions and answers