Table of Contents
Advertisement
Quick Links
Advertisement
Table of Contents

Related Manuals for Universal Space PONG A-427


Summary of Contents for Universal Space PONG A-427
- Page 1 Arcade version IMPORTANT www.universal-space.com Operation Manual...
- Page 2 PONG Manual WE ARE HERE TO ASSIST For parts and service Have Questions? Contact us! UNIS SERVICE CENTER Tel: 972-241-4263 Fax: 214-919-4918 Email: service@unisusasupportcenter.com When contacting Service, you will need the following information and the name of your authorized distributor. 11/27/2018...
-
Page 3: Table Of Contents
PONG Manual CONTENT IMPORTANT SAFETY INSTRUCTIONS ............... 3 1. SPECIFICATIONS ....................5 3. PART NAME ......................7 5. HOW TO PLAY ......................9 6. GAME OPTION ..................... 10 7. TROUBLESHOOTING .................... 16 8. MAINTENANCE & INSPECTION ................16 9. OVERALL CONSTRUCTION ................. 20 10. -
Page 4: Important Safety Instructions
PONG Manual Thank you for purchasing PONG. We hope you enjoy the product. This manual contains valuable information about how to operate and maintain your game machine properly and safely. It is intended for the owner and/or personnel in charge of product operation. - Page 5 PONG Manual Use the following safety guidelines to help ensure your own personal safety and to help protect your equipment and surrounding environment from potential damage. This product is an indoor game machine. Do not install outdoors. Avoid installing in the following places to prevent fire, electric shock, injury and/or machine malfunctioning: ...
-
Page 6: Specifications
PONG Manual 1. SPECIFICATIONS Rated power supply: AC110V~50/60Hz; Min. Power consumption: 200W Max. Power consumption: 280W Dimension: W 55.91×D 34.10×H 31.67 in W 1420×D 866×H 804.3 mm Weight: Approximately 353 lb Part No: P148 Model: A-427 NOTICE : After turning off the game, please wait at least 1 minute before restarting again. - Page 7 PONG Manual 2. CONTENTS OF THE ACCESSORY KIT Open the package and make sure all the items are included: 1. Following accessories Part No. Code Name Picture P152-801-000 23301010020 Power cord P152-436-000 21901000010 Fuse P152-806-000 41440000247E Manual P152-180-000 20211707045A Adjust plate A P152-181-000 20211707046A Adjust plate B P152-803-000 25300171002 P152-804-000 25300172002...
-
Page 8: Part Name
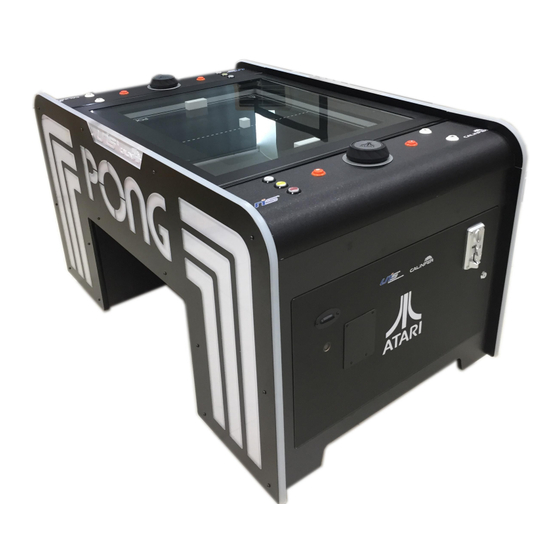
PONG Manual 3. PART NAME Key Components Paddle Paddle Ball Ball Display Display Coin mechanism Power switch Power switch 11/27/2018... - Page 9 PONG Manual 4. SET UP & INSTALLATION NOTICE We do not recommend using power tools as they may cause damage. This product is an indoor game machine. Do not install outdoors. Refer to IMPORTANT SAFETY INSTRUCTIONS (Pg. 3) for places to avoid ...
-
Page 10: How To Play
PONG Manual 5. HOW TO PLAY 5.1 Press 1P Start button or 2P Start button, then choose Easy/Normal/Hard mode to start the game. Move the jog to control the paddle, press the orange button to shoot. (Same function as the two orange buttons) Orange button 1 P start Easy... -
Page 11: Game Option
PONG Manual 6. GAME OPTION Enter into the setting menu Step 1 Locate the Player 1 side(the side near Power switch) and open the coin door. Step 2 Press Test button to move the Ball to the middle and press the Test button again, then you’ll see “CONF”... - Page 12 PONG Manual 6.1 Setting Menu When SERVICE MODE is active, you will see CONF in the scoreboard by default. Spinning the JOG will switch spelling between configuration (CONF) and checks (CHEC) BACK exits SERVICE MODE and SET selects the active option. Functions audio related Default settings reset (Press SET to “0”...
- Page 13 PONG Manual VALUES: # RANGE: 0..99 DEFULT: 30 VALUES: # RANGE: 0..99 DEFULT: 99 VALUES: # RANGE: 0..99 DEFULT: 99 VALUES: CL DEFULT: VALUES: CL DEFULT: This option only applies to units fitted with a coin mechanism. Choose FREE PLAY COIN OPERATED.
- Page 14 PONG Manual VALUES: # RANGE: 0..04 DEFAULT: 02 VALUES: # RANGE: 3..39 DEFAULT: 05 VALUES: # EASY GAME RANGE: 0..6 SPEED Game Speed: DEFAULT: 0 0-----0.3175m/s VALUES: # NORMAL GAME 1-----0.4978m/s RANGE: 0..6 SPEED 2-----0.6782m/s DEFAULT: 03 3-----0.8585m/s HARD GAME VALUES: # 4-----1.0389m/s RANGE: 0..6...
- Page 15 PONG Manual VALUES: # RANGE: 0..99 DEFAULT: 50 VALUES: # RANGE: 01.15 DEFAULT: 03 Motors tests. ( Press SET and BACK to exit.) Inputs tests. ( Press SET and BACK to exit.) LEDS, Motors and AUTO Inputs auto tests. ( Press SET and BACK to exit.) 11/27/2018...
- Page 16 PONG Manual (Press SET & BACK buttons) P1 EASY pressed P1 NORMAL pressed P1 HARD pressed P2 EASY pressed P2 NORMAL pressed P2 HARD pressed 11/27/2018...
-
Page 17: Troubleshooting
PONG Manual 7. TROUBLESHOOTING 7.1 Common Problem Please confirm that all connectors fit tightly. Symptom Possible Cause Recommended action Frame assembly connector is Game will not Check connector. loose. start Frame assembly is faulty. Contact UNIS Service. Turn on power SW again. If appeared Circuit protector changes power Power off again and again, machine has... - Page 18 PONG Manual 8.3 How To Clean The Playfield Step 1 Power off the game. Open the glass by unlocking the two locks. playfield Step 2 Utilize non-woven fabric with distilled water to clean the playfield. 8.4 How To Replace Wool Felt Pad On Paddle Step 1 Remove the wool felt pad from the paddle.
- Page 19 PONG Manual 8.6 How To Access Movement Mechanism Before processing with assembly assure you have the following tools. Name Picture Phillips screwdriver Step 1 Power off the game and open the coin door on Player 1 side (the side near the power switch).
- Page 20 PONG Manual Step 4 Remove the screw covers and loosen the screws shown in the picture. Step 5 Remove the playfield. Note: please avoid the Paddles and Ball sticking together. Step 6 Proceed to the movement mechanism. 11/27/2018...
- Page 21 PONG Manual 8.7 Belt Tension Adjustment Instruction for Y Axle If noise is heard from the tracks inside the machine, one of the reasons is that the belt has loosened. Here is the process to tighten the belt. Before processing with assembly ensure you have the following tool. Name Picture Phillip's screwdriver...
- Page 22 PONG Manual 8.8 Belt Tension Adjustment Instruction for X Axles Before processing with assembly assure you have the following tools. Name Picture Phillips screwdriver Wrench(8mm) Kit list: Name Picture Block Step 1 Follow the 8.6 steps to remove the playfield. Move Y axle to motor side. Motor side Y axle X axle...
- Page 23 PONG Manual Step 3 Check if the block is slightly above the X axle (within 0.04inch). If it is, don’t adjust the belt; if it touches the X axle, adjust the belt. √ × Need to adjust. Step 4 To adjust: Utilize Phillips screwdriver to loosen the screws a bit. Utilize the wrench to adjust the nut on the side.
-
Page 24: Overall Construction
PONG Manual 9. OVERALL CONSTRUCTION 9.1 General Assembly Part No. Code Name 1 P152-197-000 26000051000 Ticket cover 2 P152-113-000 20211707K006 DBV panel 3 P152-200-000 26000065000 Out of ticket light cover 2 4 P152-112-000 20211707K005 DBV cover 5 P152-107-000 20611707K001 Light plate A 6 P152-109-000 20611707K003 Light plate C 7 P152-111-000 20611707K007... - Page 25 PONG Manual Part No. Code Name 16 P152-193-000 26000006000 Ticket box 17 P152-116-000 20611707K009 Power supply cover 18 P152-102-000 20211707K002 SW plate Power supply pressing 19 P152-115-000 20211707K022 plate 20 P152-196-000 26000044000 Counter meter bracket 2 21 P152-104-000 20211707K003 Coin box hopper 22 P152-118-000 20211707K007 Up-down bracket 23 P152-622-000 25101210026...
- Page 26 PONG Manual 9.3 Movement Mechanism Part No. Code Name 1 P152-144-000 20211707032A Idle wheel A P152-145-000 20211707047B Idle wheel axle P152-305-000 20102000022 Non-metallic hexagon lock nut P152-301-000 20113000055 C flat washer P152-146-000 20211707054 Wheel sleeve 3 P152-143-000 20211707017B Idle wheel A bracket 4 P152-168-000 20211707035 X axle track 5 P152-167-000 20211707023B...
- Page 27 PONG Manual Part No. Code Name 19 P152-177-000 20211707052A Long sensor SW bracket 20 P152-178-000 20211707043A Fix plate A 21 P152-182-000 20211707049A Short fix bar 22 P152-147-000 20211707058 Axle plate 23 P152-148-000 20211707059 Limit bracket Part No. Code Name 1 P152-169-000 20211707036 Y axle track 2 P152-620-000 23502000049 Magnet...
- Page 28 PONG Manual Part No. Code Name 13 P152-158-000 20211707002B Y axle bracket 14 P152-153-000 20211707033A Driving wheel 15 P152-156-000 20211707034A Idle wheel B 16 P152-157-000 20211707007B Axle 17 P152-155-000 20211707021A 57 motor bracket B 18 P152-614-000 23406000031 Hybrid stepping motor 1 19 P152-179-000 20211707044A Fix plate B 20 P152-163-000 20211707042...
- Page 29 PONG Manual 9.5 Wooden Assembly Part No. Code Name 1 P152-502-000 20311707K013 L&R side plate 2 P152-121-000 20211707K010 Control panel plate 3 P152-509-000 20311707K006 Sideways plate 4 P152-503-000 20311707K002 Front-back side plate 2 5 P152-120-000 20211707K009 Connecting plate B P152-504-001 20311707K003A Front door P152-627-000 25300171001...
- Page 30 PONG Manual 9.6 Jog Assembly Part No. Code Name 1 P152-715-000 20511707002 ATARL Logo 1×2 2 P152-188-000 20611707008 Jog shell 1×2 3 P152-187-000 20611707009 1×2 4 P152-190-000 20211707008B Axle 1×2 5 P152-122-000 20211707K011 Decoration panel 1×2 6 P152-189-000 20211707013A BR bracket 1×2 7 P152-624-000 20106000318 2×2...
- Page 31 PONG Manual 9.7 Inner Frame Assembly Part No. Code Name 1 P152-126-000 20211707K012 Steel 2 P152-128-000 20611707K008 U block 3 P152-513-000 20311707K014 Inside pad 4 P152-623-000 25101210028 Spring 5 P152-127-000 20611707K011 Batten 9.8 Paddle Assembly Part No. Code Name 1 P152-619-000 23502000041 Magnet 2×2 2 P152-141-000 20611707013A...
- Page 32 PONG Manual 9.10 Right Light Plate Assembly Part No. Code Name 1 P152-702-000 20511707K002 Left L light plate 2 P152-135-000 20211707K018 Right plate 3 P152-701-000 20511707K001 Middle light plate 4 P152-703-000 20511707K003 Right L light plate 9.11 Left Light Plate Assembly Part No.
- Page 33 PONG Manual 9.12 Decals Part No. Code Name 1 P152-714-000 20511707001C Playfield glass 2 P152-707-000 20511707K007 Control panel decal 3 P152-708-001 20511707K008A Front door decal 4 P152-715-000 20511707002 ATARL Logo 5 P152-706-000 20511707K006 Button decal 6 P152-704-000 20511707K004 110V nameplate 7 P152-710-000 20511707K010 TUV 110V nameplate 1 8 P152-711-000 20511707K011 Brand R label...
- Page 34 PONG Manual Part No. Code Name 1 P152-729-000 25600000071 110V label 2 P152-726-000 25600000017 Power SW label 3 P152-722-000 25600000002 Ticket counter label 4 P152-730-000 25600000073 Fuse T3A/250V 5 P152-721-000 25600000001 Coin counter label 6 P152-723-000 25600000003 Volume label 7 P152-724-000 25600000005 Test label 8 P152-725-000 25600000009 Service label...
- Page 35 PONG Manual 9.13 Electrical Components Part No. Code Name 1 P152-402-000 23407030001 Coder P152-405-000 22401170004 Orange button P152-401-000 22604000006 Micro SW P152-403-000 22401170002 White button 1P P152-404-000 22401170003 White button 2P P152-401-000 22604000006 Micro SW 4 P152-410-000 22002020001 Light strip 5 P152-432-000 29711707006D Display board 6 P152-407-000 22201010001...
- Page 36 PONG Manual Part No. Code Name 1 P152-612-000 23407010007 Motor driver 2 P152-611-000 23407010006 Stepping motor driver 3 P152-446-000 29711707009 Main board 4 P152-418-000 22803010008A Amplifier board P152-433-000 21702000022 Multimedia board P152-434-000 23305000022 Audio cable 6 P152-419-000 22807000002 Audio isolator Hybrid stepping 7 P152-614-000 23406000031 motor...
- Page 37 PONG Manual Part No. Code Name 1 P152-438-000 20711006006 2 P152-426-000 21714000148A Fuse board 3 P152-417-000 23000000005 Counter 4 P152-416-000 21714000148 Fuse board P152-437-000 21602000106 Power supply P152-414-000 23301018004 Power cord 6 P152-406-000 21602000105 Power supply P152-412-000 22801000085 Speaker P152-445-000 25900016000 4'' speaker net cover 4500mm 8 P152-442-000 22002013004 LED light strip...
- Page 38 PONG Manual Part No. Code Name 1 P152-429-000 23301040022 DC Power cord 2 P152-428-000 21603020001A AC adapter P152-420-000 22702000010 Fan net P152-409-000 22702010025 4 P152-431-000 29791400001 POT connect board P152-430-000 22402030002 Button(green) P152-435-000 22402050001 Button(black) 4500mm 6 P152-442-000 22002013004 LED light strip (117.1in) P152-412-000 22801000085 Speaker...
- Page 39 PONG Manual Part No. Code Name 1 P152-425-000 22301000002 Coin mechanism 2 P152-447-000 29790700002 Ticket converted board 3 P152-439-000 23100000005 Ticket dispenser P152-443-000 22003000003 LED(12V) light bulb P152-444-000 22201000028 12Vwhite light bracket Back side Front side Part No. Code Name Quadraphonic mixing 1 P152-448-000 51306000020 module...
-
Page 40: Wiring Diagram
PONG Manual 10. WIRING DIAGRAM 11/27/2018... - Page 41 PONG Manual 11/27/2018...
- Page 42 PONG Manual 11/27/2018...
Need help?
Do you have a question about the PONG A-427 and is the answer not in the manual?
Questions and answers