Table of Contents
Advertisement
Available languages
Available languages
Quick Links
- 1 Quick Start and Tips
- 2 Transmitter (Thermostat) – Button Descriptions
- 3 Display Description
- 4 Electrical Scheme
- 5 Programming the Heating Modes and Schedules
- 6 Advanced Thermostat Settings
- 7 Changing Control Mode – Remote Ap / Gateway Wifi Hotspot Mode
- 8 Application Installation
- Download this manual
Advertisement
Table of Contents

Related Manuals for Saswell SAS908XWHB-7-APP


Summary of Contents for Saswell SAS908XWHB-7-APP
- Page 1 Žični internetni WIFI termostat | Wired internet WIFI thermostat Android / iOS APP SASWELL SAS908XWHB-7-APP Uporabniški priročnik User manual...
- Page 2 SI | Uporabniški priročnik Termostat Saswell SAS908XWHB-7-APP je žični programski termostat za upravljanje ogrevalnih sistemov s pomočjo aplikacije preko vašega pametnega telefona na sistemu iOS ali Android. Vse nastavitve temperatur ter sama regulacija se upravlja preko termostata samega oziroma v načinu upravljanja preko aplikacije se le ta izvaja preko aplikacije.
- Page 3 Za izdelek je bila izdana izjava o skladnosti. Ta in ostala dokumentacija je dostopna na spletni strani www.sen-controls.eu. Proizvajalec izdelka je SASWELL CONTROLS (HONGKONG) LTD. Uvoznik in distributer za Saswell v Sloveniji je Sen Controls d.o.o., Belokranjska cesta 29, 8340 Črnomelj, Slovenija...
- Page 4 Lastnosti Specifikacije enote • Napajanje: Velik LCD ekran • AC 100-240V 50/60Hz Hkratni prikaz trenutne ter želene temperature Bateriji 2xAA LR6 1.5V - v tem primeru prostora termostat deluje kot navadni žični, brez wifiapp • Zaklep termostata • dostopa. Prikaz ure in trenutnega dneva Nastavitev temperature: od 5°C do 35°C •...
- Page 5 Hitra navodila Temperature in vrednosti spreminjate s tipkama in . Tipka P opravlja funkcijo potrditve ali prehoda med meniji. S tipko R potrdite funkcije ali končate urejanje nastavitev. Spremembe temperatur, časovnih preklopov (ob kateri uri želite preklop) vršite s tipko P-kratek pritisk, željena vrednost utripa - spremembo izvršite s tipko ...
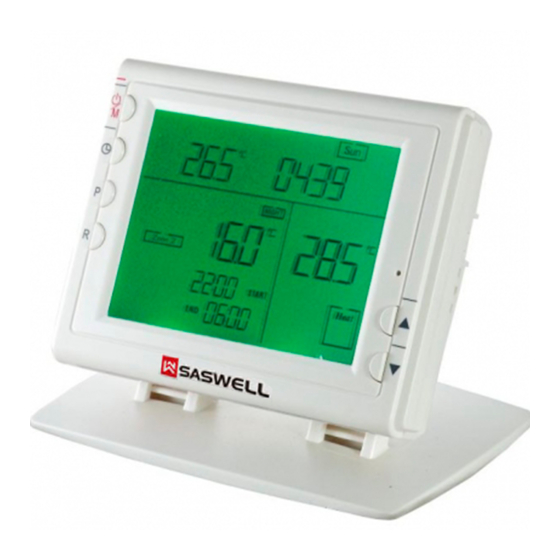
- Page 6 Opis termostata – gumbi, stikala in prikaz na ekranu Opis gumbov in stikal Vklop / Zaščita proti zmrzovanju / Izklop Nastavitev ure Nastavitev, uporaba programa (kratek pritisk) / konstantna temp., držanje temperature (dolgi pritisk) Potrditev / izhod Tipka reset Navzgor; Zvišanje vrednosti Navzdol;...
- Page 7 Opis ekrana Dan oz. dnevi Trenutne nastavitev Ogrevanje prostora Delovanje (izklopljeno Off ali vklopljeno – sonce) Napaka pri komunikaciji Način upravljanja Načini programa Delovanje ogrevanja (se prižge le če se prostor trenutno ogreva) Enota temperature Način delovanja (program, konstantna temperatura - držanje) Obvestilo za slabe baterije Trenutno nastavljena temperatura ogrevanja...
- Page 8 Namestitev Namestitev baterij Najprej odstranite zadnji pokrov termostata. To storite tako, da z občutkom primete pokrov zgoraj in spodaj in potegnete navzven. Nato pravilno vstavite dve AA (LR6) 1.5V bateriji. Pokrov lahko zaenkrat pustite zunaj, zaradi naslednjega koraka. Montaža Termostat namestite steno željeni...
- Page 9 Nato izvedite električno vezavo. Ponovno, montažo naj izvede strokovno usposobljena oseba! Shema vezave:...
- Page 10 Odstranite varovalo kontaktov. Napajanje ter signalne kable povežite v spodaj prikazani del ohišja. Po končanju vezave, namestite varovalo kontaktov nazaj. Prikaz napak Spodaj je opis treh napak, ki se lahko pojavijo na ekranu ob uporabi naprave: Napaka / prikaz Opis Slabe baterije –...
- Page 11 Osnovna nastavitev termostata Nastavitev ure Ob pritisku na tipko , se vklopi način urejanja dni in ure. To opazite tudi z utripanjem trenutne pozicije na ekranu. Program vam najprej ponudi urejanje trenutne ure – minute. Vrednost spreminjate s tipkami ter . Ko ste zadovoljni z nastavitvijo minut, pritisnite tipko , da preidete na urejanje trenutne ure.
- Page 12 Primer nastavitve privzetega 7 dnevnega časovnega programa s 6 preklopi. Za referenco uporabite tabelo 2 iz poglavja PRIVZETIH TABEL PROGRAMOV Vstopite v način urejanja s kratkim pritiskom na tipko P. Začne utripati dan, nato s tipko ali izberete želeni dan katerega želite urediti. Izbiro potrdite s kratkim pritiskom na tipko P.
- Page 13 Privzete tabele programov (le te lahko preuredite po Vaših željah) Tabela 1 (7 dni, 4 časovni programi, preklopi) Ogrevanje 1-Jutro 2-Odhod 3-Prihod 4-Večer Ponedeljek (Mon) 6:00 21°C 8:00 16.5°C 21°C 16.5°C 18:00 22:00 Torek (Tue) 6:00 21°C 8:00 16.5°C 21°C 16.5°C 18:00 22:00...
- Page 14 Tabela 2 (7 dni, 6 časovnih programov, preklopi) Ogrevanje 1-Jutro 2-Odhod 3-Malica 4-Popoldan 5-Prihod 6-Večer ℃ ℃ ℃ ℃ ℃ ℃ Ponedeljek 6:00 8:00 16.5 12:00 14:00 16.5 18:00 22:00 16.5 (Mon) ℃ ℃ ℃ ℃ ℃ ℃ Torek 6:00 8:00 16.5 12:00...
- Page 15 Tabela 3 (5 + 1 + 1 dni, 4 časovni programi, preklopi) Ogrevanje 1-Jutro 2-Odhod 3-Prihod 4-Večer Ponedeljek (Mon) 6:00 21°C 8:00 16.5°C 21°C 16.5°C 18:00 22:00 Torek (Tue) 6:00 21°C 8:00 16.5°C 21°C 16.5°C 18:00 22:00 Sreda (Wed) 6:00 21°C 8:00 16.5°C...
- Page 16 Tabela 4 (5 + 1 + 1 dni, 6 časovni programi, preklopi) Ogrevanje 1-Jutro 2-Odhod 3-Malica 4-Popoldan 5-Prihod 6-Večer Ponedeljek 6:00 8:00 12:00 14:00 18:00 22:00 21℃ 16.5℃ 21℃ 16.5℃ 21℃ 16.5℃ (Mon) Torek (Tue) 6:00 21℃ 8:00 16.5℃ 12:00 21℃...
- Page 17 Tabela 5 (5 + 2 dni, 4 časovni programi, preklopi) Ogrevanje 1-Jutro 2-Odhod 3-Prihod 4-Večer Ponedeljek (Mon) 6:00 21°C 8:00 16.5°C 21°C 16.5°C 18:00 22:00 Torek (Tue) 6:00 21°C 8:00 16.5°C 21°C 16.5°C 18:00 22:00 Sreda (Wed) 6:00 21°C 8:00 16.5°C 21°C 16.5°C...
- Page 18 Tabela 6 (5 + 2 dni, 6 časovnih programov, preklopi) Ogrevanje 1-Jutro 2-Odhod 3-Malica 4-Popoldan 5-Prihod 6-Večer Ponedeljek 6:00 8:00 12:00 14:00 18:00 22:00 21℃ 16.5℃ 21℃ 16.5℃ 21℃ 16.5℃ (Mon) Torek (Tue) 6:00 8:00 12:00 14:00 18:00 22:00 21℃ 16.5℃...
- Page 19 Napredna nastavitev termostata Za dostop do napredne nastavitve termostata, izklopite napravo s kratkim pritiskom na tipko . Naprava mora biti Off (glej opis prikaza 5). Nato držite tipko P (3 sekunde) in vstopili boste v napredne nastavitve. Po meniju se pomikate s tipko P.
- Page 20 Pametna prilagoditev – Če imate to funkcijo vklopljeno, bo termostat ES (OFF) On / Off začel delovati že pred preklopom naslednjega programa gretja in poskušal čim bolj udobno ogreti na željeno temperaturo. Če je ta funkcija vklopljena, se naprava ves čas uči in prilagaja ter izračuna, koliko časa prej mora začeti z ogrevanjem.
- Page 21 Zaklepanje tipk Ta funkcija vam omogoča zaklep termostata in ko je funkcija vklopljena so onemogočene vse morebitne spremembe nastavitev. Funkcijo aktivirate tako, da istočasno držite tipk in za tri sekunde. Ko je funkcija aktivirana, se na zaslonu prikaže simbol ključavnice (glej opis prikaza ekrana – 14). Funkcijo izklopite z daljšim (3 sekunde) pritiskom tipk ...
- Page 22 Android: Da bi vključili ta način, odprite aplikacijo. Na ekranu se vam v desnem kotu zgoraj prikaže napis »DIRECT«. Pritisnite na ta napis in program začne z iskanjem Saswell WIFI termostatov v bližini. Aplikacija išče odprte termostate in njihova WIFI brezžična omrežja, ki jih oddajajo. Ko aplikacija prikaže najdene termostate, izberete želenega in kliknite na njegov SSID (le tega lahko tudi najdete...
- Page 23 Ko kliknete nanj, lahko nastavite želeno ali zgolj preverite temperaturo prostora preko aplikacije. Pomembno – Da bi dostopali do testnega načina lokalne uporabe, mora biti termostat priključen na električno napajanje in ne baterijsko ter v načinu ROOM CON – v nasprotnem primeru termostata ne boste videli na vašem telefonu.
- Page 24 »spam« razdelek v vašem poštnem odjemalcu. Sedaj ko imate ustvarjen vaš račun Saswell, se z njim prijavite in sicer v glavnem meniju aplikacije vnesite pod EMAIL vaš poštni naslov in pod PASSWORD vaš geslo ter pritisnite LOGIN. Sedaj bi morali videli pregled (Overview) vseh...
- Page 25 Ker bi radi dodali nov termostat k vašemu računu za upravljanje preko interneta, morate pod prvim korakom imeti termostat pod stalnim električnim napajanjem (baterijsko napajanje ne omogoča daljinskega upravljanja Saswell termostatov). Sedaj preverite da je termostat v ROOM CON načinu – če ni, pojdi par strani nazaj in ga prestavite iz MASTER CON v ROOM CON.
- Page 26 CON načinu, priključen v električno omrežje, sledite naslednjim korakom: Ker ste kliknili na + v desnem zgornjem kotu ekrana, pritisnite »FIND DEVICE«. Sedaj bi morali videti seznam vseh Saswell internetnih termostatov, ki so v bližini in so pripravljeni na parjenje z Vašim Saswell računom.
- Page 27 Vašega termostata »SSID:Thermostat-….« in se povežite nanj. Sedaj se vrnite v Thermostat aplikacijo. Aplikacija bi morala sama zaznati, da ste povezani na Saswell termostat ter prešla na naslednji korak, v kateremu morate potrditi geslo Vašega domačega brezžičnega omrežja.
- Page 28 Uporaba aplikacije – Preimenovanje in odstranjevanje termostata Vsi na novo dodani termostati imajo generična imena in če bi si radi organizirali termostate v vašem domu, lahko vsakega preimenujete po vaših željah. To storite tako da, ko ste v pregledu vseh Vaših naprav (termostatov), držite par sekund na imenu termostata, katerega želite preimenovati in aplikacija Vam ponudi opcijo »Rename thermostat«...
- Page 29 Uporaba aplikacije – Nastavitve programov, temperature, pregled stanja Ko imate dodane termostate v aplikaciji, vam pod razdelkom »Overview« aplikacija prikaže stanje le teh – ECO (away) način, trenutna temperatura prostora, želena temperatura prostora in če je termostat vključen. Če je termostat na voljo (v bližini vašega povezanega brezžičnega omrežja) lahko pritisnete na ime termostata in preidete v pregled termostata.
- Page 30 Nastavitev programov lahko izvajate, ko pritisnete na pregledu na tipko »PROGRAM«. Ta vam odpre meni, ki ga vidite na levi. Urnik ogrevanja je lahko vključen ali izključen (1 – podrsate). Sedaj nastavljate urnike ogrevanja (2) za izbran oz. izbrane dneve, ki jih označite na točki 3.
- Page 31 EN | User manual Thermostat Saswell SAS908XWHB-7-APP is a wired thermostat for managing the heating systems with the help of your mobile phone application on Android or iOS system. All temperature settings and the regulation itself is easily controlled via the thermostat in battery supply mode or via mobile app when powered through electrical 230V power and set correctly.
- Page 32 Declaration of conformity has been issued for the product. This and other documentation is available on the website www.sen-controls.eu. The manufacturer of this product is SASWELL CONTROLS (HONGKONG) LTD. Importer and distributor for Saswell in Slovenia is Sen Controls d.o.o., Belokranjska cesta 29, 8340 Črnomelj, Slovenia...
-
Page 33: Specifications
Features Specifications • Large LCD display • Power supply Simultaneous display of the current room temperature AC 100-240V 50/60Hz or and the set heating temperature • Batteries 2xAA LR6 1.5V – in this case, the Display of the current hour and day •... - Page 34 Quick start and tips Temperature changing, programming switches (at what hour the switch should occur) and all confirmations are done by short pressing button P, when the value is blinking. You can change the values, when they are blinking, by pressing buttons ...
- Page 35 Transmitter (thermostat) – Button descriptions Button description On / Frost protection / Off (stand by) Setting the clock Setting the programs (short press/ Hold, constant temperature (long press) Confirm / Exit Reset button Up; Increase value Down; Reduce value...
- Page 36 Display description Date, day Hour Current selected setting Heating Operation (Off or if turned on the sun symbol will be lit) Communication error Control mode Program mode Heating operation (turns on only if the room is currently heating) Temperature unit Mode of operation (program, hold) Battery replacement warning The currently set heating temperature...
- Page 37 Installation Battery installation First remove the rear cover from the thermostat. Do this by carefully pulling the cover from the top and bottom of the cover and pull it outwards. Then insert two AA (LR6) 1.5V batteries the correct polarity. You can leave the cover until the next step.
- Page 38 After you’ve completed this step, preform electrical wiring. Once again, the assembly / installation should be carried out by a qualified person! Electrical scheme: 230V 50Hz Heating device Pump Heating device wiring diagram Pump wiring diagram...
- Page 39 Remove safety contacts. Connect power and signal cables to the housing section shown below. After completion of assembly, install safety of the contacts back on the housing. On display troubleshooting Short description of possible errors, the device might show on the display: Error shown on display Description Bad batteries - requires the replacement of batteries as soon as...
- Page 40 Basic thermostat setting Setting the clock Pressing the button enters the clock and day setting mode. When in editing mode, the current setting position will blink. First you are setting the time – hours and minutes. You can change the value by pressing or buttons. When you are done setting the time, press the ...
- Page 41 Example of setting the default 7 day schedule with 6 switches. Check table two for reference. Enter the editing mode by briefly pressing the P button. The day flashes, then press or to select the day you want to edit. Confirm the selection by briefly pressing the P button.
- Page 42 Default program schedules (you can rearrange them according to your wishes) Table 1 (7 days, 4 hourly/time switches) Heating 1-Morning 2-Work 3-Came back 4-Night Monday 6:00 21°C 8:00 16.5°C 21°C 16.5°C 18:00 22:00 Tuesday 6:00 21°C 8:00 16.5°C 21°C 16.5°C 18:00 22:00 Wednesday...
- Page 43 Table 2 (7 days, 6 hourly/time switches) Heating 1-Morning 2-Work 3-Lunch 4-Afternoon 5-Came back 6-Night Monday 6:00 8:00 12:00 14:00 18:00 22:00 21℃ 16.5℃ 21℃ 16.5℃ 21℃ 16.5℃ Tuesday 6:00 21℃ 8:00 16.5℃ 12:00 21℃ 14:00 16.5℃ 18:00 21℃ 22:00 16.5℃...
- Page 44 Table 3 (5 + 1 + 1 days, 4 hourly/time switches) Heating 1-Morning 2-Work 3-Came back 4-Night Monday 6:00 21°C 8:00 16.5°C 21°C 16.5°C 18:00 22:00 Tuesday 6:00 21°C 8:00 16.5°C 21°C 16.5°C 18:00 22:00 Wednesday 6:00 21°C 8:00 16.5°C 21°C 16.5°C 18:00...
- Page 45 Table 4 (5 + 1 + 1 days, 6 hourly/time switches) Heating 1-Morning 2-Work 3-Lunch 4-Afternoon 5-Came back 6-Night Monday 6:00 8:00 12:00 14:00 18:00 22:00 21℃ 16.5℃ 21℃ 16.5℃ 21℃ 16.5℃ Tuesday 6:00 8:00 12:00 14:00 18:00 22:00 21℃ 16.5℃...
- Page 46 Table 5 (5 + 2 days, 4 hourly/time switches) Heating 1-Morning 2-Work 3-Came back 4-Night Monday 6:00 21°C 8:00 16.5°C 21°C 16.5°C 18:00 22:00 Tuesday 6:00 21°C 8:00 16.5°C 21°C 16.5°C 18:00 22:00 Wednesday 6:00 21°C 8:00 16.5°C 21°C 16.5°C 18:00 22:00 Thursday...
- Page 47 Table 6 (5 + 2 days, 6 hourly/time switches) Heating 1-Morning 2-Work 3-Lunch 4-Afternoon 5-Came back 6-Night Monday 6:00 8:00 12:00 14:00 18:00 22:00 21℃ 16.5℃ 21℃ 16.5℃ 21℃ 16.5℃ Tuesday 6:00 8:00 12:00 14:00 18:00 22:00 21℃ 16.5℃ 21℃ 16.5℃...
- Page 48 Advanced thermostat settings To access advanced thermostat settings, turn off the device by briefly pressing the key. The device must be off or in standby. Then long press the P button (3 seconds) and enter the advanced setting. You can change the values using ...
- Page 49 ES (OFF) On / Off Smart Adaption, Adjustment - If you have this feature turned on, the thermostat will start heating and functioning before the next heating program is switched on and will try to get to the desired temperature as comfortable as possible.
- Page 50 Key Lock This feature allows you to lock the thermostat, and when the function is turned on, any changes to the settings are disabled. Activate the function by holding down and buttons at the same time for three seconds. When the function is activated, the lock symbol is displayed (see display description - 14).
- Page 51 »DIRECT« button. Click on it and the application will start looking for nearby Saswell thermostats. All of nearby thermostats, that are in ROOM CON mode will be seen and listed. Select the one that you wish to connect by pressing on his SSID* name (thermostats SSID is also printed on the case of the thermostat starting with »THERMOSTAT-»...
- Page 52 WIFI settings. Find the SSID* of the thermostat and click on it (SSID starts with »THERMOSTAT-»). Now return to the Saswell app. Now, you should able to see the current room temperature and set the desired heating temperature via app.
- Page 53 Using the App – Creating a new Saswell account (registration) To save all of your thermostats and be able to set your heating schedule programs, you have to create a new Saswell account if you don't have one yet. You can do this easy and anonymous by: Open the app.
- Page 54 Using the App – Adding a new thermostat Before adding a new thermostat to your account, you have to make sure that the thermostat is electrically powered (not only battery powered). Now check if the thermostat is in AP mode – ROOM CON. If not, turn it to ROOM CON using the instructions on previous pages.
- Page 55 After selecting the thermostat, you have to select the gateway to connect your thermostat to. The gateway is the name of SSID of your home wireless network. Select the one that is the closest to your Saswell thermostat to ensure connection quality. If your home wireless router is too far away, use a Wi-Fi extender or move the thermostat or router closer.
- Page 56 If the thermostat is successfully added, you should be able to see it under Overview windows near all of your other added thermostat, if there are any. Each thermostat is named like it’s SSID, which is also visible on the thermostats housing (“Thermostat-…”). You’ve successfully added your new Saswell thermostat to the Saswell app.
- Page 57 Using the App – Renaming and deleting the thermostat All of the newly added thermostats have generic and pre-set names. If you’d like to organize the thermostats in your home, you can easily rename each one by your preferences or remove one if you wish to re-add or just remove it from your account. You can do this by pressing on the thermostats name for a few seconds and a popup window should appear, asking for your choice to remove or rename the thermostat.
- Page 58 Using the App – Setting heating schedule programs, temperature and status After you’ve added a thermostat to your app, you can see it under Overview when you login to the app. Under overview you can see a short status of all thermostats – ECO (away) mode active or not, current room temperature, current set temperature and if the thermostat is turned off.
- Page 59 Heating schedule programs can be set by pressing on the button “PROGRAM”. This opens a new menu, which you can see on the left side. The heating schedule program can be turned on or off by sliding on top right button (1). Now you’re setting the heating schedule for (2) selected day or days, that you can mark on point 3.
Need help?
Do you have a question about the SAS908XWHB-7-APP and is the answer not in the manual?
Questions and answers