
Subscribe to Our Youtube Channel
Related Manuals for Clarke CDTJ12


Summary of Contents for Clarke CDTJ12
- Page 1 WARNING: Read these instructions before using the machine DOVETAIL JIG MODEL NO: CDTJ12 / CDTJ24 PART NO: 6462170, 6462175 OPERATION & MAINTENANCE INSTRUCTIONS LS0111...
-
Page 2: Introduction
GUARANTEE This CLARKE product is guaranteed against faulty manufacture for a period of 12 months from the date of purchase. Please keep your receipt as proof of purchase. -
Page 3: Table Of Contents
CONTENTS INTRODUCTION ............... 2 GUARANTEE ..............2 CONTENTS ............... 3 OVERVIEW ............... 4 PREPARATION FOR USE ..........5 Assembling the Jig..............5 Mounting the Jig ..............5 Setting the End Stops............6 Placing the Timber into the Jig..........7 Setting the Template Position..........7 Setting the Backstop Position .......... -
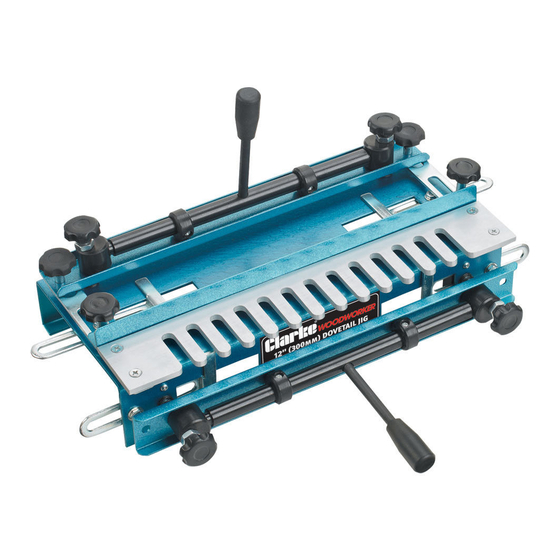
Page 4: Overview
OVERVIEW DESCRIPTION NO DESCRIPTION Locking Clamp Handle Backstop Locking Screw Eccentric Cam Horizontal Stop Eccentric Bar Vertical Stop Clamp Backstop Clamp Adjusting Screw Template Template Securing Screw Parts & Service: 020 8988 7400 / E-mail: Parts@clarkeinternational.com or Service@clarkeinternational.com... -
Page 5: Preparation For Use
PREPARATION FOR USE ASSEMBLING THE JIG Screw the front and top handles into the eccentric bars. • The workpieces will be locked when the top locking clamp handle is pushed away from you and when the lower locking clamp handle is pushed downwards. -
Page 6: Setting The End Stops
SETTING THE END STOPS 1. Use a set square to draw a pencil line halfway across the first finger of the template • The line must be square to the edges of the template. 2. Line up the inside edge of the left horizontal stop with the line you just drew on the template. -
Page 7: Placing The Timber Into The Jig
PLACING THE TIMBER INTO THE JIG 1. Align the timber so that the side of the workpiece is mounted in the front vertical clamp. • It should extend above the front edge of the jig by the thickness of the piece to be mounted under the top clamp (front or back of the drawer). -
Page 8: Setting The Backstop Position
SETTING THE BACKSTOP POSITION The distance the backstop needs to be positioned from the front of the template fingers depends on the size of router base fitted to your router, The formula to calculate this is:- router base diameter cutter tip diameter 2 x width of the drawer sides EXAMPLE Using a router which has a base diameter of 160 mm, making a drawer that... -
Page 9: Cutting A Dovetail
CUTTING A DOVETAIL PREPARATION OF TIMBER As with all detailed joinery the components must be sized, cut and squared accurately. • It is preferable that the width of the timber is in exact steps of 1/2" as this will give a series of fully-formed dovetails. The joints on the right of the project (1 + 2) are cut on the left hand side of the jig. -
Page 10: Cutting The Joint
CUTTING THE JOINT You should carry out the initial cuts on two trial pieces of timber of the same width and thickness as the final components. This will allow you to alter various settings in order to get the joint to fit perfectly. 1. -
Page 11: Troubleshooting
If you have any problems which cannot be resolved by reference to the above, or if you require spare parts for your jig please contact your local Clarke dealer. RECOMMENDED ROUTER We recommend you use a Clarke CR1C Router available from your local Clarke dealer. Model Number CR1C •...
Need help?
Do you have a question about the CDTJ12 and is the answer not in the manual?
Questions and answers