Advertisement
Quick Links
General Information:
Read through carefully before beginning assembly.
»
When assembling components, place on a clean, flat,
»
non-abrasive surface to avoid scratches.
In the event of missing or defective parts, please call our
»
customer service department directly at 1-877-258-6020
Tools required:
Cordless Drill with #2 phillips bit
»
Hammer
»
Tape Measure
»
Shovel
»
Post Hole Digger (recommended)
»
Ladder/Step stool (recommended)
»
Kingston pergola
Assembly & installation Instructions
Part #
1
4" sq. x 93" Post
2
1½" x 5½" x 106" Lower Support
3
1½" x 5½" x 106" Upper Support
4
⅞" x 1½" x 106" Top Rail
5
1½" Upper Support Bracket
6
4" sq. New England Post Cap
7
6⅛" Support Rail End Cap
8
30" U-channel Ground Anchor
9
Hardware Kit (includes):
PVC Glue Can
⅞" x 1½" Top Rail Cap
2" Kappet Screw
1¼" Kappet Screw
¾" Kappet Screw
Kappet Screw Caps
1" Self-tapping White-head Screws
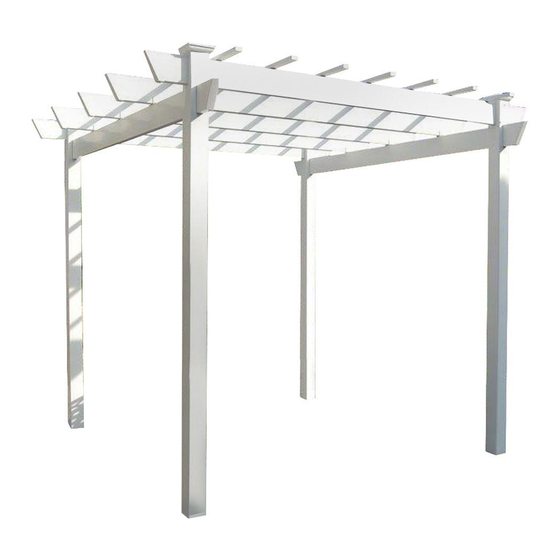
FIGURE 1
Product dimensions &
Part identification
Parts List:
Description
(Box Number)
(1)
(2)
(3)
Qty
4
2
(2)
5
(2)
7
6
(3)
4
(3)
14
(3)
4
(1)
1
14
48
35
24
107
8
Advertisement

Related Manuals for Dura Trel Kingston


Summary of Contents for Dura Trel Kingston
-
Page 1: Parts List
Kingston pergola Assembly & installation Instructions Parts List: Part # Description (Box Number) 4” sq. x 93” Post 1½” x 5½“ x 106” Lower Support 1½” x 5½“ x 106” Upper Support ⅞” x 1½” x 106” Top Rail 1½” Upper Support Bracket 4”... - Page 2 Lay out one lower support (part 2). [Lower support has six pilot holes drilled in top edge] Using ¾” kappet screws, fasten three upper support brackets (part 5) to lower support. Snap kappet screw caps over screw heads. Insert ends of lower support through bottom routed holes of two posts (part 1).
- Page 3 Lay two top rails (part 4) onto upper supports. To set width of pergola, line up outer most holes of top rails with outer most pilot holes of upper supports. Using 1¼” kappet screws, fasten top rails to upper supports. Snap kappet screw caps over screw heads.
- Page 4 Using 1¼” kappet screws, fasten top rails to upper supports. Snap kappet screw caps over screw heads. [This will center remaining upper supports] Using ¾” kappet screws, fasten upper support brackets to upper supports. Snap kappet screw caps over screw heads. Using 1¼”...
- Page 5 PERGOLA INSTALLATION Option 1 Slide one 30” steel u-channel ground anchor (part 8) into bottom of each post. Slide ground anchor about 12 inches into post, leaving 18 inches for in-ground. Using 1” self-tapping white-head screw fasten post to ground anchor. Using product dimension drawings (figure 1), dig holes approximately 18 inches deep.
Need help?
Do you have a question about the Kingston and is the answer not in the manual?
Questions and answers