Polygroup SUMMER WAVES ST1100 Owner's Manual
Sand filter pump for above ground swimming pools 10 inch 12 inch
Hide thumbs
Also See for SUMMER WAVES ST1100:
- Owner's manual (44 pages) ,
- Owner's manual (44 pages) ,
- Owner's manual (22 pages)
Table of Contents
Advertisement
Available languages
Available languages
SAND FILTER PUMP
READ AND KEEP THESE INSTRUCTIONS FOR FUTURE REFERENCE
For answers to common questions, setup videos and troubleshooting tips, please visit
support.polygroupstore.com or call Customer Service: (888) 919-0070
DO NOT RETURN PRODUCT TO STORE
Should you encounter a problem with your Polygroup® Product, please DO NOT return the product to the place of purchase. All Warranty claims must be made
directly to Polygroup®. Prior to contacting Customer Service, please first review the Troubleshooting Guide in the Installation Manual, or review the FAQ and
instructional videos at support.polygroupstore.com. If you are still unable to correct the problem, please contact Polygroup® Customer Service at (888) 919-0070. Please
have the product type, model number and your purchase receipt ready, so that our Customer Service Representative can assist you in resolving the problem. You may
be asked to return all or part of the product for inspection and/or repair. Do not return any product to Polygroup® without a Return Merchandise Authorization number.
Polygroup
Limited (Macao Commercial Offshore), (hereinafter "Polygroup
®
and workmanship for 180 days from the date of purchase.
and must produce such upon request by Polygroup
This Limited Warranty applies only to the original purchaser of the product and is limited solely to the repair or replacement of the product, to be decided in Polygroup
sole discretion. Consequential damages, including claims for loss of water, pool chemicals, damage, or labor are not covered under this Limited Warranty. This Warranty
will be declared invalid should the Purchaser modify or repair the product themselves or by unauthorized persons; use non-Polygroup
product; use the product in contravention of the manufacturer's Instructions; use improper voltage; abuse the product in any way; or through accident or negligence.
Normal wear-and-tear is not covered under this Warranty, nor are acts of God outside the control of Polygroup
IN NO EVENT SHALL Polygroup
®
FOR DIRECT OR CONSEQUENTIAL DAMAGES. Some states or countries, or others jurisdictions do not allow the exclusion or limitation of incidental or
consequential damages, so the above limitation or exclusion may not apply to you.
SUMMER WAVES
FOR ABOVE GROUND SWIMMING POOLS
ST1100 (10") / ST1600 (12") models
LIMITED WARRANTY
Original Purchaser must retain proof of such purchase in the form of an original store sales receipt
or its designated agents.
®
, THEIR AUTHORIZED AGENTS, RELATED ENTITIES, OR EMPLOYEES BE LIABLE TO THE BUYER OR ANY OTHER PARTY
DISTRIBUTED BY: Polygroup
Unit J, 10
Floor, Macau Square, Av do Infante D.Henrique, No.43-53A, Macau
th
") warrants to the original purchaser only, the Sand Filter Pump against defects in material
®
Warranty claims cannot be processed without a valid proof of purchase.
LIMITED (MACAO COMMERCIAL OFFSHORE)
®
OWNER'S MANUAL
®
To order parts and accessories,
please visit www.polygroupstore.com
parts or accessories with the
®
.
®
Manual #
09C3A40USA15
's
®
Advertisement
Chapters
Table of Contents

Subscribe to Our Youtube Channel
Related Manuals for Polygroup SUMMER WAVES ST1100


Summary of Contents for Polygroup SUMMER WAVES ST1100
-
Page 1: Limited Warranty
Warranty claims cannot be processed without a valid proof of purchase. ® This Limited Warranty applies only to the original purchaser of the product and is limited solely to the repair or replacement of the product, to be decided in Polygroup ’s ®... -
Page 2: Table Of Contents
TABLE OF CONTENTS Warnings ................................. 3 ~ 6 Preliminary Steps & Sand Pump Power Information & Part List ..............7 ~ 8 Setup Instructions ............................9 ~ 13 Operating Instructions ............................ . 14 Pump Motor Protection & Pool Maintenance & Pool Water Care ..............15 Troubleshooting Guide ............................ -
Page 3: Warnings
INSTALLING A POOL, IN ORDER TO COMPLY WITH STATE OR LOCAL LAWS REGARDING FENCING AND OTHER SAFETY REQUIREMENTS. CUSTOMERS SHOULD CONTACT THEIR LOCAL BUILDING CODE ENFORCEMENT OFFICE FOR FURTHER DETAILS. POLYGROUP® IS NOT RESPONSIBLE FOR ANY ADDITIONAL EXPENSES THAT YOU MAY INCUR. - Page 4 Turn on the pump for the recommended hours daily. If you are unsure of the time frames please refer to support.polygroupstore.com for the recommended Pump Operation Hours based on pool types and sizes. Clean and replace filter cartridge frequently. Replace only with genuine Polygroup / Summer Wave Brand filter cartridge.
-
Page 5: Warnings
OWNER’S MANUAL First Aid 1. Keep a working phone and a list of emergency numbers near the pool. 2. Become certified in cardiopulmonary resuscitation (CPR). In the event of an emergency, immediate use of CPR can make a lifesaving difference. Special Warning 1. -
Page 6: Save These Instructions
ASME American Society of Mechanical Engineers Two Park Avenue, New York NY 10016-5990 Contact: 800-843-2763 (U.S. & Canada) 973-882-1170 (outside North America) www.asme.org NSPI National Spa and Pool Institute (see APSP) UL Underwriters Laboratories 333 Pfingsten Road,Northbrook IL 60062-2096 Contact: 877-854-3577 or 847-272-8800 www.ul.com NSF NSF International P.O. -
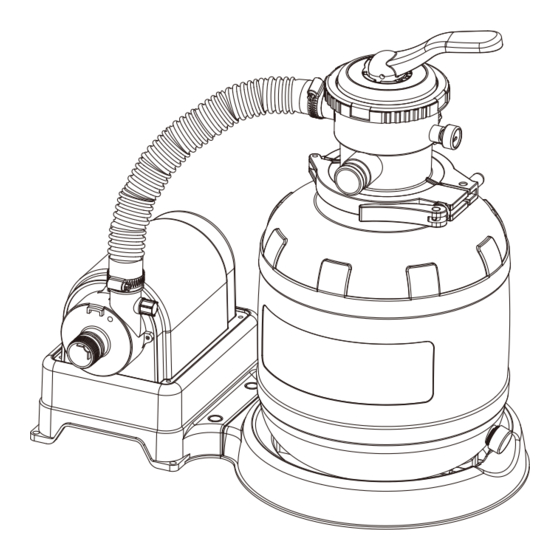
Page 7: Preliminary Steps & Sand Pump Power Information & Part List
5. All electrical components shall be installed in accordance with Article 680 of the National Electrical Code (NEC) “Swimming Pools, Fountains and Similar Installations” or its latest approved edition. 6. The ST Series Pump systems are manufactured by Polygroup and ETL control number 4000608 and 4006317 - double insulated and grounded - 120 Volts A.C. - Page 8 RETURN FITTING SUCTION FITTING Should you encounter any problems, contact Customer Service at (888) 919-0070 from 8 AM to 5 PM Mon. thru Fri. MST. Extended operating days and hours during peak season requirements.
-
Page 9: Setup Instructions
OWNER’S MANUAL SETUP INSTRUCTIONS Before assembling your product, please take a few minutes to check the contents and become familiar with all the parts. WARNING: CLIMBING HAZZARD! PLEASE PREVENT CHILDREN FROM CLIMBING ON THE FILTRATION SYSTEM TO GAIN ACCESS TO THE POOL. 2. - Page 10 5. Insert and push the Lock Pins all the way down to 6. With the Drain Valve of the Sand T pointing outward. secure the Pump with the Sand Tank Base Place the Sand T on the Sand Tank Base PUSH Drain Valve ALIGN...
- Page 11 OWNER’S MANUAL 8. Fill the tank with #20 silica sand ONLY. You can purchase the sand from your local home improvement or building material store. Slowly pour the sand into the Sand Tank until the sand level is between the Min and Max marks on the Center Pipe Sand 10.
- Page 12 Apply the Clamp to the flange of the 6-Port Valve C lose the Clamp by pushing the 2 jaws as close together as and the Sand Tank possible. IMPORTANT: Align the hinge on the Clamp with the ridge on the flange of the 6-Port Valve PUSH ALIGN 14.
- Page 13 OWNER’S MANUAL 15. Continue to turn the CAM-HANDLE to tighten the jaw until no 16. Insert the CAM-SHAFT Bolt Cap to the end of the CAM-BOLT. more turns can be made. Align the CAM-HANDLE with the Clamp and push the CAM-HANDLE toward the Sand Tank CAM-HANDLE 18.
-
Page 14: Operating Instructions
OPERATING INSTRUCTIONS FUNCTIONS OF THE 6-PORT VALVE WARNING: NEVER CHANGE POSITIONS ON THE 6-PORT VALVE WITH THE PUMP MOTOR RUNNING. VALVE POSITION FUNCTION WATER FLOW DIRECTION To reverse the water flow and wash the sand bed. Backwash the Pool > Pump > Sand (backward) > Drain Outlet BACKWASH sand before first use and every 2 weeks. -
Page 15: Pump Motor Protection & Pool Maintenance & Pool Water Care
5. Check filter pump, hoses and fittings for leaks. If a leak is found, see the “TROUBLESHOOTING GUIDE” Section below. 6. Check seams in pool periodically. Minor repairs may be made with the repair patch kit (supplied with pool). Additional patches are available from Polygroup ®... -
Page 16: Troubleshooting Guide
TROUBLESHOOTING GUIDE WARNING: TURN OFF THE PUMP AND UNPLUG THE POWER CORD BEFORE TROUBLESHOOTING THE FILTER PUMP. PROBLEM CAUSE SOLUTION A The motor is not plugged in. A GFCI power cord must be plugged into a grounded 3-prong power outlet. Or GFCI not activated B Low voltage B Check the line voltage, it must be in the range of 105 to 125 Volts A.C. -
Page 17: Replacement Parts Ordering Info
OWNER’S MANUAL REPLACEMENT PARTS ORDERING INFO ST1100 ST1600 Description Key# PART # PART # P58PP1782E09 P58PP2884A09 Sand Tank Base P58PP2884G8U Sand Tank P58000000W05 P58000001W05 Drain Valve Cap P58PF0800W05 P58PF0800W05 Center Pipe P586402000W1 P586402001W1 Sand Guard P58PF8891P01 P58PF8891P01 P58897023E09 P58897023E09 Clamp P58897023G8U P58897023G8U CAM-SHAFT Bolt Cap... -
Page 18: Asme Compliant Suction Fitting Information
OWNER’S MANUAL ASME COMPLIANT SUCTION FITTING INFORMATION PSF-100A AND PSF-100B SUCTION OUTLET (FOR ABOVE GROUND POOLS) 1. PSF-100A and PSF-100B Suction Outlets are certified by IAPMO in accordance with the ASME/ANSI A112.19.8b-2009 Suction Fitting for use in Swimming Pools, Wading Pools, Spas, and Hot Tubs. 2. - Page 19 Si le surge algún problema con su producto Polygroup®, NO devuelva el producto al establecimiento de compra. Las reclamaciones por garantía deben realizarse directamente a Polygroup®. Antes de ponerse en contacto con el servicio de atención al cliente, revise la guía de resolución de problemas, en el manual de instalación, o consulte las FAQ en support.polygroupstore.com Si continúa sin poder resolver el problema, póngase en contacto con el servicio de atención al cliente...
- Page 20 Índice Advertencias ..............................3 ~ 6 Pasos preliminares y Información sobre la potencia de la bomba de arena y Lista de piezas......7 ~ 8 Instrucciones de montaje ..........................9 ~ 13 Instrucciones de operación ..........................14 Protección del motor de la bomba y Mantenimiento de la piscina y Tratamiento del agua de la piscina ....15 Guía de resolución de problemas ........................
-
Page 21: Advertencias
ADICIONALES AL INSTALAR UNA PISCINA, EN CUMPLIMIENTO DE LAS LEYES ESTATALES O LOCALES RELATIVAS AL VALLADO Y OTROS REQUISITOS DE SEGURIDAD. LOS CLIENTES DEBEN PONERSE EN CONTACTO CON LAS AUTORIDADES LOCALES CORRESPONDIENTES PARA MÁS INFORMACIÓN. POLYGROUP NO ES RESPONSABLE POR GASTOS ADDICIONALES QUE PUEDAN OCCURIR. Precauciones de seguridad para los niños 1. - Page 22 Active el sistema de bomba del filtro durante al menos 6 horas al día. Limpie y cambie el cartucho del filtro con frecuencia. Reemplazar solo con un cartucho de filtro original de la marca Polygroup / Summer Waves .
- Page 23 MANUAL DEL USUARIO filtro de la bomba debe colocarse de manera que no pueda ser usado por los niños pequeños como medio de acceso a la piscina. No deje juguetes dentro de la piscina al terminar de usarla, ya que los juguetes y objetos similares podrían atraer a los niños a la piscina. 3.
- Page 24 ANSI American National Standards Institute 25 West 43rd Street, New York NY 10036 Contacto: 212-642-4900 www.ansi.org APSP Association of Pool & Spa Professionals (formerly National Spa and Pool Institute) 2111 Eisenhower Avenue, Suite 500 Alexandria VA 22314-4679 Contacto: 703-838-0083 www.apsp.org ASME American Society of Mechanical Engineers Two Park Avenue, New York NY 10016-5990 Contacto: 800-843-2763 (U.S.
-
Page 25: Pasos Preliminares Y Información Sobre La Potencia De La Bomba De Arena Y Lista De Piezas
última edición aprobada. 6. Los sistemas de bomba de filtración de la serie CP son fabricados por Polygroup® con el número de control de ETL 400608 y 4006317, con doble aislamiento y conexión a tierra, 120 VCA y 60 Hz. (Todas las unidades deben contar con 105 VCA como mínimo para empezar a funcionar correctamente). - Page 26 Accesorio de retorno Accesorio de succión En caso de problemas, póngase en contacto con el servicio de atención al cliente en el (888) 919-0070, de L a V de 8h a 17h. MST. Los horarios de atención se amplían durante temporada alta...
-
Page 27: Instrucciones De Montaje
MANUAL DEL USUARIO INSTRUCCIONES DE MONTAJE Antes de montar el producto, dedique unos minutos a revisar el contenido y familiarícese con todas las piezas. ADVERTENCIA: COLOQUE ESTE PRODUCTO APARTADO DE LA PISCINA A FIN DE EVITAR QUE LOS NIÑOS SE SUBAN A ÉL Y ACCEDAN A LA PISCINA. 2. - Page 28 5. Coloque los pasadores de bloqueo hasta abajo para 6. Con la válvula de desagüe del depósito de arena asegurar la bomba a la base del depósito de arena colocada hacia fuera. Coloque el depósito de arena en su base PRESIONAR Válvula de drenaje...
- Page 29 MANUAL DEL USUARIO 9. Llene el depósito con arena de sílice #20 UNICAMENTE. Puede comprar la arena en una tienda de bricolaje o almacén de materiales de construcción. Vaya echando arena poco a poco en el depósito de arena hasta que el nivel de arena esté entre las marcas de mínimo y máximo del pipa central Arena 11.
- Page 30 Coloque la abrazadera en la reborde de la válvula de 6 Cierre la abrazadera acercando las 2 mordazas lo máximo posible. puertos y el depósito de arena PRESIONAR ALINEAR IMPORTANTE: Alinie la bisagra a la abrazadera cresta de la valvual de 6 puertos 15.
- Page 31 MANUAL DEL USUARIO 16. Siga girando el Mango para apretar la mordaza hasta que no 17. Inserte el tapón en el tornillo para la abrazadera. pueda girarse más. Alinee el PASADOR/TORNILLO con la abrazadera y empújelo hacia el depósito de arena PASADOR DEL EJE DE LEVAS 19.
-
Page 32: Instrucciones De Operación
INSTRUCCIONES DE OPERACIÓN FUNCIONES DE LA VÁLVULA DE 6 PUERTOS CUIDADO: NUNCA CAMBIE DE POSICIONES EN LA VALVULA DE 6 PUERTOS CUANDO ESTE PRENDIDA LA BOMBA POSICIÓN DE LA VÁLVULA FUNCIÓN DIRECCIÓN DEL FLUJO DE AGUA Para invertir el flujo de agua y lavar la cama de arena. Realice una (BACKWASH) resacade la arena antes de usar por primera vez y cada dos Piscina >... -
Page 33: Protección Del Motor De La Bomba Y Mantenimiento De La Piscina Y Tratamiento Del Agua De La Piscina
NOTA : Niveles excessivos de cloro o niveles bajos de pH pueden dañar su lona de piscine y también cambiar el color de la lona. 3. Se puede limpiar la piscina con una aspiradora usando una mangera de jardín de Polygroup® o puede comprarla en una tienda de suministros para piscina. -
Page 34: Guía De Resolución De Problemas
GUÍA DE RESOLUCIÓN DE PROBLEMAS ADVERTENCIA: DESENCHUFE EL CABLE DE ALIMENTACIÓN ANTES DE SOLUCIONAR CUALQUIER PROBLEMA EN LA BOMBA DE FILTRACIÓN. PROBLEMA CAUSA SOLUCIÓN A El motor no está conectado. O el A El cable de alimentación del interruptor diferencial debe estar conectado a un tomacorriente conectado a tierra. -
Page 35: Información Sobre El Pedido De Piezas De Repuesto
MANUAL DEL USUARIO INFORMACIÓN SOBRE EL PEDIDO DE PIEZAS DE REPUESTO ST1100 ST1600 Description Nº Llave N.º DE PIEZA N.º DE PIEZA P58PP1782E09 P58PP2884A09 Base del depósito de arena P58PP2884G8U Depósito de arena P58000000W05 P58000001W05 Tapón de la válvula de desagüe P58PF0800W05 P58PF0800W05 Conducto central... -
Page 36: Información Sobre El Accesorio De Succión En Conformidad Con Asme
MANUAL DEL USUARIO INFORMACIÓN SOBRE EL ACCESORIO DE SUCCIÓN EN CONFORMIDAD CON ASME PSF-100A Y PSF-100B ORIFICIO DE SALIDA DE SUCCIÓN (PARA PISCINAS SOBRE SUELO) 1. Los orificios de salida de succión PSF-100A y PSF-100B tienen la certificación de la IAPMO de acuerdo con la norma ASME/ANSI A112.19.8b-2009 Accesorio de succión para piscinas, piscinas infantiles, spas y bañeras de hidromasaje.
Need help?
Do you have a question about the SUMMER WAVES ST1100 and is the answer not in the manual?
Questions and answers