Polygroup Funsicle SkimmerPlus SFX600 User Manual
Filter pump
Hide thumbs
Also See for Funsicle SkimmerPlus SFX600:
- Owner's manual (63 pages) ,
- User manual (48 pages) ,
- Owner's manual (36 pages)

Related Manuals for Polygroup Funsicle SkimmerPlus SFX600


Summary of Contents for Polygroup Funsicle SkimmerPlus SFX600
- Page 1 SkimmerPlus Filter Pump User Guide Simple steps to setting up and enjoying your pool pump Sign up for future 09C3A4USAA05 offers and discounts. Scan the QR Code. ©2022...
-
Page 2: Table Of Contents
Contents Welcome! ..........................3 Warranty Information . -
Page 3: Welcome
Learn more at Funsicle.com. Limited Warranty Polygroup® makes products at the best quality we are able to offer. Polygroup is pleased to offer warranty for the repair or replacement of pool products for 1 year from the date of purchase. -
Page 4: Safety Guidelines
Customers should contact their local building code enforcement office for further details. Polygroup is not responsible for any additional expenses that you may incur. SAFETY CARE FOR CHILDREN •... - Page 5 SWIMMING POOL BARRIERS Important: Swimming pool barriers, which restrict access to the pool by small children, may be required by law. A barrier is necessary to provide protection against potential drowning and near drowning. Barriers are not a substitute for constant supervision of children. Check state or local laws and codes before setting up the pool.
- Page 6 Pump Operation Hours based on pool types and sizes. Clean and replace filter cartridge frequently. Replace only with a genuine Polygroup® / Funsicle® Brand filter cartridge. Refer to the Filter Pump User Guide for additional water care information.
- Page 7 • Never enter the pool or spa if a suction fitting or drain cover is loose, broken, or missing. • Immediately notify the pool/spa owner or operator if you find a drain cover loose, broken, or missing. RISK OF DROWNING •...
- Page 8 • Do not install on a deck or other surface at, above, or slightly below the top rail of the pool. • Do not use the filter pump during severe weather conditions, i.e. electrical storms, tornadoes, etc. • Be aware of overhead power lines when vacuuming your pool or using a telescoping pole. •...
- Page 9 • Connect the equipment into an outlet on a circuit different from that to which the receiver is connected. • Consult the dealer or an experienced radio/TV technician for help. POLYGROUP SERVICES N.A. INC. 303 SW 16th Street, Suite 5, Bentonville, AR, 72712, USA SAVE THESE INSTRUCTIONS...
-
Page 10: Before You Begin
• This Filter Pump is manufactured by Polygroup® and ETL control number 4000608 and 4006317 – double insulated and grounded – 120VAC 60Hz. All units must have a minimum of 105VAC to start and run properly. - Page 11 Pool Exterior Pool Interior With GFCI Without GFCI...
-
Page 12: Setting Up The Filter Pump
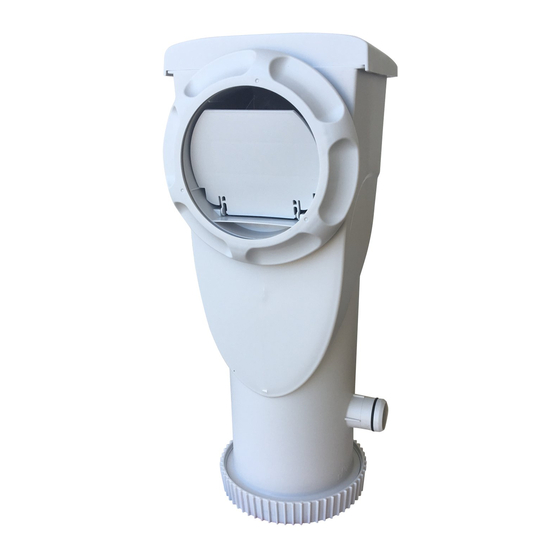
Setting Up the Filter Pump WARNING: Climbing hazard! Please prevent children from climbing on the filter canister to gain access to the pool. STEP 1: Install the Skimmer 1. Set up your pool following the instructions in 2. Turn counterclockwise to remove the the Pool User Guide. -
Page 13: Step 2: Install The Return Fitting
STEP 2: Install the Return Fitting 1. Assemble the Return Fitting Now the Pump should be installed outside the pool wall as below. indicated below. Pool Interior Pool Interior To optimize water circulation, twist the RF Diverter so that it faces up and away from the Skimmer Opening. -
Page 14: Using The Pump
3. You can now fill the pool with water up to 2. Slide close the Top Cover onto the between the MIN and MAX markings on the Skimmer Canister inside of Skimmer Canister The water level should be between the min and max markers located inside the Skimmer Canister. - Page 15 Description of GFCI Plug with Timer Function “RESET” button: • When the display screen shows a number between "01” to “10", but the pump is not operating (e.g. the "TEST" button is pressed while the pump is working), press the "RESET"...
-
Page 16: Maintaining The Pump
Maintaining the Pump • Check the pump output daily. If water flow reduces, see Problem 2 of Troubleshooting Guide (p. 23). • Check the Pump, Hoses and Fittings for leaks. If a leak is found, see Problem 4 of Troubleshooting Guide (p. 23). •... -
Page 17: Caring For Your Pool
Caring for Your Pool The following items are required to get your pool ready for use. They are available at funsicle.com • or your local pool supplies stores: a. Test kit – for checking the chlorine and pH levels of the pool water b. -
Page 18: Servicing The Pump
Servicing the Pump The most efficient way to troubleshoot or replace the Pump is to disassemble the entire filtration system. Please drain the water level to below the pool’s Skimmer Opening, then disassemble the system following the steps below. CAUTION: •... - Page 19 3. Put a water container (not included) under the Skimmer to collect water. Slide open the Top Cover , and take out the Strainer Basket and Filter Cartridge 4. Have one person holding the Water Stopper and Skimmer Canister , while the other person unscrews the Motor Seal Nut CAUTION: DO NOT PUSH OR PULL THE CANISTER as this may cause damage between the Canister and pool liner.
- Page 20 STEP 2: Inspect or Replace the Rotor The Pump consists of a Rotor Assembly and its related parts. If the Rotor and/or its parts is/are broken, or the Rotor, even in perfect condition, is not seated in place between the Volute Cover Pump Body , the Pump will not function properly.
- Page 21 STEP 3: Replace or Reassemble the Pump IMPORTANT: Make sure that the cord of Lubricate the Canister Gasket , then insert it the Motor Assembly is placed through back into the groove (inner groove for the Motor Seal Nut BEFORE replacing SFX600/SFX1000) at the bottom of the the Pump.
- Page 22 Once the Motor is correctly aligned, match the threads of the Motor Seal Nut to that of the Canister, and tighten by twisting the Nut counterclockwise. IMPORTANT: Make sure the Nut and Canister are not cross-threaded; otherwise leaks may occur.
-
Page 23: Troubleshooting Guide
Troubleshooting Guide Problem Cause Solution A. Plug the Power Cord Set to a grounded power outlet. For Power A. Pump not plugged in Cord Set (with GFCI), press the RESET button to start the Pump. 1. Pump Motor B. Power Cord Set B. - Page 24 WARRANTY For warranty information, visit funsicle.com/warranty. NEED PARTS? To order parts and accessories, visit funsicle.com. REGISTER YOUR PRODUCT Scan the QR code Distributed by: Polygroup Pacific Limited Unit 606, 6th Floor, Fairmont House, 8 Cotton Tree Drive, Central, Hong Kong.
Need help?
Do you have a question about the Funsicle SkimmerPlus SFX600 and is the answer not in the manual?
Questions and answers
Output on pump is 1/2 when filter is in
Does the water stopper part #23 need to be attached to the skimmer canister when the filter pump is running?
Do you need to prime the filter and if so, how to do that??
How can my filter pump be set to run all the time instead of turning off after 10hrs
The numbers on pool are P40014425 and F1140-N 102222022 , Pump runs few seconds stops , can I purchase a Pump replacement, maybe just the bottom with Pump in it.
My pump is not working I can change the hours but the test & rest buttons are not working