Table of Contents
Advertisement
Quick Links
Download this manual
See also:
Quick Manual
Advertisement
Table of Contents

Subscribe to Our Youtube Channel
Related Manuals for Elektron Analog Four MKII


Summary of Contents for Elektron Analog Four MKII
- Page 1 Analog Four MKII Digital mind, analog soul User Manual...
-
Page 2: Fcc Compliance Statement
Elektron may also make improvements and/or changes in the products and programs described in this document at any time without notice. In no event shall Elektron be liable for any special, indirect, or consequential damages or any damages whatsoever resulting from loss of use, data, or profits, whether in an action of contract, negligence, or other action, arising out of or in connection with the use or performance of this information. - Page 3 • Do not exceed the limitations specified in the Electrical specifications. SAFETY INSTRUCTIONS FOR THE POWER ADAPTER ELEKTRON PSU-3b • The adapter is not safety grounded and may only be used indoors. • To ensure good ventilation for the adapter, do not place it in tight spaces. To prevent risk of electric shock and fire because of overheating, ensure that curtains and other objects do not prevent adapter ventilation.
-
Page 4: Table Of Contents
4.1.2 ABOUT THE OSCILLATORS AND FILTERS ..........15 5. OVERVIEW OF THE ANALOG FOUR MKII STRUCTURE ......16 5.1 +DRIVE . - Page 5 TABLE OF CONTENTS 8.1.3 PROJECT MANAGER ..............22 9.
- Page 6 TABLE OF CONTENTS 9.11.8 MODULATION WHEEL ..............34 9.11.9 BREATH CONTROLLER .
- Page 7 TABLE OF CONTENTS 10.10 CLICK TRACK ................44 10.10.1 ACTIVE .
- Page 8 15.3 ANALOG FOUR MKII AS A FILTER BANK ........... 73 15.4 USING AN EXTERNAL OSCILLATOR WITH THE ANALOG FOUR MKII ......75 15.5 ANALOG FOUR MKII WITH AN ELECTRIC GUITAR .
- Page 9 TABLE OF CONTENTS...
-
Page 10: Introduction
1. INTRODUCTION 1. INTRODUCTION Thank you for choosing the Analog Four MKII. It is a digitally controlled analog synthesizer featuring, among many things, the renowned Elektron step sequencer. This is truly an analog synthesizer for the creative artist. To make the most of the machine, we recommend you to carefully read this manual. -
Page 11: Analog Four Mkii Background
We at Elektron owe a lot to analog technology. It is in our blood. The Sidstation, our first product, featured an analog filter which was decisive in generating the unique sound of the synth. With the Analog Four MKII we take the next step on our analog journey. -
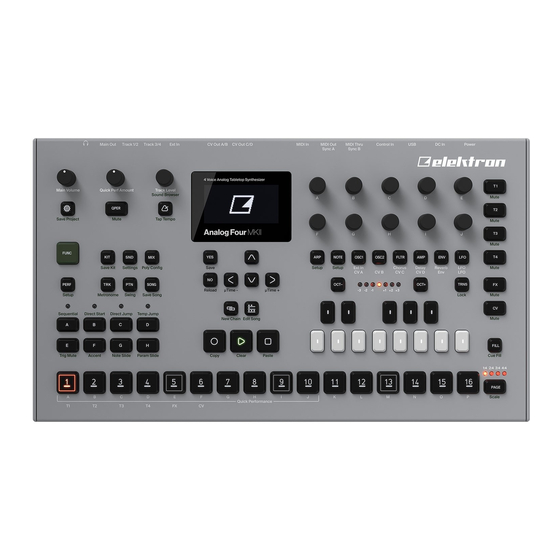
Page 12: Panel Layout And Connectors
3. PANEL LAYOUT AND CONNECTORS 3. PANEL LAYOUT AND CONNECTORS 3.1 FRONT PANEL 1. MAIN VOLUME sets the volume for the main outputs and the headphones output. 2. [GLOBAL SETTINGS] opens the GLOBAL SETTINGS menu. The secondary function opens the SAVE PROJECT menu. -
Page 13: Rear Connectors
1. POWER, For turning the unit on and off. 2. DC IN, Use the included Elektron PSU-3b power adapter, connected to a power outlet. 3. High Speed USB 2.0, Use an A to B USB 2.0 connector cable to a computer host. -
Page 14: Connecting The Unit
2. Connect the main out L/R from the Analog Four MKII to your mixer or amplifier. 3. If you want to use MIDI, connect MIDI OUT from the Analog Four MKII to the MIDI IN of the device you wish to send data to. Connect the MIDI IN of the Analog Four MKII to the MIDI OUT of the device you wish to receive data from. -
Page 15: Analog Four Mkii Signal Path
The ladder filter utilizes discrete low-noise transistors, and the multimode filter uses high-quality VCAs. The combination of tradition and innovation ensures a unique sound with a broad range of possibilities. For more information, please see “APPENDIX E: ANALOG FOUR MKII ARCHITEC- TURE” on page 104. -
Page 16: Overview Of The Analog Four Mkii Structure
128 Sounds. Generic settings and states (tempo, mutes et cetera) are also stored in each project. A project becomes the active working state of the Analog Four MKII once it’s loaded. From here it is pos- sible to edit the patterns, kits, songs, and globals of the project. The Analog Four MKII always retains the active working state, the active project, even when switched off. -
Page 17: Chains
The synth tracks consist of tracks 1–4. To edit a synth track, press the [TRACK 1–4] key. Sounds are loaded to the synth tracks. Sounds can be played polyphonically. 5.3.2 THE FX TRACK The FX track controls the Analog Four MKII internal send effects. To edit the FX track, press the [FX] track key. 5.3.3 THE CV TRACK The CV track is used for controlling external equipment capable of receiving analog CV and Gate signals. -
Page 18: The User Interface
6. THE USER INTERFACE 6. THE USER INTERFACE The screen is the center of Analog Four MKII editing. 1. The currently active kit. When turning a DATA ENTRY knob, the full name of the adjusted parameter is shown here. 2. The current tempo displayed with one decimal. -
Page 19: Copy, Clear And Paste
The Overbridge software suite enables a tight integration between the Analog Four MKII and a computer DAW software. When using Overbridge, the user interface for the Analog Four MKII will present itself as a clearly laid out plug-in window in your DAW. Access, edit, and automate parameters for sound shaping on screen. Always find your device preset parameters in the same state as you left them when you return to your DAW project, with the convenient total recall functionality. -
Page 20: Quick Start
THE UNIT” on page 14. 7.1 PLAYING THE FACTORY PRESETS The Analog Four MKII is shipped with several preset patterns, kits, and Sounds. To immediately start experi- menting with the Analog Four MKII, just follow the instructions below. 1. Switch on the Analog Four MKII. -
Page 21: Projects
8. PROJECTS A project is the top level structure of the Analog Four MKII. A project contains 128 patterns, 128 kits, 16 songs, 4 global slots, and a project Sound pool consisting of up to 128 Sounds. Projects are handy when for example wanting to save a specific setup for a live performance or for managing a select number of compo- sitions. -
Page 22: Project Manager
8. PROJECTS A small arrow in front of the project name indicates the slot that the currently active proj- ect is linked to. Projects can be copied/cleared/pasted in the LOAD PROJECT and SAVE PROJECT menus. A lock symbol indicates the project is write protected. 8.1.3 PROJECT MANAGER Opens the PROJECT MANAGER menu. -
Page 23: Kits And Sounds
9. KITS AND SOUNDS 9. KITS AND SOUNDS Kits and Sounds are the basic building blocks of Analog Four MKIIs sound crafting. A kit is a collection of Sound, FX, and CV track parameter settings. A Sound is essentially a synth track patch, made up by sub- tractive synthesis from the oscillators through the filters via its various parameter settings. -
Page 24: Load Kit
9. KITS AND SOUNDS 9.2.2 LOAD KIT Opens a menu where you can load one of the up to 128 saved kits. The kit list will appear when you open this menu. Inverted graphics indicates the active kit. Use the [ARROW] keys or the TRACK LEVEL knob to select the kit you wish to load. -
Page 25: Control 2 In Mod
9. KITS AND SOUNDS By default, the parameter macro knob spans a parameter value range of 0–127. A parameter macro value of 0 will not introduce any changes to the sound. The bar on the left in the screen shows a graphical representation of the incoming signal. 9.2.9 CONTROL 2 IN MOD Same as CONTROL 1 IN MOD but for Control In 2. -
Page 26: Performance Rename
9. KITS AND SOUNDS Use the [UP] [DOWN] arrow keys to select the DATA ENTRY knob corresponding to the perfor- mance macro that is edited. Press [YES] to confirm the selection. The menu where track parameters are assigned to the selected performance macro will be displayed. Up to five track parameters can be assigned to a performance macro. -
Page 27: Performance Mixer
9. KITS AND SOUNDS 9.3.5 PERFORMANCE MIXER Press [MIX] to open the PERFORMANCE MIXER menu. In this menu, the level of the tracks can be controlled with DATA ENTRY knobs A-E. 9.4 QUICK PERFORMANCE Quick performance gives you the possibility to control one of your performance macros without being in PERFORMANCE mode. -
Page 28: Voice Routing
9. KITS AND SOUNDS press the [TRIG 1–4] keys. When in the POLY CONFIG menu, the [TRIG 1–4] keys on the front panel will be half-bright. When a voice is activated, the corresponding [TRIG] key will be full-bright. Voices that are not set to be poly enabled will be dedicated monophonic voices for their corresponding tracks. - Page 29 9. KITS AND SOUNDS POLYPHONIC VOICE ALLOCATION METHOD: RESET (SHOWN AS PLAYED FROM TRACK 1) PLAYED NOTE C/D/D#/F BEGINNING OF NOTE END OF NOTE VOICE A/B/C/D ASSIGNED VOICE VOICE C VOICE B VOICE B VOICE A VOICE A POLYPHONIC VOICE ALLOCATION METHOD: ROTATE PLAYED NOTE C/D/D#/F BEGINNING OF NOTE...
- Page 30 9. KITS AND SOUNDS POLYPHONIC VOICE ALLOCATION METHOD: REASSIGN PLAYED NOTE C/D/D#/F BEGINNING OF NOTE END OF NOTE VOICE A/B/C/D ASSIGNED VOICE VOICE D VOICE C VOICE B VOICE B VOICE A VOICE STEALING PLAYED NOTE C/D/D#/F/G BEGINNING OF NOTE END OF NOTE VOICE A/B/C/D ASSIGNED VOICE...
-
Page 31: Sound Menu
9. KITS AND SOUNDS 9.6 SOUND MENU In this menu Sounds in the +Drive Sound library or the Sound pool of the active project can be browsed and managed. Other menu options let you clear the track Sound, rename the track Sound or change the set- tings for the track Sound. -
Page 32: Search
9. KITS AND SOUNDS 9.7.6 SEARCH Performs a text search and list all Sounds with names matching or including the text. See “THE NAMING MENU” on page 10 on how to enter text. Open the SOUND BROWSER instantly by double-pressing [T1–4] keys. The SOUND BROWS- ER may also be accessed by pressing [FUNC] + TRACK LEVEL. -
Page 33: Store Track Sound
9. KITS AND SOUNDS • +DRIVE • BANK A–P 9.8.3 STORE TRACK SOUND Saves the active track Sound to the selected slot. [YES] + [SND] offers a short cut to this operation. 9.8.4 RENAME Renames the selected Sound. 9.8.5 EDIT TAGS Opens a menu where Sounds can be tagged. -
Page 34: Oscillator Drift
Gives access to a menu where up to 5 PARAMETER page parameters can be assigned to the MIDI pitch bend command. If MIDI pitch bend messages are sent to the Analog Four MKII from an external device, these messages will affect the parameters assigned in this menu. Open the menu by pressing [YES]. -
Page 35: Breath Controller
9. KITS AND SOUNDS 9.11.9 BREATH CONTROLLER Gives access to a menu where up to 5 PARAMETER page parameters can be assigned to the MIDI breath controller command (CC #2). Open the menu by pressing [YES]. Setting up the parameters works in the same way as setting up performance macros. -
Page 36: The Fx Track
FX and CV track parameter settings are only saved as part of a kit. 9.14.1 THE FX TRACK The FX track controls the Analog Four MKII internal send effects. To edit the FX track, press the [FX] track key. Five PARAMETER pages exist for the FX track: EXT IN contains parameters relating to the external inputs. -
Page 37: The Sequencer
• Length and time signature for the tracks. 10.1 BASIC PATTERN OPERATIONS The Analog Four MKII can seamlessly switch between patterns. This, plus the ability to chain patterns, are handy features when for example making live improvisations. 10.1.1 SELECTING A PATTERN Press the [BANK GROUP] key to choose the bank group from which a pattern will be selected. -
Page 38: Tempo
[FUNC] key is released. “PREP” is shown in the lower left corner of the screen. Tempo shift is very handy when manually syncing the Analog Four MKII to a turntable or an external sound source. Note that you do not need to be in the TEMPO menu to perform tempo shifting. -
Page 39: Trig Types
LIVE RECORDING mode is the second method of adding trigs to the tracks. In this recording mode, the [KEYBOARD] keys, or an external MIDI keyboard connected to the Analog Four MKII, can be played in real time to input trigs to the tracks. It is also possible to enter parameter locks in real time. Trigs input in LIVE RECORDING mode will be placed on the sequencer in a micro timed fashion, meaning the µTM... -
Page 40: Notes Setup
10. THE SEQUENCER 10.4.1 NOTES SETUP Contains settings mainly relating to track quantization and scale. It is the same menu as accessed by pressing [FUNC] + [NOTE]. The NOTES SETUP menu is covered in section “NOTES SETUP” on page 10.4.2 ARP SETUP Contains settings for the track arpeggiators. -
Page 41: Mod
10. THE SEQUENCER 10.6.1 MOD Activates the arpeggiator and controls how the arpeggiated notes will be sorted. OFF will deactivate the arpeggiator. TRU will play the notes in the same order as they were inserted. UP will play the notes in ascending order, from the lowest note to the highest, on a per octave basis. DWN will play the notes in descending order, from the highest note to the lowest, on a per octave basis. -
Page 42: Arpeggiator Setup
10. THE SEQUENCER 10.7 ARPEGGIATOR SETUP Pressing [FUNC] + [ARP] opens the ARPEGGIATOR SETUP menu. Here the arpeggiator length and note offsets are set. Select the length of the arpeggio by turning DATA ENTRY knob E. The max length is 16 sequencer steps. The <TRIG LEDS>... -
Page 43: Env (F)
10. THE SEQUENCER 10.8.6 ENV (F) Controls whether the ENVF should be retrigged or not when a note trig or lock trig is activated by the sequencer. 10.8.7 ENV (2) Controls whether the ENV2 should be retrigged or not when a note trig or lock trig is activated by the sequencer. -
Page 44: Click Track
10. THE SEQUENCER 10.10 CLICK TRACK The CLICK TRACK menu controls the internal metronome of the Analog Four MKII. Open the menu by pressing [FUNC] + [TRK]. Use the [UP]/[DOWN] arrow keys or the TRACK LEVEL knob to select in the list of settings. -
Page 45: Advanced Mode
A 2X time signature setting is useful for increasing the base resolution of the step se- quencer to 32nd notes. A 3/4X setting is useful when the Analog Four MKII is playing alongside other instruments set to the same BPM, and you want the Analog Four MKII to play triplets. -
Page 46: Sound Locks
10. THE SEQUENCER locked trig will begin to flash rapidly, indicating the trig now contains a parameter lock. Remove a single parameter lock by holding [TRIG] + pressing the DATA ENTRY knob of the locked parameter. By remov- ing a note trig and entering it again, all parameter locks will be erased from the trig. In LIVE RECORDING mode, turning a DATA ENTRY knob will input parameter locks to the active track. -
Page 47: Fill Mode
10. THE SEQUENCER 1ST is true when 1ST is false. A trig with this trig condition is always active apart from the first time the pattern plays (when looped). X% is a probability condition. There is an x% chance that the trig will be active. A:B A sets how many times the pattern plays before the trig condition is true. -
Page 48: Note Slide
10. THE SEQUENCER Select the track that will be affected by pressing the corresponding [TRACK] key. Select the accent value by turning the TRACK LEVEL knob. The higher the value, the more accentuation will be added to accent trigs. While the ACCENT menu is open, the sequencer will display accent trigs. Place or remove accent trigs by pressing the [TRIG] keys. -
Page 49: Swing
10. THE SEQUENCER 10.12.9 SWING Sets the swing of the pattern, allowing for a different rhythmic groove. Access this menu by pressing [FUNC] + [PTN]. 10.12.10 TRACK TRANSPOSE Tracks can be transposed up or down, and the transpose function can be locked for one handed oper- ation. -
Page 50: Quick Save And Reload Commands
10. THE SEQUENCER pressing [PAGE] + [STOP] again. Press [PAGE] + [PLAY] to clear the active track page. Undo the oper- ation by repeating the key presses. Copy the Sound of a synth track by pressing [TRACK] + [RECORD]. Select a new track to which the Sound will be pasted and press [TRACK] + [STOP] to paste. -
Page 51: Chains And Songs
11. CHAINS AND SONGS 11. CHAINS AND SONGS Chains are sequences consisting of several patterns. Chains and patterns can be used to form songs. 256 pattern entries are available for the 64 chains. One chain, for example, can be made of 256 patterns or two chains can be made of 128 patterns each. -
Page 52: Song Edit Menu
11. CHAINS AND SONGS 11.2.1 SONG EDIT MENU Songs are created in the SONG EDIT menu, which is accessed by pressing [FUNC] + [SONG MODE]. Songs are played row by row, starting from the top and moving towards the bottom. If a song row con- tains a chain, all patterns in the chain will play before the song play position moves to the next row. -
Page 53: Song Menu
11. CHAINS AND SONGS mute method is covered on page 28. Adding song mutes when not in the SONG EDIT menu can also be achieved by pressing [SONG MODE] + [TRACK] or [CHAIN MODE] + [TRACK]. Transpose a pattern by highlighting it with the song cursor and pressing [TRNS] + the [KEYBOARD] keys. -
Page 54: Global Settings Menu
12 GLOBAL SETTINGS MENU The GLOBAL SETTINGS menu offers settings that affect the Analog Four MKII on a global level. Global tune, MIDI and CV settings are made here. Up to four Global slots, where each can have individual settings, are available. -
Page 55: Quantize Live Rec
12.5 MIDI CONFIG In this menu, various sub-menus dealing with the MIDI functionality of the Analog Four MKII are found. 12.5.1 SYNC Controls how the Analog Four MKII receives and sends MIDI clock and transport commands. Change settings by using the [LEFT]/[RIGHT] arrow keys. -
Page 56: Port Config
MIDI will make the Analog Four MKII listen only to MIDI data sent to the MIDI IN port. USB will make the Analog Four MKII listen only to MIDI data sent to the USB port. MIDI+USB will make the Analog Four MKII listen to MIDI data sent to both the MIDI IN and USB ports. -
Page 57: Channels
INT, no MIDI data will be sent. When set to INT + EXT, messages will be sent internally as well as externally. When set to EXT, messages will only be sent externally. RECEIVE NOTES will when active make it possible to play the Analog Four MKII using an external MIDI keyboard. - Page 58 Note that the map entries may be instantly tried by playing the specified range on your external MIDI keyboard or the Analog Four MKII [KEYBOARD] keys. To use your custom multi map, remember to set the external MIDI keyboard to the as-...
- Page 59 12 GLOBAL SETTINGS MENU In MULTI MAP EDIT, Setting a specific SOUND SLOT and setting SOUND INC to 1 is convenient if you wish to define, for example, a succession of drum sounds that you have stored in a given sound slot range to be mapped to a certain section of the keyboard.
-
Page 60: Cv Config
12 GLOBAL SETTINGS MENU 12.6 CV CONFIG CV/Gate output signals are calibrated and set up in this menu. 12.6.1 CV A-D CONFIG Each of the subpages is identical and one for each CV/Gate output exists. The list of available parame- ters in this menu will depend on the menu settings. -
Page 61: Voltage Trim
Analog Four MKII or the external machine is off. Make sure you have a good voltmeter before proceeding. Connect a TRS cable to the output you want to trim. -
Page 62: Control Input 1
12 GLOBAL SETTINGS MENU Activate/deactivate routing of any the four voices to the main output and the FX track. Navigate using the [ARROW] keys. Tick or untick box with the [YES] key. Alternatively, instantly activate or deactivate voice to main or voice to FX using the [TRIG] keys 1-4 and 9-12, respectively. -
Page 63: Sysex Send
12 GLOBAL SETTINGS MENU When receiving or sending SysEx data, the MIDI ports or the USB port of the Analog Four MKII should be connected to the external sending/receiving device. If the Analog Four MKII is sending or receiving SysEx data through the MIDI ports, use the Elektron TM-1 USB MIDI interface for up to 10x transfer speeds. -
Page 64: System
12.11.1 USB CONFIG To use the Analog Four MKII as an Overbridge device, you must set it to Overbridge mode. Do so by se- lecting the OVERBRIDGE MODE menu item and ticking the box by pressing [YES]. For more information, please see “6.6 OVERBRIDGE”... -
Page 65: Os Upgrade
For the transfer to be possible, the device sending the OS syx-file should be connected to either the MIDI IN or USB port of the Analog Four MKII. Cancel the waiting state by pressing [NO]. When receiving the OS a progress bar will be visible. Once the bar has been filled, the texts “ERASING FLASH”... -
Page 66: Startup Menu
EARLY START UP menu. As the Analog Four MKII receives the OS a progress bar will indicate the how much of the OS that has been received. When upgrading, the [TRIG] keys will light up one after another. Please note that this procedure takes a while. -
Page 67: More On Oscillators, Filters, And Envelopes
The sub oscillator thus operates at 2/3 of the oscillator frequency. If for instance, the oscillator plays a G, then the sub oscillator will play the C below it. Together with the other oscilla- tor, this makes it possible to play a simple chord using just one track of the Analog Four MKII. -
Page 68: Other Oscillator Waveform Selections
14. MORE ON OSCILLATORS, FILTERS, AND ENVELOPES To get a C minor chord (C, Eb, G), set the oscillator TUN parameter to +7 semitones (for the G), set the sub oscillator to 5TH (for the C), and set the other oscillator to +3 semi- tones (for the minor third, Eb). -
Page 69: Envelopes
14. MORE ON OSCILLATORS, FILTERS, AND ENVELOPES LP2 This 12 dB/octave lowpass mode attenuates frequencies above the cutoff frequency with twelve decibels per octave, similarly to most other classic 2-pole VCFs. The amount of resonance determines how much the frequencies around the cutoff frequency will be boosted. The sound of this filter is cleaner than the ladder filter, and their different sonic characters are both worth trying out. - Page 70 14. MORE ON OSCILLATORS, FILTERS, AND ENVELOPES 6–7 Exponential attack, exponential decay/release. Since our hearing perceives loudness exponentially, this shape is primarily useful as an amplitude envelope for very long sounds that are supposed to fade in and fade out at a very constant rate. When used as a filter envelope, very clicky, whip lash-like sounds can also be obtained by using this shape.
-
Page 71: Setup Examples
FILTER The CV/Gate track of the Analog Four MKII is made for controlling external, CV/Gate equipped, analog gear. In this scenario, a vintage analog synthesizer is controlled by the Analog Four MKII. The pitch and filter cutoff will be controlled. -
Page 72: Analog Four Mkii With Other Elektron Gear
7. Press [FUNC] + [FLTR]. In this menu, set TYPE to VALUE LIN. Exit the menu. 8. The Analog Four MKII is now ready to control the external synthesizer. On the CV A, CV B and CV C pages, you can see the controllable parameters. These parameters can, of course, be parameter locked. -
Page 73: Analog Four Mkii As A Filter Bank
15.3 ANALOG FOUR MKII AS A FILTER BANK Thanks to the neighbor routing, all the filters of the Analog Four MKII can be used for providing an immense mono filter bank consisting of 8 filters plus 4 overdrive circuits. The setup can be either serial or parallel. - Page 74 6. Place note trigs on the first step of the sequencer. Trigging the amplitude envelope is necessary. 7. Press play on the Monomachine. 8. Press play on the Analog Four MKII. The filters of the synth tracks can now be used to shape the incom- ing Monomachine sound.
-
Page 75: Using An External Oscillator With The Analog Four Mkii
In this setup example, the CV track will trig the oscillator of an external analog synth. The output of this oscillator will be routed to the left input of the Analog Four MKII. Synth track 1 of the Analog Four MKII will control the pitch of both the internal oscillators and the external oscillator. -
Page 76: Analog Four Mkii With An Electric Guitar
2. Connect the audio out from the amplifier to the left audio input of the Analog Four MKII. 3. First method: Select the FX track on the Analog Four MKII with [FX] track key. To make use of the Wide- shift Chorus, press [PARAMETER] key 3, CHORUS. - Page 77 15. SETUP EXAMPLES 4. Second method: Select Track 1 on the Analog Four MKII by pressing [TRACK 1] key. 5. On the OSC1 menu page, set the WAV parameter to IN L using DATA ENTRY knob F. Set SUB, the sub oscillator, to off.
-
Page 78: Useful Key Combinations (Quick Keys)
16. USEFUL KEY COMBINATIONS (QUICK KEYS) 16. USEFUL KEY COMBINATIONS (QUICK KEYS) Use the key combinations below in order to quickly perform certain tasks. 16.1 GENERAL [FUNC] + [RECORD] will perform a copy command. Action depends on the currently active page or mode. [FUNC] + [PLAY] will perform a clear command. -
Page 79: Chain Editing
16. USEFUL KEY COMBINATIONS (QUICK KEYS) 16.10 CHAIN EDITING [FUNC] + [CHAIN] to create new scratch pad row. [CHAIN] + [LEFT/RIGHT] to move chain cursor. [CHAIN] + [NO] to remove Pattern from the chain before cursor (or selected). [BANK X/X] + [TRIG] to enter a new Pattern into the chain (positioned where the cursor is at). -
Page 80: Technical Information
17. TECHNICAL INFORMATION 17. TECHNICAL INFORMATION ELECTRICAL SPECIFICATIONS HARDWARE Impedance balanced audio outputs: 128 × 64 pixel OLED screen Headphones out level: +19 dBu (55 Ω) MIDI In/Out/Thru with DIN Sync out Main outputs level: +19 dBu 2 × 1/4” impedance balanced main audio out jacks Output impedance: 440 Ω... -
Page 81: Credits And Contact Information
CREDITS CONTACT INFORMATION PRODUCT DESIGN AND DEVELOPMENT ELEKTRON WEBSITE Oscar Albinsson http://www.elektron.se Ali Alper Çakır OFFICE ADDRESS Oscar Dragén Elektron Music Machines MAV AB Magnus Forsell Anders Gärder Sockerbruket 9 Andreas Henriksson SE-414 51 Gothenburg Sweden Fabian Hundertmark Christer Lindström... -
Page 82: Appendix A: Synth Track Parameters
APPENDIX A: SYNTH TRACK PARAMETERS APPENDIX A: SYNTH TRACK PARAMETERS In this appendix, the parameters of the synth tracks are explained. OSCILLATOR 1 The OSC1 pages control the first oscillator, its sub oscillator, plus the noise generator. OSC1 (page 1) SPD (OSC1 PWM Speed) sets the speed of the os- cillator’s PWM LFO, which can be used to modulate the waveshape back and forth around the set PW... - Page 83 APPENDIX A: SYNTH TRACK PARAMETERS OSCILLATOR 2 The OSC2 pages control the second oscillator and the accompanying sub oscillator. Settings that will affect both oscillators are found here as well. OSC2 (page 1) OSC 1&2 (page 2) TUN (OSC2 Coarse Tune) sets the pitch of the os- AM1 (Osc1 AM) engages Amplitude Modulation on cillator in semitones.
- Page 84 APPENDIX A: SYNTH TRACK PARAMETERS FILTERS In the FILTERS page, settings that will affect the two track filters are found. FILTERS TYP (Filter2 Type) selects the filter type of Filter 2. Seven types are available: 2-pole Lowpass, 1-pole Lowpass, Bandpass, 1-pole Highpass, 2-pole High- pass, Bandstop, and Peak.
- Page 85 APPENDIX A: SYNTH TRACK PARAMETERS AMPLITUDE The AMP page contains settings for the amplitude envelope and the effects sends, as well as panning and volume of the sound. ATK (EnvA Attack) sets the attack time of the EnvA envelope, which controls the amplitude of the track. DEC (EnvA Decay) sets the decay time of the EnvA envelope.
- Page 86 APPENDIX A: SYNTH TRACK PARAMETERS ENVELOPES Here parameters controlling the two assignable envelopes are found. The first envelope, ENVF, is hard- linked to the cutoff parameters of the two filters but can also modulate two user-selectable destinations. ENVF (page 1) ENV2 (page 2) ATK (EnvF Attack) sets the attack time of the EnvF ATK (Env2 Attack) sets the attack time of the Env2...
- Page 87 APPENDIX A: SYNTH TRACK PARAMETERS The two track LFOs can be used to modulate the other synth track parameters. LFO1 (page 1) LFO2 (page 2) SPD (LFO1 Speed) sets the speed of LFO1. It is SPD (LFO2 Speed) sets the speed of LFO2. It is synced to the BPM.
-
Page 88: Appendix B: Fx Track Parameters
APPENDIX B: FX TRACK PARAMETERS APPENDIX B: FX TRACK PARAMETERS In this appendix, the parameters of the external input page and the three send effects are explained. EXTERNAL IN The EXT IN page controls the signal path from the two audio inputs to the main mixer. These external sig- nals can be routed to the effects and panned just like the four synth tracks. - Page 89 APPENDIX B: FX TRACK PARAMETERS WIDESHIFT CHORUS The Wideshift Chorus can be used to widen sounds, enhance the stereo image or add subtle movement to sounds. CHORUS PRE (Predelay) sets the predelay time of the Wide- shift Chorus. SPD (Speed) sets the low-frequency modulation speed of the chorus taps.
-
Page 90: Saturator Delay
APPENDIX B: FX TRACK PARAMETERS SATURATOR DELAY The Saturator Delay adds an echo-like effect to the audio. Thanks to the special features of this effect, it can also be used to subtly warm or severely distort the delay signal. DELAY OVR (Overdrive) sets how much the delay signal will be overdriven. - Page 91 APPENDIX B: FX TRACK PARAMETERS SUPERVOID REVERB The Supervoid Reverb is perfect for positioning sounds in the mix. It can simulate everything from vast locations to small spaces. REVERB PRE (Predelay) sets the predelay time of the Super- void Reverb. DEC (Decay) sets the decay of the reverberated signal, essentially setting the size of the acoustic room.
- Page 92 APPENDIX B: FX TRACK PARAMETERS FX LFO The FX LFO menu consists of two LFOs dedicated to modulating FX track parameters. LFO1 (page 1) LFO2 (page 2) SPD (LFO1 Speed) sets the speed of LFO1. It is SPD (LFO2 Speed) sets the speed of LFO2. It is synced to the BPM.
-
Page 93: Appendix C: Cv Track Parameters
APPENDIX C: CV TRACK PARAMETERS APPENDIX C: CV TRACK PARAMETERS CV A-D The CV A-D pages control the signals sent from the four CV/Gate outputs. Depending on the CV type chosen in the CV CONFIG menu, the available parameters will change. For more information, please see “12.6.1 CV A-D CONFIG”... - Page 94 APPENDIX C: CV TRACK PARAMETERS CV ENVELOPES Here parameters controlling the two assignable CV envelopes are found. The CV envelopes can modulate parameters found on the CV track. They can also be sent to the CV/Gate outputs, by setting up a CV chan- nel’s type as VALUE LIN.
- Page 95 APPENDIX C: CV TRACK PARAMETERS CV LFO The two CV LFOs can be used to modulate other CV track parameters. They can also be sent to the CV/ Gate outputs, by setting up a CV channel’s type as VALUE LIN and then letting the LFO modulate its VAL parameter.
-
Page 96: Appendix D: Midi
APPENDIX D: MIDI APPENDIX D: MIDI This appendix covers the MIDI CC and NRPN implementation. The data range of each parameters CC and/ or NRPN value is written in parentheses after the value. PERFORMANCE PARAMETERS The following messages affect the performance parameters on all tracks. They are also sent when adjust- ing the knobs controlling the parameters. - Page 97 APPENDIX D: MIDI OSC 1 Parameter Encoder CC MSB CC LSB NRPN MSB NRPN LSB Sub Oscillator 71 (0–127) 1 (0–127) Pulsewidth 72 (0–127) 1 (0–127) PWM Speed 73 (0–127) 1 (0–127) PWM Depth 74 (0–127) 1 (0–127) NOISE Parameter Encoder CC MSB CC LSB...
- Page 98 APPENDIX D: MIDI FILTERS Parameter Encoder CC MSB CC LSB NRPN MSB NRPN LSB Filter1 Frequency 18 (0–127) 50 (0–127) 1 (0–127) 40 (0–127) Filter1 Resonance 89 (0–127) 1 (0–127) Filter Overdrive 1 (0–127) Filter1 Keytracking 1 (0–127) Filter1 Envelope Amount 102 (0–127) 1 (0–127) Filter2 Frequency...
- Page 99 APPENDIX D: MIDI ENV2 Parameter Encoder CC MSB CC LSB NRPN MSB NRPN LSB Env2 Destination A 1 (0–127) Env2 Depth A 22 (0–127) 54 (0–127) 1 (0–127) 77 (0–127) Env2 Destination B 1 (0–127) Env2 Depth B 23 (0–127) 55 (0–127) 1 (0–127) 79 (0–127)
- Page 100 APPENDIX D: MIDI EXT IN Parameter Encoder CC MSB CC LSB NRPN MSB NRPN LSB Ch2 Pan 2 (0–127) Ch2 Level 2 (0–127) CHORUS Parameter Encoder CC MSB CC LSB NRPN MSB NRPN LSB Predelay 2 (0–127) Speed 2 (0–127) Depth 2 (0–127) Width...
- Page 101 APPENDIX D: MIDI LFO1 Parameter Encoder CC MSB CC LSB NRPN MSB NRPN LSB LFO1 Speed 2 (0–127) LFO1 Speed Multiplier 2 (0–127) LFO1 Fade 2 (0–127) LFO1 Start Phase 2 (0–127) LFO1 Mode 2 (0–127) LFO1 Waveform 2 (0–127) LFO1 Destination 1 2 (0–127) LFO1 Depth 1...
- Page 102 APPENDIX D: MIDI CV B Parameter Encoder CC MSB CC LSB NRPN MSB NRPN LSB CV B Value 3 (0–127) CV B Clock 3 (0–127) CV B Source 3 (0–127) CV B Bend Depth 3 (0–127) CV B Note Slide time 3 (0–127) 3 (0–127) 3 (0–127)
- Page 103 APPENDIX D: MIDI ENV1 Parameter Encoder CC MSB CC LSB NRPN MSB NRPN LSB Env1 Depth 1 3 (0–127) 67 (0–127) Env1 Destination 2 3 (0–127) Env1 Depth 2 3 (0–127) 69 (0–127) ENV2 Parameter Encoder CC MSB CC LSB NRPN MSB NRPN LSB Env2 Attack Time...
-
Page 104: Appendix E: Analog Four Mkii Architecture
APPENDIX E: ANALOG FOUR MKII ARCHITECTURE APPENDIX E: ANALOG FOUR MKII ARCHITECTURE This appendix shows the complete architecture and constituent parts of the Analog Four MKII. Gray boxes show analog elements. White boxes show digital elements. SYNTH TRACKS 1-4 FROM PREVIOUS VOICE... -
Page 105: Index
INDEX INDEX +DRIVE 16 Clear kit 24 Load kit 24 Performance mode 25 ACCENT 47 ARPEGGIATOR 40 LEGATO MODE 34 Arpeggiator setup 42 LIVE RECORDING MODE 39 LOADING CHAINS 51 Kit 24 CLICK TRACK 44 Song 53 CONDITIONAL LOCKS 46, 47 CONNECTING THE UNIT 14 MASTER TUNE 54 COPY, PASTE AND CLEAR... - Page 106 Recording modes 39 AF MKII with external oscillator 75 Tempo 38 AF MKII with external synthesizer 71 Trig types 39 AF MKII with other Elektron gear 72 PERFORMANCE MODE 25 SONGS 51 Performance configure 25 Transpose 52 SOUND BROWSER 31...
Need help?
Do you have a question about the Analog Four MKII and is the answer not in the manual?
Questions and answers