Elektron analog four Getting Started Manual
Elektron analog four 4 voice analog synthesizer
Hide thumbs
Also See for analog four:
- Full reference manual (88 pages) ,
- Full reference manual (131 pages)
Table of Contents
Advertisement
Quick Links
Advertisement
Table of Contents

Related Manuals for Elektron analog four


Summary of Contents for Elektron analog four
- Page 2 Elektron machines are sold with a three year EU warranty, starting from the date of the original purchase. Being able to prove the date of the original purchase with an invoice or a receipt is necessary if you require warranty service. If the machine should need a repair during the warranty period no charges will be applied for parts or labor. This warranty is transferable to other owners should the Elektron machine be resold during the warranty period.
- Page 3 THANK YOU Thank you for purchasing the Analog Four. This Getting Started guide covers the basics of the ma- chine. The complete User Manual is available as a digital download at www.elektron.se. We wish you a happy analog experience! —The Elektron Team...
-
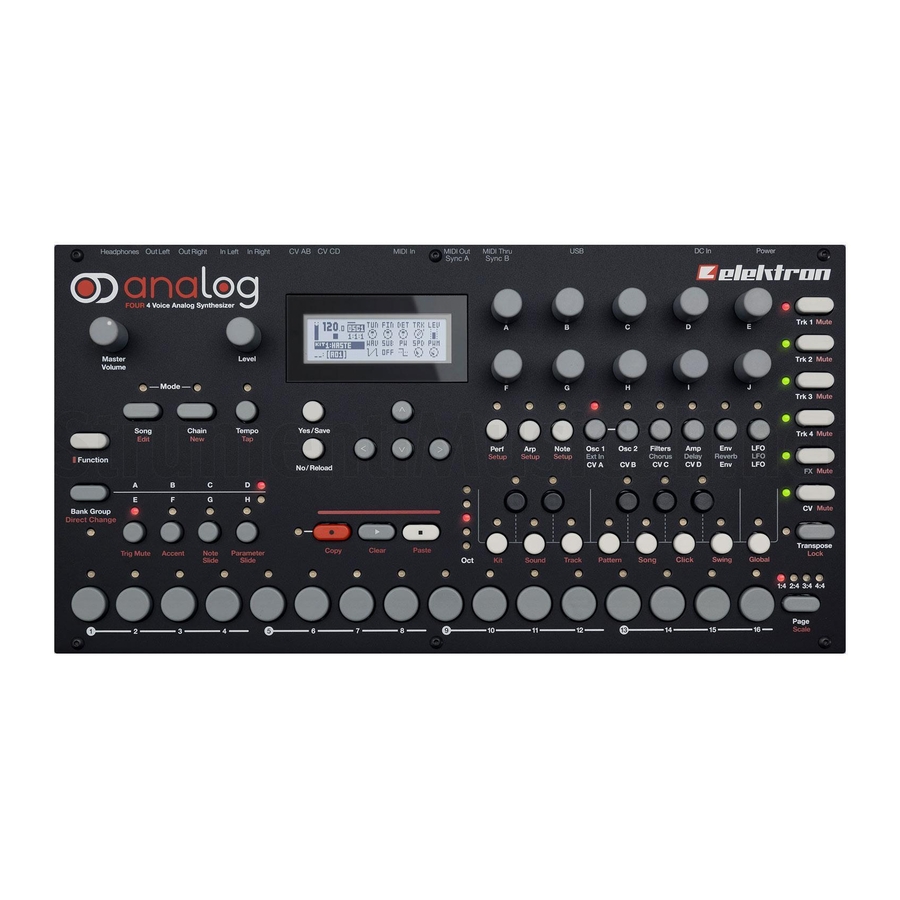
Page 4: Panel Layout
PANEL LAYOUT 15 16 FRONT PANEL 8 The LCD screen. 1 9 The [ARROW] keys. Used for menu navigation. They sets the volume for the main outputs MASTER VOLUME are called [UP], [DOWN], [LEFT] and [RIGHT]. and the headphones output. 2 [SONG MODE] activates/deactivates SONG mode. 10 [PERFORMANCE] activate PERFORMANCE mode. -
Page 5: Data Entry
6 MIDI In. Use standard MIDI cable to connect MIDI Out functionality is activated or not. of an external MIDI unit to control the Analog Four. 19 <PATTERN PAGE> LEDs indicate how many pattern 7 CV outputs C and D. Connect to external synth with pages the active pattern consists of and which pattern CV inputs. -
Page 6: The User Interface
3 If MIDI control of the Analog Four is desired, connect the MIDI OUT port of the device you wish send data from to the MIDI IN port of the Analog Four. The MIDI THRU port duplicates the data arriving at the MIDI IN port, so it can be used for chaining MIDI units together. - Page 7 3 [NO/RELOAD] is used to negate, deselect or go back one or more steps. EXPERIMENTING WITH PATTERNS The Analog Four is equipped with several preset patterns, kits and Sounds. To immediately start experimenting with the Analog Four, just follow the instructions below.
- Page 8 Sounds. Generic settings and states (tempo, mutes et cetera) are also stored in each project. When a project is loaded it becomes the active working state of the Analog Four. From here it is possible to edit the patterns, kits, songs and globals of the project.
-
Page 9: Loading A Kit
KITS AND SOUNDS Kits and Sounds are the basic building blocks of the Analog Four. Kits can be regarded as a collection of Sounds as well as other settings. A Sound is essentially a synth track patch. Sounds can be loaded to any of the synth tracks. - Page 10 SAVING A KIT 1 Open the KIT menu by pressing [FUNCTION] + [KEYBOARD C1]. 2 Use the [UP] and [DOWN] arrow keys to select SAVE KIT. Press [YES/SAVE] to open the menu. 3 Select the position to which the kit should be saved by using the [ARROW] keys or the knob.
-
Page 11: Saving A Sound
SAVING A SOUND 1 Open the SOUND menu by pressing [FUNCTION] + [KEYBOARD D1]. 2 Use the [UP] and [DOWN] arrow keys to select SOUND MANAGER. Press [YES/SAVE] to open the menu. The SOUND MANAGER is a more powerful version of the SOUND BROWSER. Here Sounds can be saved, loaded, tagged, locked et knob or by pressing [UP]/[DOWN]. -
Page 12: Playing A Sound
3 Sounds can be played polyphonically. See POLYPHONY below. POLYPHONY The Analog Four is capable of four voice multitimbral polyphony (or unison). This is possible due to the versatile sound engine that can change sound instantly and allow completely dynamic voice allocation. The sequencer is fully polyphonic, allowing overlapping notes and chords to be programmed on the tracks. -
Page 13: Editing The Fx And Cv Tracks
EDITING THE FX AND CV TRACKS Editing the FX and CV tracks is very similar to editing the Sounds of the synth tracks of the active kit. The PARAMETER pages contain parameters relevant for the two types of track. THE NAMING SCREEN The naming method is identical for the various naming situations that appear when kits, Sounds, patterns, songs or projects are saved or renamed. -
Page 14: Basic Pattern Operations
BASIC PATTERN OPERATIONS The sequencer of the Analog Four stores information in patterns. A pattern controls the playback of the synth, FX and CV tracks and various aspects of these tracks. All adjustments made to the patterns are automatically saved. - Page 15 3 Place note trigs on the sequencer by pressing the [TRIG] keys. To add note values to trigs, press and hold a [TRIG] key while pressing a key on the [KEYBOARD]. To add a trigless lock, press [FUNCTION] and [TRIG]. 4 Press [PLAY] to listen to the sequence. LIVE RECORDING MODE LIVE RECORDING mode is the second method of adding trigs to the tracks.
-
Page 16: Factory Reset
FACTORY RESET When performing a factory reset on the Analog Four it will overwrite and re-initialize the active project (including all pattern, kit, sound pool and global data). The +Drive project slot 1 will be overwritten and re-initialized. Sound bank A and B will be overwritten with the factory Sounds. -
Page 17: Analog Four Accessories
ECC-2 CARRYING BAG AND PL-2 PROTECTIVE COVER The carrying bag holds one Analog Four. The protective plastic lid is put on top of the Analog Four panel in order to protect the LCD display and the knobs. When you purchase the bag you get a complementary protective lid. -
Page 18: Technical Information
3 × individual effect sends MIDI control This Getting Started manual is copyright © 2012—2014 Elektron Music Machines MAV AB. All reproduction without writ- ten authorization is strictly prohibited. The information in this manual may change without notice. Elektron’s product names, logotypes, titles, words or phrases may be registered and protected by Swedish and international law. -
Page 19: Additional Design
CONTACT INFORMATION PRODUCT DESIGN AND DEVELOPMENT ELEKTRON WEBSITE Oscar Albinsson www.elektron.se Magnus Forsell OFFICE ADDRESS Anders Gärder Jimmy Myhrman Elektron Music Machines MAV AB Jon Mårtensson Sockerbruket 9 David Revelj SE-414 51 Gothenburg Mattias Rickardsson Sweden Daniel Troberg TELEPHONE ADDITIONAL DESIGN... - Page 20 Elektron Music Machines MAV AB, Sockerbruket 9, SE-414 51 Gothenburg, Sweden | +46 (0)31 743 744 0 www.elektron.se...
Need help?
Do you have a question about the analog four and is the answer not in the manual?
Questions and answers