Table of Contents
Advertisement
Advertisement
Table of Contents

Related Manuals for Elektron Syntakt


Summary of Contents for Elektron Syntakt
- Page 1 Syntakt Quick Guide...
- Page 3 Now is the time. You sit at your sonic workspace and turn on the Elektron Syntakt. It breathes into life, and the glint of red light spirits you into action. Analog synthesis meets digital synthesis.
- Page 4 FCC compliance statement This device complies with part 15 of the FCC rules. Operation is subject to the follow- ing two conditions: (1) This device may not cause harmful interference, and (2) this device must accept any interference received, including interference that may cause undesired operation.
- Page 5 In no event shall Elektron be liable for any special, indirect, or consequential damages or any damages whatsoever resulting from loss of use, data, or profits, whether in an action of contract, negligence, or other action, arising out of or in connection with the use or performance of this information.
- Page 6 IMPORTANT SAFETY INSTRUCTIONS 1. Do not use the unit near water. 2. Never use aggressive cleaners on the casing or on the screen. Remove dust, dirt and fingerprints with a soft, dry and non-abrasive cloth. More persistent dirt can be removed with a slightly damp cloth using only water.
- Page 7 WARNING! TO REDUCE THE RISK OF FIRE, ELECTRICAL SHOCK OR PRODUCT DAMAGE • Do not expose the unit to rain, moisture, dripping or splashing and also avoid placing objects filled with liquid, such as vases, on the unit. • Do not expose the unit to direct sunlight, nor use it in ambient temperatures exceeding 35°C as this can lead to malfunction.
-
Page 8: Table Of Contents
2.3 SETTING UP AND STARTING SYNTAKT ........ - Page 9 5.4 TRIG MODIFIERS ............22 5.5 TEMPO .
-
Page 10: Introduction
Messages visible on the screen are written in upper case letters with quotation marks. For example, “QUANTIZE LIVE REC”. 1.2 THE USER MANUAL This Quick Guide will guide you through the basic functions of this product. For more detailed information, please see the Syntakt User Manual that you can download on www.elektron.se. -
Page 11: Panel Layout And Connections
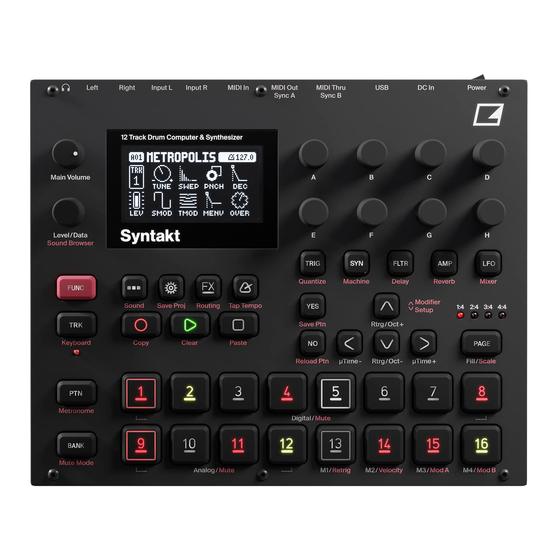
2. PANEL LAYOUT AND CONNECTIONS 2.1 FRONT PANEL CONTROLS Left Right Input L Input R MIDI In MIDI Out MIDI Thru DC In Power Sync A Sync B 12 Track Drum Computer & Synthesizer Main Volume Level/Data Sound Browser TRIG FLTR Quantize Machine... - Page 12 4. [GLOBAL SETTINGS] contains the management of projects, MIDI configuration, and the System settings. The secondary function saves the current project. 5. [FX] selects the FX track and lets you access its parameter pages. The secondary function opens the ROUTING menu, where you set which tracks and effects are rout- ed to the Analog FX block or not.
- Page 13 12. [PAGE] selects the active pattern page in GRID RECORDING mode, if the pattern is made up of more than 16 steps. The <PATTERN PAGE> LEDs indicate how many pattern pages the active pattern consists of and which pattern page is currently active. The LED flashes on the pattern page currently playing.
-
Page 14: Rear Panel Connections
20. [FUNC] key. Press and hold, and then press another key to access the secondary function of that key. The secondary functions are written in red on the Syntakt front panel. 21. LEVEL/DATA sets the overall volume level of the active track. It is also used for setting parameters and scrolling through lists. -
Page 15: Setting Up And Starting Syntakt
USB connector of the Syntakt. 4. If you want to use MIDI to control the Syntakt, connect the MIDI OUT port of the device you wish to send data from to the MIDI IN port of the Syntakt. The MIDI THRU port duplicates the data arriving at the MIDI IN port, so it can be used for chaining MIDI units together. -
Page 16: Sound Architecture
ANALOG DIGITAL 3. SOUND ARCHITECTURE ANALOG VOICE MULTIMODE The illustrations below show the Syntakt sound architecture, with the analog and digital OVERDRIVE SOUND OUTPUT FILTER ANALOG GENERATOR voice types and send effects. The illustrations also show what components of the sound DIGITAL architecture are analog (grey boxes) or digital (white boxes). -
Page 17: Analog Fx Block
4. INTERACTING WITH THE SYNTAKT The screen shows all the information needed for real-time interaction and editing on the Syntakt. The eight DATA ENTRY knob parameters shown will vary depending on the given situation. Below is the main interface screen of the SRC page. -
Page 18: Screen Navigation
4. Eight track parameters. They show what the DATA ENTRY knobs control and their current parameter values. 5. The main volume setting of the active track. Use the LEVEL/DATA knob to change the volume setting. 6. Active track. 4.1 SCREEN NAVIGATION Use the [ARROW] keys [UP], [DOWN], [LEFT] or [RIGHT] to navigate menus or sub-menus. -
Page 19: Func] Keypress Combinations
[REC] to copy. Press [FUNC] + [STOP] to paste. Press [FUNC] + [PLAY] to clear. Paste and clear operations is undone by repeating the keypress combination. See the different sections in the Syntakt User Manual for more information on when these commands are available. -
Page 20: Overbridge
The Overbridge software suite enables tight integration between the Syntakt and a com- puter DAW. When using Overbridge, the user interface for the Syntakt will present itself as a clearly laid out plug-in window in your DAW. Access, edit, or automate parameters for sound shaping on screen. -
Page 21: Experimenting With Patterns
5. EXPERIMENTING WITH PATTERNS 5.1 PLAYING THE FACTORY PRESETS You can find a number of preset patterns, Sounds, and samples in the Syntakt. Follow the instructions below to get started exploring your new instrument. 1. Press [BANK] and then press [TRIG 9] key to select bank A. The screen reads “BANK A: SELECT PTN”. -
Page 22: Trig Modifiers
1. Make sure a pattern is playing. 2. Press the [FUNC] + [BANK] key to enter MUTE mode. 3. Press any of the [TRIG] keys or the [FX] key to mute the corresponding track. Press again to unmute. The light of the [TRIG] keys indicates the mute status. Unlit keys are muted tracks. -
Page 23: About The Tracks
6.2 MIDI TRACKS You can change all tracks on the Syntakt from being an audio track to instead be used as a MIDI track, meaning you can have up to twelve MIDI tracks. The MIDI tracks are used to control external, MIDI-equipped gear. -
Page 24: The Fx Track
[PARAMETER] keys to access the PARAMETER pages for the FX track. 7. THE SEQUENCER The Syntakt's sequencer stores its information in patterns. A pattern controls the playback of the audio tracks, and the MIDI tracks by the trigs entered on the sequencer. 7.1 SELECTING A PATTERN 1. -
Page 25: Trig Types
7.5 PATTERN RECORDING MODES Syntakt offers three main input modes when creating or editing a pattern, GRID RECORD- ING mode, LIVE RECORDING mode, and STEP RECORDING mode. To create a new pattern, first select an empty pattern slot in one of the banks. -
Page 26: Live Recording Mode
4. Select another track, and add note trigs and lock trigs. Repeat the procedure for all the tracks you want to use. 5. Press [PLAY] to listen to the sequence. 7.7 LIVE RECORDING MODE LIVE RECORDING mode is the second method of adding trigs to the tracks. In this record- ing mode, all the [TRIG] keys are played in real-time to input trigs to the tracks. -
Page 27: Parameter Locks
3. Press and hold [FUNC] and then press [TRIG 1–16] key to add a note trig on the corresponding track to the active step. The active step then automatically advances to the next step. 7.9 PARAMETER LOCKS Parameter locks enable all trigs to have their own unique parameter values. The note trigs of an audio track can, for example, have different pitch, amp, or filter settings. -
Page 28: Technical Information
8. TECHNICAL INFORMATION ELECTRICAL SPECIFICATIONS HARDWARE Impedance balanced audio outputs 128 × 64 pixel OLED screen Main outputs level: +15 dBu MIDI In/Out/Thru with DIN Sync out Output impedance: 440 Ω unbalanced 2 × 1/4” impedance balanced audio out jacks 2 × 1/4” audio in jacks Headphones output 1 × 1/4”... -
Page 29: Credits And Contact Information
Magnus Forsell Jennifer Giöbel CONTACT INFORMATION Andreas Henriksson ELEKTRON WEBSITE Mario Adriane Hernandez http://www.elektron.se Tomas Hjalmarsson Thomas Jansson OFFICE ADDRESS Patrik Johansson Elektron Music Machines MAV AB Christian Karlsson Banehagsliden 5 Åsa Larsson SE-414 51 Gothenburg Erik Liakhovets Sweden Andreas Liffgarden... - Page 30 ELEKTRON THREE YEAR WARRANTY Elektron machines are sold with a three year limited warranty, starting from the date of the original purchase. Being able to prove the date of the original purchase with an invoice or a receipt is necessary if you require warranty service. If the machine should need a repair during the warranty period no charges will be applied for parts or labor.
Need help?
Do you have a question about the Syntakt and is the answer not in the manual?
Questions and answers