
Related Manuals for Quick MILL MILANO 0980


Summary of Contents for Quick MILL MILANO 0980
- Page 1 since 1945 ça GROUP OPERATING INSTRUCTIONS PROFESSIONAL HOME COFFEE MACHINES...
- Page 2 QUICK MILL S.R.L. thank you for having purchased one of our products. Before using the machine we suggest you carefully read this manual to obtain the necessary information for correctly using and servicing the product. If you have any questions please contact your retailer or our offices.
-
Page 3: Table Of Contents
TABLE OF CONTENTS TABLE OF CONTENTS ..................3 INTRODUCTION ....................5 Symbols......................5 Warnings ......................6 GENERAL INFORMATION ................ 7 Destination for use ..................7 Improper use ....................7 Safety instructions ..................8 General information ..................9 Safety ......................9 Vibrations ....................... - Page 4 TRANSPORT ................... 76 Packaging ..................... 76 Removal of packaging .................. 76 INSTALLATION ..................77 MACHINE CLEANING ................78 Cleaning the coffee brew group ..............78 Grinding Capacity and Settings ..............79 Good Rules to Obtain an Excellent Expresso .......... 80 How to Heat and Dose the Milk ..............
-
Page 5: Introduction
INTRODUCTION Keep this instruction manual in a safe place. For any information or difficulties not fully explained, please contact the service personnel. Symbols The warning triangle identifies all the explanations of an important nature for the safety of persons. Follow these instructions to avoid accidents! Indicates a warning or note of key functions or useful information. -
Page 6: Eu Warnings
Warnings The packaging material (plastic bags, polystyrene, nails, cardboard, etc.) must not be left within the reach of children as they are a potential source of danger. Before connecting the machine to power supply, make certain that the rating plate corresponds to the requirements of the electrical grid. -
Page 7: General Information
1. GENERAL INFORMATION This user manual is an essential part of the safe operations of your Machine, therefore it is important that you read the enclosed warnings and cautions carefully. Particularly information concerning safety during installation, operation and cleaning. Please keep this User Manual in a safe place where it can be made available for all users. - Page 8 “off” position at the machine power switch and disconnect it from the electrical supply: do not try to repair it. Any repair must be performed by the Quick Mill operator. Please contact Quick Mill.
-
Page 9: General Information
General information The machine must be operated with soft, clean drinking water. If the local water supply has a high mineral content use a water softener. A build-up of mineral deposit may restrict the flow of water within the hydraulic systems causing damage to the machine and risking personal injury. -
Page 10: Machine Components And Functioning
2. MACHINE COMPONENTS AND FUNCTIONING A description follows of the parts that compose the machine and how they function. 0960 – CAROLA ça Legend: Coffee brew group Cup warmer Coffee brew lever Water tank Filterholder General switch Boiler gauge Machine light ON Drip tray Heating light l x h x p... - Page 11 Commissioning Remove the cup warmer lid (f). Take out the delivery and discharge pipes and withdraw the water tank. Fill the water tank (g), with drinking water, softened if possible. Return the water tank to its original position. Switch on the machine bringing the switch (h) to position 1; the light (i) switches on.
-
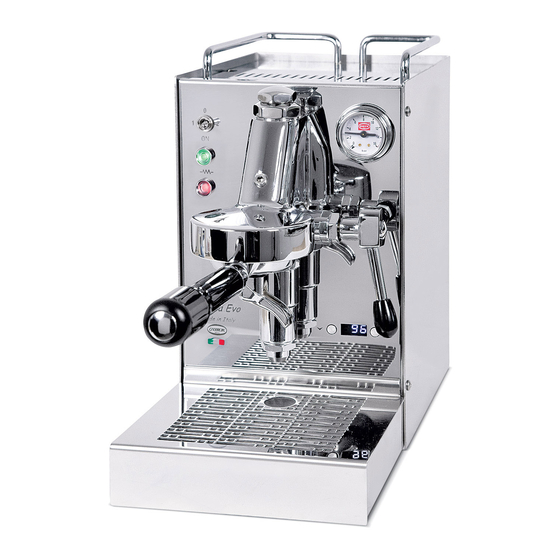
Page 12: 0980 - Milano
0980 – MILANO ça Legend: Brew group Drip tray Coffee delivery lever Cup warmer Filter holder Pressure adjustment valve Steam valve m. Water tank lid Steam wand Water tank Hot water valve General switch + Hot water wand Machine light ON Boiler gauge Heating light Pump gauge... - Page 13 Commissioning Remove the tank filler lid (m). Fill the tank (n), under the cup warmer, with drinking water, softened if possible. Connect the machine to an electric socket, switch on the machine with the general switch (o) on position 1, the green ON light switches on. The machine fills the boiler.
- Page 14 Steam delivery Wait until the heater light switches off (p) and make sure that the pressure indicated on the boiler gauge (h) is over 0,8 Bar. Open the Steam valve (d) for a few seconds and discharge a little steam into the drip tray (j), then immerse the steam wand (e) in the brew to be heated and turn on the tap, when the required temperature is reached, turn off the tap.
- Page 15 Coffee pressure adjustment valve The machine is delivered with the coffee pressure valve (l) set at 10 Bar. The end user can adjust the valve to increase or decrease the pressure. Release the group filter holder. Remove the filter from the filter holder. Insert the blind filter in the filter holder.
-
Page 16: 0980 - Andreja
0980 – ANDREJA ça Legend: Brew group Drip tray Coffee delivery lever Cup warmer Filter holder Pressure adjustment valve Steam valve m. Water tank lid Steam wand Water tank Steam wand General switch Hot water wand Machine light ON Boiler gauge Heating light Pump gauge... - Page 17 Boiler lifting indicator light lxhxp: 445 mm 24 K EIGHT 220/230V – 50/60H - 115V – 60H OLTAGE 1500W OWER ANK CAPACITY 1,60 OILER CAPACITY LITRES +5°C / 45°C EMPERATURE Commissioning Open the tank filler lid. Fill the tank (n) with drinking water, softened if possible. ça Connect the machine to an electric socket.
- Page 18 Steam delivery Wait until the heating light (q) switches off and make sure that the pressure indicated on the boiler gauge (h) is more than 0.8 Bar. Open the steam valve (d) for a few seconds and discharge a little steam into the drip tray (e) then immerse the steam wand in the liquid to be heated and open the tap, when the required temperature is reached, close the tap...
- Page 19 Repeat the above operations until the required adjustment is achieved. Valve adjustment screw It is advised to adjust the pressure within a maximum of 12 and a minimum of 9 Bar. ça...
-
Page 20: 0980 - Andreja Dosata
0980 – ANDREJA DOSATA ça Legend: Brew group Drip tray Coffee delivery controls Cup warmer Filter holder Pressure adjustment valve Steam valve m. Water tank lid Steam wand Water tank Hot water valve General switch Hot water wand Machine light ON Boiler gauge Heating red light Pump gauge... - Page 21 Commissioning Lift the tank lid (m) and fill the tank (n) with water, (drinking water, softened if possible). Connect the machine to an electric socket. Switch on the machine through the general switch (o) in postion 1 and wait for the machine to fill the boiler and reach the functioning temperature: the red heating light (q)is to switch on, then off.
- Page 22 Steam delivery Activate the steam delivery for a few seconds with the knob (d) and discharge the condensation formed in the steam pipe into the drip tray (j) then close the steam delivery. Immerse the steam wand (e) roughly half-way in the liquid to be heated, reactivate the steam delivery with the knob.
- Page 23 Coffee dosing controls On the front of the machine there are the illuminated dosing keys. Key 1 = expresso Key 2 = long coffee Key 3 = double expresso Key 4 = double long coffee Key 5 = continuous does dose ça Using one of the keys from 1 to 4, the machine starts delivery, stopping when the set dose is reached (see “Dose setting”).
- Page 24 Display and Boiler temperature adjustment Boiler temperature management is by means of an electronic board in the machine. The temperature of the water contained in the boiler can be seen or modified through the 5 dosing keys. To see the temperature set, switch on the machine keeping the keys 1+5 pressed.
- Page 25 To engage the automatic Standby/Economy function after 20 minuties with no coffee delivery, proceed as follows: Switch off the machine. Press keys 3+5 simultaneously. Switch on the machine. Key 1 flashes twice = Standby/Economy not engaged. Key 1 flashes 3 times = Standby/Economy engaged. Press key 4 to decrease the flashes (Standby/Economy disengagement).
- Page 26 Factory values reset To reset the factory values of the machine, proceed as follows: Switch off the machine. Press keys 1+3+5 simultaneously. Switch on the machine. Release the keys when they start to flash. ça...
- Page 27 Coffee pressure adjustment valve The machine is delivered with the valve (l) set at 10 Bar. The end user can adjust the valve (l) to increase or decrease the pressure. Release the filter holder from the group. Remove the filter from the filter-holder. Insert the blind filter in the filter-holder.
- Page 28 Specific functions of model 980 Andreja Dosata Filling Timeout If the boiler filling takes longer than 120 seconds, the machine generates an alarm with an intermittent acoustic warning and flashing of the dosing keys. In this alarm status the boiler heating does not start. This condition may occur if the machine is switched on for the first time, with the boiler completely empty.
-
Page 29: 0981 - Rubino
0981 – RUBINO ça Legend: Brew group Drip tray Coffee delivery lever Cup warmer Filter holder General switch Steam valve Heating light Stem wand m. Empty water tank indicator light Hot water valve Machine light ON Hot water wand Water tank Boiler gauge l x h x p 452 mm... - Page 30 Commissioning Remove the cup warmer (j). Fill the tank (n), under the cup warmer, with drinking water, softened if possible. Connect the machine to an electric socket, switch on the machine with the general switch (k) in position 1. The machine starts to fill the boiler. Activate the coffee brew group lifting the lever (b): deliver water from the group to ensure that the circuit has filled correctly.
- Page 31 Steam delivery Wait until the heating light switches off (l) and make sure that the pressure indicated on the boiler gauge is over 0.8 Bar. Open the steam valve (d) for a few seconds and discharge a little steam into the drip tray (i) then immerse the steam wand (e) in the liquid to be heated and open the tap, when the required temperature is reached, close the tap.
-
Page 32: 0985 - Aquila E Aquila Pid
0985 – AQUILA E AQUILA PID ça... - Page 33 Legend: Coffee brew group Water tank lid Coffee delivery level Water tank Filter holder m. General switch Steam valve Machine light ON Steam wand Heating light Hot water valve Termopid (if present) Hot water wand Tank/service valve Boiler gauge + Tank/service switch (0=tank/1=service) Pump gauge Pump pressure adjustment...
-
Page 34: 0985 - Aquila
0985 – AQUILA Commissioning The 0985 Aquila model without TermoPID can be supplied either with water coming from the tank or from the water mains. According to the type of supply, proceed as follows. Tank Position the tank/service tap (q), underneath the machine, on tank. Position the tank/service switch (r) on tank. - Page 35 Coffee brew Remove the filter holder (c) from its seat, turning it clockwise. Fill the filter with one or two doses of coffee (according to the filter inserted). Press the coffee with the presser. Place the filter holder (c) to its seat, turning it anti-clockwise. Place the cups under the corresponding outlets under the filter holder.
- Page 36 To engage the Standby/Economy function so that the machine, after 20 minuties with no coffee delivery, will automatically set in Standby/Economy, proceed as follows: Switch off the machine. Keep the lever raised as for dosing a coffee. Switch on the machine. The LED flashes twice = Standby/Economy not engaged.
- Page 37 Pump pressure adjustment valve The machine is delivered with the valve set at 10 Bar. The end user can adjust the valve (s) to increase or decrease the pressure. Release the filter holder from the group. Remove the filter from the filter-holder. Insert the blind filter in the filter-holder.
- Page 38 Specific functions of model 0985 Aquila Filling Timeout If the boiler filling takes longer than 120 seconds, the machine generates an alarm with an intermittent acoustic warning. This condition may occur if the machine is switched on for the first time, with the tank completely empty.
-
Page 39: 0985 -Aquila Pid
0985 –AQUILA PID Commissioning The 0985 Aquila PID model can be supplied either with water coming from the tank or from the water mains. According to the type of supply, proceed as follows. Tank Position the tank/service tap (q), underneath the machine, on tank. Position the tank/service switch (r) on tank. - Page 40 Coffee brew Remove the filter holder (c) from its seat, turning it clockwise. Fill the filter with one or two doses of coffee (according to the filter inserted). Press the coffee with the presser. Place the filter holder (c) to its seat, turning it anti-clockwise. Place the cups under the corresponding outlets under the filter holder.
- Page 41 Standby/Economy function The Standby/Economy is used to set the machine in a condition of low conpumption by switching off the boiler heating resistor. The machine automatically sets in Standby/Economy after 20 minutes if no coffee is delivered. When the machine is in Standby/Economy, the relevant LED (t) flashes every 2 seconds.
- Page 42 Pump pressure adjustment valve The machine is delivered with the valve set at 10 Bar. The end user can adjust the valve (s) to increase or decrease the pressure. Release the filter holder from the group. Remove the filter from the filter-holder. Insert the blind filter in the filter-holder.
- Page 43 Specific functions of model 985 with AQUILA Filling Timeout If the boiler filling takes longer than 120 seconds, the machine generates an alarm with an intermittent acoustic warning. This condition may occur if the machine is switched on for the first time, with the boiler completely empty.
-
Page 44: 0992 - Qm67 - 2 Boiler Pid
0992 – QM67 - 2 BOILER PID ça... - Page 45 Coffee brew group Pressure adjustment valve Coffee delivery lever Drip tray Filter holder m. General switch ON/OFF Steam valve Machine green light ON Steam wand Coffee heating red light Hot water valve Steam switch Hot water wand Steam green light ON Steam boiler pressure gauge+ Steam heating red light Pump pressure gauge...
- Page 46 TermoPID see the section “ ”. TERMO ID SETTING AND FUNCTIONING Coffee brew Remove the filter (c) holder from its seat, turning it clockwise. Fill the filter with one or two doses of coffee (according to the filter inserted). Press the coffee with the presser. Place the filter holder to its seat, turning it anti-clockwise.
- Page 47 Standby/Economy function The Standby/Economy is used to set the machine in a condition of low conpumption by switching off the boiler heating resistor. The machine automatically sets in Standby/Economy after 20 minutes if no coffee is delivered. When the machine is in Standby/Economy, the relevant LED (u) flashes every 2 seconds To exit from Standby/Economy, just deliver a coffee with the lever.
- Page 48 Coffee pressure adjustment valve The machine is delivered with the valve set at 10 Bar. The end user can adjust the valve (k) to increase or decrease the pressure. Release the filter holder from the group. Remove the filter from the filter-holder. Insert the blind filter in the filter-holder.
- Page 49 Specific functions of model 0992 QM67 - 2 Boiler PID Filling Timeout If the boiler filling takes longer than 120 seconds, the machine generates an alarm with an intermittent acoustic warning. This condition may occur if the machine is switched on for the first time, with the boiler completely empty.
-
Page 50: 0995 - Vetrano
0995 – VETRANO ça Legend: Coffee brew group Cup warmer Coffee delivery lever Water tank Filter holder General switch + Light ON Steam valve m. Heating light Steam wand Boiler filling light Hot water valve Tank/service valve Hot water wand Tank/service switch (0=tank/1=service) Steam boiler gauge+ Direct discharge tank... - Page 51 l x h x p 460 mm 26 K EIGHT – 50/60 H – 60 H 220/230 - 115 OLTAGE 1500 W OWER ANK CAPACITY LITRES 1,80 OILER CAPACITY LITRES +5°C / +45°C EMPERATURE Commissioning The 0995 Vetrano model can be supplied either with water coming from the tank or from the water mains.
- Page 52 Wait until the machine reaches the working temperature indicated by the orange light that switches off (m) and the boiler gauge pointer (h) that is to indicate a value between 1 Bar and 1,5 Bar. When used for the first time, with the machine warmed, allow an outlow of approx.0,5 litres of water to flush the group activating the coffee delivery.
- Page 53 Hot water delivery Place the container to collect the water under the hot water wand (g). Open the water tap (f) to deliver the hot water. When the required level is reached close the water tap. Pump pressure adjustment valve The machine is delivered with the valve set at 10 Bar.
-
Page 54: 0995 - Vetrano - 2 Boiler Pid
0995 – VETRANO - 2 BOILER PID ça... - Page 55 Legend: Coffee brew group Machine ON green light Coffee delivery lever Coffee heating red light Filter holder Steam switch Steam valve Steam ON green light Steam wand Steam heating red light Hot water valve Standby/Economy light Hot water wand Tank/service valve Boiler pressure gauge+ Tank/service switch (0=tank;1=service) Pump pressure gauge...
- Page 56 Mains water supply: Connect the mains water supply pipe to the fitting under the machine. Position the tank/service tap (t), underneath the machine, on service. Position the tank/service switch (u) on service. For this machine it is necessary that the water collected in the drip tray is conveyed to the domestic drainage outlet.
- Page 57 In machines with display, during delivery it is possible to see the seconds count to check the extraction time. It is recommended to be very careful of the machine hot parts, especially the delivery group and the steam pipe. Never place the hands under the steam pipe and/or the group when carrying out the relevant operations.
- Page 58 To engage the Standby/Economy function so that the machine, after 20 minuties with no coffee delivery will automatically set in Standby/Economy, proceed as follows: Switch off the machine. Keep the lever raised as for dosing a coffee. switch on the machine. the LED flashes twice = Standby/Economy not engaged the LED flashes 3 times = Standby/Economy engaged bring the lever down...
- Page 59 Pump pressure adjustment The machine is delivered with the valve set at 10 Bar. The end user can adjust the valve (w) to increase or decrease the pressure. Release the filter holder from the group. Remove the filter from the filter-holder. Insert the blind filter in the filter-holder Attach the filter holder to the coffee brew group.
- Page 60 Specific functions of model 0995 Vetrano 2 Boiler Pid Filling Timeout If the boiler filling takes longer than 120 seconds, the machine generates an alarm with an intermittent acoustic warning. This condition may occur if the machine is switched on for the first time, with the boiler completely empty.
-
Page 61: 995 - Vetrano Dosata - 2 Boiler Pid
995 - VETRANO DOSATA - 2 BOILER PID ça... - Page 62 Legend: Coffee brew group m. General switch ON/OFF Coffee delivery control Machine ON green light Filter holder Coffee heating red light Steam valve Steam switch Steam wand Steam ON green light Hot water valve Steam heating red light Hot water wand Tank/service valve Boiler gauge Tank/service switch (0=tank;1=service)
- Page 63 Mains water supply: Connect the mains water supply pipe to the fitting under the machine. Position the tank/service tap (s), underneath the machine, on service. Position the tank switch (t) on service. For this machine model it is necessary that the water collected in the drip tray is conveyed to the domestic drainage outlet.
- Page 64 It is recommended to be very careful of the machine hot parts, especially the delivery group and the steam pipe. Never place the hands under the steam pipe and/or the group when carrying out the relevant operations. Steam delivery Activate the steam delivery for a few seconds with the knob (d) and discharge the condensation formed in the steam pipe into the drip tray (l) then close the steam delivery.
- Page 65 Using one of the keys from 1 to 4, the machine starts delivery, stopping when the set dose is reached (see “Dose setting”). For key 5 “continuous dose”, delivery has to be stopped by pressing the same key. Dose setting Coffee dosing takes place automatically through the specific keys which, in the factory have been assigned a default quantity.
- Page 66 To engage the Standby/Economy function so that the machine, after 20 minuties with no coffee delivery, will automatically set in Standby/Economy, proceed as follows: switch off the machine press keys 3+5 simultaneously switch on the machine key 1 flashes twice = Standby/Economy not engaged key 1 flashes 3 times = Standby/Economy engaged press key 4 to decrease the flashes (Standby/Economy disengagement) press key 5 to increase the flashes (Standby/Economy engagement)
- Page 67 Pump pressure adjustment The machine is delivered with the valve set at 10 Bar. The end user can adjust the valve (v) to increase or decrease the pressure. Release the filter holder from the group. Remove the filter from the filter-holder. Insert the blind filter in the filter-holder.
- Page 68 Factory values reset To reset the machine factory values, follow these steps: Switch off the machine. Press simultaneously keys 1+3+5. Switch on the machine. Release the keys when they start to flash. ça...
- Page 69 Specific functions of model 0995 Vetrano Dosata 2 Boiler PID Filling Timeout If the boiler filling takes longer than 120 seconds, the machine generates an alarm with an intermittent acoustic warning and flashing of the dosing keys. In this alarm condition the boiler heating does not start. This condition may occur if the machine is switched on for the first time, with the boiler completely empty.
-
Page 70: Termopid Functioning And Programming (Excluding Model 0960 Carola)
3. TERMOPID FUNCTIONING AND PROGRAMMING (excluding model 0960 CAROLA) Through one of the TermoPID models mounted, it is possible to adjust the temperature of the machine boilers. To set the temperature, proceed as follows. Set-point temperature programming ça To access the set point temperature adjustment programming, proceed as follows: ▼... -
Page 71: Alarms
Factory parameters preset With the PRESET operation, the TermoPID control unit can be reconfigured with the default parameters (factory data). To perform the PRESET, proceed as follows: ▼. With the termopid disabled. press Power the board. When the display shows “prs” release the key. Cut-out the power to the board. -
Page 72: Pid Parameters Graph (Model 0960 Carola)
Pid Parameters Graph (model 0960 CAROLA) ET POINT TEMPERATURES ça... - Page 73 ET POINT TEMPERATURES ça...
- Page 74 ET POINT TEMPERATURES ça...
-
Page 75: Accessories
4. ACCESSORIES ça Legend: Two cups filter Brush One cup filter Mains input pipe Blind filter Wooden presser One cup filter holder Discharge pipe Two cups filter holder... -
Page 76: Transport
5. TRANSPORT Packaging During transport, always keep the package in the correct position referring to the indications printed on the outside of the box. Do not turn over or lay the machine and packaging on its side. The packaging contains loose parts and accompanying documentation which is to be kept for further consultation. -
Page 77: Installation
6. INSTALLATION The machine is shipped ready for installation in accordance with the data found rating plate. Ensure that the machine specifications comply with those of the local electrical power supply. The electrical system must be equipped with an efficient residual current device or an automatic circuit breaker with an efficient earthing system. -
Page 78: Machine Cleaning
7. MACHINE CLEANING Careful and accurate cleaning of the machine is very important for the reliability, duration and safety of the equipment. Clean the filter, removing it from the filter holder and wash it in clean water. This operation is facilitated using a brush. At least once a week, even if the coffee pours out normally, it is necessary to clean the gasket of the group using the specific brush. -
Page 79: Grinding Capacity And Settings
Grinding Capacity and Settings The coffee grinding serves to increase the contact surface between the coffee and the water, enhancing the extraction of these substances by the water. To regulate a correct grinding for expresso coffee, it is necessary to find the right grinding point, the right granulometry. -
Page 80: Good Rules To Obtain An Excellent Expresso
Good Rules to Obtain an Excellent Expresso 1. Purge (or flushing) This is a fundamental operation to be carried out before every expresso, to ensure maximum hygiene and cleanliness of the beverage. Release the filter holder and deliver water to remove any coffee residue from previous coffees, and clean the machine spray. - Page 81 4. Pressing After grinding, the coffee has to be pressed with the aid of a manual presser, the only tool that guarantees absolute precision. 5. Filter holder cleaning – second part Now clean the filter holder again, this time along the edges, to remove any grounds.
-
Page 82: How To Heat And Dose The Milk
How to Heat and Dose the Milk Pour the fresh, cold milk into the mik jug, filling it half-way. Use 250 ml to prepare the milk for one cup; use 500 ml to prepare the milk for two cups. Bleed off the steam from the empty wand for a few seconds. Place the jug so that the spout of the steam pipe is just underneath the milk surface. -
Page 83: How To Pour The Milk Cream
How to Pour the Milk Cream Start to gently pour the milk as soon as it is mounted into the centre of the cup, making sure the cream remains compact. When the milk and the coffee are well mixed and the cup is half full, move your hand more quickly, bringing the beak of the jug to the cup and increasing the dosing angle. -
Page 84: Menú
Menú HORT COFFEE HITE Cup 150 ml Cup of 90 ml 40 ml espresso 110 ml hot milk, little cream 20 ml espresso SPRESSO AFFÈ ATTE Cup/Glass of 220 ml Cup of 90 ml 40 ml espresso ... -
Page 85: Maintenance
8. MAINTENANCE Maintenance operations are to be carried out with the machine off and cold, and with the electric plug disconnected. Do not use detergents, metal or abrasive tools, such as steel wool, metal brushes, needles, etc for cleaning, but only a moist cloth or sponge. -
Page 86: Extraordinary Maintenance
Extraordinary maintenance A blind filter is supplied together with the machine, for the cleaning of the coffee brew group. This operation is to be carried out at least once a week, to remove the coffee encrustations from the circuit. Release the filter holder from the group. Remove the filter from the filter holder and insert the blind filter. -
Page 87: Possible Problems
9. POSSIBLE PROBLEMS If the power supply cable becomes damaged, contact an authorised after sales service, because a special tool is necessary. Waste materials used for processing or maintenance, if they are not bio- degaradable or cause pollution, are to be placed in separate containers and handed over to the specific collection centres. - Page 88 Inconsistent coffee delivery: 1. Clean the filter in the filter holder. 2. The coffee grounds are too fine or too coarse. No hot water or steam delivery: 1. No water in the reservoir; refill with water. 2. Nozzles clogged; clean the nozzles of the steam spout with a pin. For any other type of irregularity or problem which has not been specified, unplug the power supply cable, avoid performing any direct repairs or inspections and contact a qualified technical service centre.
-
Page 89: Decommissioning
DECOMMISSIONING Temporary Empty the water reservoir and the spill basin. Switch off the main switch and remove the power plug from the mains. Perform the maintenance operations. Store the machine in a dry environment, protected from the elements and with limited access (avoid leaving it in the reach of minors or unfit persons). - Page 90 NOTE: _______________________________________________ _______________________________________________ _______________________________________________ _______________________________________________ _______________________________________________ _______________________________________________ _______________________________________________ _______________________________________________ _______________________________________________ _______________________________________________ _______________________________________________ _______________________________________________ ça _______________________________________________ _______________________________________________ _______________________________________________ _______________________________________________ _______________________________________________ _______________________________________________ _______________________________________________ _______________________________________________ _______________________________________________ _______________________________________________ _______________________________________________ _______________________________________________ _______________________________________________ _______________________________________________ _______________________________________________ _______________________________________________ _______________________________________________ _______________________________________________ _______________________________________________...
- Page 91 ça The taste of Perfection Via Stati Uniti D’America 6/8-20030 Senago (MI) Ph.02/9986106- Fax.02/99010947 Reg.delle Imprese di Milano (MI-1999-193954) Cap.Soc.€ 52.000,00i.v. – R.E.A.Milano 1593567 C.F.-P.IVA 12859930153 – N.Mecc.MI 300877 Http:/www.quickmill.it November 2018 Revision 1...
Need help?
Do you have a question about the MILANO 0980 and is the answer not in the manual?
Questions and answers