
Related Manuals for EOS InfraStyle


Summary of Contents for EOS InfraStyle
- Page 1 InfraStyle / InfraStyle i Control unit for infrared cabins Operating Instructions Made in Germany Druck-Nr.: 2902 5037 Stand: 25/19...
-
Page 2: Documentation
Read instructions Result of a step Table title Title of figure Revision history Date Version Description 23 April 2019 01.00 First version 25/2019 01.10 Installation dimensions for InfraStyle i changed. Operating Instructions - InfraStyle / InfraStyle i... -
Page 3: Table Of Contents
4.6.1 Screen saver ...................44 4.6.2 Standby mode................45 4.6.3 Operational lock/child lock ............46 4.6.4 Heating period – auto stop ............49 4.6.5 Operating data ................51 4.6.6 Display brightness................55 4.6.7 Holiday cottage mode ...............56 Troubleshooting ...................59 InfraStyle / InfraStyle i - Operating Instructions... - Page 4 Setting the ECO runtime ............71 Defining the light source manually ............72 Heating period limiter ................75 Updating firmware ..................76 6 General terms and conditions of service ..........80 7 Disposal ........................83 Operating Instructions - InfraStyle / InfraStyle i...
-
Page 5: General Safety Instructions
Caution Indicates a hazardous situation which, if not avoided, could result in minor or moderate injury. NOTICE Notice Indicates a hazardous situation which, if not avoided, will result in damage to the unit. InfraStyle / InfraStyle i - Operating Instructions... -
Page 6: Mounting And Electrical Installation
60335-2-53 may be used. Install a safety temperature limiter if needed. Observe the manufacturer's safety and installation instructions for infrared emitters and heating foils. Observe the cabin manufacturer’s safety and installation in- structions. Operating Instructions - InfraStyle / InfraStyle i... -
Page 7: Operator Instruction
Spending time in an infrared or sauna cabin can lead to serious health risks or even death for persons with health impairments. Persons with health impairments who spend time in a sauna must consult a doctor before entering an infrared or sauna cab- InfraStyle / InfraStyle i - Operating Instructions... - Page 8 Children and persons who have not received proper instruction must not clean or service the system. Operating Instructions - InfraStyle / InfraStyle i...
-
Page 9: Standards And Regulations
Electromagnetic compatibility – Requirements for household appliances, electric tools and similar apparatus – Part 1: Emission DIN EN 55014-2 Electromagnetic compatibility – Requirements for household appliances, electric tools and similar apparatus – Part 2: Immunity InfraStyle / InfraStyle i - Operating Instructions... -
Page 10: Identification
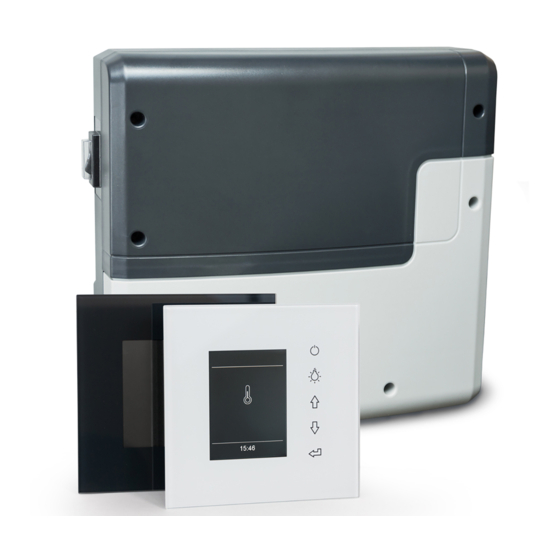
Identification This chapter describes the control panel. For a detailed description of the InfraStyle / InfraStyle i relay box, please refer to the installation instructions. The relay box can be operated with one of the following control panels: InfraStyle for mounting outside of the cabin, in black or white. -
Page 11: Intended Use
InfraStyle / InfraStyle i control panels The InfraStyle / InfraStyle i control panels are suitable for private and com- mercial use to control infrared cabins. They must only be mounted on a wall. -
Page 12: Description Of The Units
Check the scope of delivery for completeness. Ensure that you have received the correct control panel: InfraStyle for mounting outside of the cabin, either in or on the wall. InfraStyle i for mounting inside the cabin in the wall. - Page 13 Infrared receiver for coloured light module and sound mod- 94.6810 SBM-GLT-MOD HOME Modbus module 94.7077 SBM-GLT-KNX HOME KNX module 94.7078 Modular distributor RJ12 for connecting cable for control 2001.5298 panel and sauna bus InfraStyle / InfraStyle i - Operating Instructions...
-
Page 14: Control Panels
C Icons for program selection InfraStyle diagram The InfraStyle i control panel must only be mounted on the cabin's interior wall. In addition, a voltage regulator is mounted outside of the cabin. The InfraStyle control panel must only be mounted on the cabin’s exterior wall. -
Page 15: Control Panel Circuit Board
InfraStyle circuit board connections InfraStyle i A Front panel – back D Sauna bus connection B Insulation E Voltage regulator connection C Circuit board (diagram) F Memory card (microSD) connection InfraStyle i circuit board connections InfraStyle / InfraStyle i - Operating Instructions... -
Page 16: Technical Data
Housing Plastic Control panel dimensions (W x H x InfraStyle: 127 x 130 x 25 mm, mounting depth approx. 20 mm InfraStyle i: 142 x 202 x 42 mm, mounting depth approx. 37 Voltage regulator for InfraStyle i Aluminium housing, approx. 75 x 40 x 30 mm (L/W/H), cable length 3 m... -
Page 17: Operation
Add-on modules or accessories are detected after the unit is switched on again and their corresponding icons appear in the sub-menus. 09:12 09:12 InfraStyle InfraStyle i A Front panel C Status bar B Display D Function buttons Control panels InfraStyle / InfraStyle i - Operating Instructions... - Page 18 The home screen (standby) appears after the display has not been touched for 15 seconds. Settings that have not been saved are lost. Date and time are saved if the built-in battery is in working order. All other settings are saved permanently. Operating Instructions - InfraStyle / InfraStyle i...
-
Page 19: Switching The System On/Off
: Press and hold for approx. 3 seconds until the cabin is switched on. 09:12 The cabin is switched on with the pre-set parameters after the countdown. Switching the system off Press InfraStyle / InfraStyle i - Operating Instructions... -
Page 20: Switching The Lighting On/Off
The lighting must conform to protection class IPX4 (splash- proof) and be resistant to ambient temperatures. Connect only dimmable light sources. Setting the light output, see 5.2 Defining the light source manually, 72. Operating Instructions - InfraStyle / InfraStyle i... -
Page 21: Configuration Upon Commissioning Or After A Reset
The settings must be redefined upon commissioning and after a complete system reset. The program guides you through the required steps. Defining the user interface language Select a language and confirm. Language 10:01 InfraStyle / InfraStyle i - Operating Instructions... - Page 22 Set the minutes and confirm. Setting the date Set the year, month and day and confirm your settings. Date Setting year 03.01.2019 09:22 Once a setting is confirmed, the next place value is selected. Operating Instructions - InfraStyle / InfraStyle i...
- Page 23 08:27 You must now set the channel groups and operating mode for infrared operation. Configuring the IR channel groups, 68 Setting the operating mode, 27 InfraStyle / InfraStyle i - Operating Instructions...
-
Page 24: Adjusting The Ir Emitters
IR emitter in Emitter operating mode, but rather is switched off when the ambient temperature reaches 70°C. In Foil operating mode, it is controlled via the ambient temperature sensor. Note that the intensity and temperature settings impact the duration of the heat-up phase. Operating Instructions - InfraStyle / InfraStyle i... -
Page 25: Basic Settings
15 seconds. You can end standby mode by tapping on one of the following icon buttons: Up, Down, or Enter. One of the following icons is displayed on the default screen, depending on the operating mode. 10:51 10:51 Default screen InfraStyle / InfraStyle i - Operating Instructions... - Page 26 4.5.7 Recurring heating periods, 36 Settings ECO mode 4.6 Advanced settings, 43 4.5.8 Switching ECO mode on/off, 41 Back When the system is switched off, you can close a sub-menu by pressing Operating Instructions - InfraStyle / InfraStyle i...
-
Page 27: Ir Operating Mode
IR intensity. In this operating mode, only the intensity of the IR emitters can be set. Depending on the IR operating mode you select, you can now set the temperature and/or intensity. InfraStyle / InfraStyle i - Operating Instructions... -
Page 28: Ir Temperature
Set the temperature and confirm. Temperature Setting for operation IR mode 65°C 09:07 Confirm the set value. The value is saved and the display returns to the screen for operating mode selection. Operating Instructions - InfraStyle / InfraStyle i... -
Page 29: Ir Intensity
You can set the intensity only after you have defined the channel groups. See 5.1.6 Configuring the channel groups, 68 Setting the IR emitter intensity : Select and confirm. IR intensity °C °C 09:01 Select the channel and confirm. B: Back Middle 09:05 InfraStyle / InfraStyle i - Operating Instructions... -
Page 30: Automatic Start Time
4.5.4 Automatic start time This function allows you to set the automatic start time up to 24 hours in advance. Setting the automatic start time, 31 Deleting the start time, 32 Operating Instructions - InfraStyle / InfraStyle i... - Page 31 Time 6:00 09:21 A line appears under the active place value. Confirmed numbers are displayed in green. The start time flashes in the status bar next to the time. 09:10 14:15 InfraStyle / InfraStyle i - Operating Instructions...
-
Page 32: Dimming The Cabin Lighting
4.1 Switching the system on/off, 19 5.2 Defining the light source manually, 72 Setting the brightness of the cabin lighting : Select and confirm. Light °C °C 09:01 Operating Instructions - InfraStyle / InfraStyle i... - Page 33 Operation Set the brightness and confirm. Light Setting brightness 100% 09:02 The value can be set in 1% increments between 0% and 10% and in 5% increments between 10% and 100%. InfraStyle / InfraStyle i - Operating Instructions...
-
Page 34: One-Time Heating Period
Setting a one-time heating period, 34 Deleting timer settings, 36 Setting a one-time heating period : Select and confirm. Timer °C °C 09:01 : Select and confirm. Timer Select single event 09:02 Operating Instructions - InfraStyle / InfraStyle i... - Page 35 Setting the IR temperature, 28 b) Setting the IR emitter intensity, 29 In addition to the time, the date and the time of the next heating period flashes in the status bar. Monday 09:10 14:15 InfraStyle / InfraStyle i - Operating Instructions...
-
Page 36: Recurring Heating Periods
Setting the second heating period in the series, 40 Deleting the heating period in a series, 41 Setting the time for the first heating period of the series : Select and confirm. Timer °C °C 09:01 Operating Instructions - InfraStyle / InfraStyle i... - Page 37 Operation : Select and confirm. Timer Select series event 09:02 Select the day of the week and confirm. Monday 09:04 InfraStyle / InfraStyle i - Operating Instructions...
- Page 38 2 3 4 09:05 Enter the start time and runtime for each heating period. Set the hours and minutes for the start time and confirm. Start time Setting Hour Monday 1 14:15 09:06 Operating Instructions - InfraStyle / InfraStyle i...
- Page 39 See 5.3 Heizzeitbegrenzung, 78. The maximum heating period can be pre-set. See 5.3 Heizzeitbegrenzung, 78. You can set a temperature for the set period. Setting the IR temperature, 28 InfraStyle / InfraStyle i - Operating Instructions...
- Page 40 Confirm the operating mode. f) Set the temperature. In addition to the time, the date and the time of the next heating period flashes in the status bar. Monday 09:10 14:15 Operating Instructions - InfraStyle / InfraStyle i...
-
Page 41: Switching Eco Mode On/Off
From the main menu. Cancelling ECO mode from the main menu, This option allows you to cancel ECO mode early even if a runtime has been pre-set. Using a push button that is available as an option. InfraStyle / InfraStyle i - Operating Instructions... - Page 42 09:10 Cancelling ECO mode from the main menu : Select and confirm. ECO stop °C 09:51 ECO mode is deactivated. The heating is started up again as defined in the settings. Operating Instructions - InfraStyle / InfraStyle i...
-
Page 43: Advanced Settings
Setting the heating period, 49 Chapter 4.6.5 Operating data, 51 Display brightness, Holiday cottage mode, Setting the contrast, 55 Entering the PIN for holiday cottage mode and activating it, 57 InfraStyle / InfraStyle i - Operating Instructions... -
Page 44: Screensaver
: Select and confirm. Screensaver 09:01 Set the hours and minutes and confirm. Start time Setting Hour 08:21 The time is saved. The home screen with date and time is displayed as the screen saver. Operating Instructions - InfraStyle / InfraStyle i... -
Page 45: Standby Mode
In standby mode, the display is completely black. Tap on one of the icon buttons to end standby mode. Setting the time for standby mode activation : Select and confirm. : Select and confirm. Standby 09:01 InfraStyle / InfraStyle i - Operating Instructions... -
Page 46: Operational Lock/Child Lock
No access to the control unit The control unit cannot be used if the PIN is not known. Save the PIN in a safe place. Contact your retailer or EOS Service if you lose your PIN. Operating Instructions - InfraStyle / InfraStyle i... - Page 47 In this mode, it is only possible to switch off the heat if it is running and switch on the lighting. You must enter the PIN to use any of the other functions. InfraStyle / InfraStyle i - Operating Instructions...
- Page 48 Resetting the PIN for the operational lock/child lock Keypad lock Setting Code 0000 09:14 Confirm the first zero (0). Keypad lock Setting Code 0000 09:14 The cursor appears under the second zero. Operating Instructions - InfraStyle / InfraStyle i...
-
Page 49: Heating Period - Auto Stop
6 hours. If the system is used commercially, there is no limit for the heating period. Please observe the statutory intermission times. 5.3 Heating period limiter, 75 Setting the heating period : Select and confirm. : Select and confirm. Auto stop 09:01 InfraStyle / InfraStyle i - Operating Instructions... - Page 50 6 hours. Therefore, it is only possible to decrease the heating period. If the system is used commercially, you must observe the statutory intermission times. The end of the heating period is displayed in the top bar. 5:55:25 13:18 Operating Instructions - InfraStyle / InfraStyle i...
-
Page 51: Operating Data
Retrieving contact data, 54 Retrieving the firmware version and unit serial number : Select and confirm. : Select and confirm. Operation data 09:01 : Select and confirm. Operation data Firmware version 09:11 InfraStyle / InfraStyle i - Operating Instructions... - Page 52 Firmware version Firmware version Serial 123456789 Serial 001234567 Panel L.-IR R 3.29 R 1.15 09:11 09:11 Retrieving the next service date : Select and confirm. : Select and confirm. Operation data 09:01 Operating Instructions - InfraStyle / InfraStyle i...
- Page 53 09:13 Service/Maintenance Time remaining until recommended maintenance 500 h 09:15 The amount of time remaining until the next service date is displayed. The operation time is set to 500 hours by the factory. InfraStyle / InfraStyle i - Operating Instructions...
- Page 54 Operation Retrieving contact data : Select and confirm. : Select and confirm. Operation data 09:01 : Select and confirm. Operation data Contact data 09:15 Operating Instructions - InfraStyle / InfraStyle i...
-
Page 55: Display Brightness
Fax: +49 (0)2775 82-431 servicecenter@eos-sauna.de www.eos-sauna.de 09:15 4.6.6 Display brightness You can adjust the display's brightness to accommodate environmental conditions. Setting the contrast : Select and confirm. : Select and confirm. Display brightness 09:01 InfraStyle / InfraStyle i - Operating Instructions... -
Page 56: Holiday Cottage Mode
No access to the control unit The control unit cannot be used if the PIN is not known. Save the PIN in a safe place. Contact your retailer or EOS Service if you lose your PIN. Operating Instructions - InfraStyle / InfraStyle i... - Page 57 Holiday home mode Setting Code for locking 1000 09:11 Enter the numbers and confirm each number. Confirmed numbers are displayed in green. The display switches to the standby screen and is locked. InfraStyle / InfraStyle i - Operating Instructions...
- Page 58 0000 09:16 Confirm all four white zeros. The zeros are displayed in green. The display switches to the standby screen. The lock is removed and all functions are available again. Operating Instructions - InfraStyle / InfraStyle i...
-
Page 59: Troubleshooting
Too many add-on modules connected. Connect IR module with separate power supply. Bus connection plug not plugged in. Plug in plug. Bus cable damaged. Replace bus cable. Unit not detected. Set unit address for the module. InfraStyle / InfraStyle i - Operating Instructions... -
Page 60: Service Settings
This can lead to serious health risks or even death in persons with health impairments. Only trained personnel may change settings at the service level. Service level code (5349) should be given only to trained per- sonnel. Operating Instructions - InfraStyle / InfraStyle i... -
Page 61: Service Level
Temperature control Setting the cabin Display manufacturer contact data °C temperature, 67 IR setup Configuring the IR channel groups, 68 Setting the ECO function runtime, 71 HOME function Back See separate documentation. InfraStyle / InfraStyle i - Operating Instructions... -
Page 62: Opening Service Settings
CAUTION! Only trained personnel may change settings at the service level. Enter code 5349 and confirm. Code Setting Code 5349 09:11 Increase or decrease the individual numbers and confirm. Confirmed numbers appear green. Select the desired icon and confirm. Operating Instructions - InfraStyle / InfraStyle i... -
Page 63: Service/Maintenance
When it is time for service again, a reminder with the saved contact data is displayed when the unit starts. For information about the amount of time remaining before service is required again, see Retrieving the next service date, 52. InfraStyle / InfraStyle i - Operating Instructions... -
Page 64: Switching Hysteresis For The Ir Temperature
Example — 46°C target temperature and hysteresis 4 K: The heater is switched off at 48°C and switched on at 44°C. Setting the hysteresis Open the service settings. See 5.1.1 Opening service settings, 62 : Select and confirm. hysteresis °C 09:21 Operating Instructions - InfraStyle / InfraStyle i... -
Page 65: Reset Function
5.1.4 Reset function You can perform a factory reset to restore the operating data or all of the settings. Resetting the settings Open the service settings. See 5.1.1 Opening service settings, 62 InfraStyle / InfraStyle i - Operating Instructions... -
Page 66: Temperature Control
This offset can be set to a higher or lower value between -10 K to +10 K. Example — 2 K: The temperature is displayed approx. 2 K lower than it would be if a different measuring device were used. Operating Instructions - InfraStyle / InfraStyle i... - Page 67 Setting the cabin temperature Open the service settings. See 5.1.1 Opening service settings, 62 °C : Select and confirm. temperature adaption °C 09:21 Set the desired offset and confirm. temperature adaption Setting Temperature 09:22 InfraStyle / InfraStyle i - Operating Instructions...
-
Page 68: Configuring The Channel Groups
IR group 1 IR group 2 IR group 3 IR group 4 IR group 5 Configuring the IR channel groups Open the service settings menu. Opening the service settings menu, 62 Operating Instructions - InfraStyle / InfraStyle i... - Page 69 Service settings : Select and confirm. IR setup °C 09:11 Select the channel and confirm. Assignment channel A A B C 09:15 InfraStyle / InfraStyle i - Operating Instructions...
- Page 70 Follow the same steps to configure the next channel group. Once the channel groups are configured, the IR temperature and IR intensity can be set. Setting the IR temperature, 28 Setting the IR emitter intensity, 29 Operating Instructions - InfraStyle / InfraStyle i...
-
Page 71: Setting The Eco Runtime
Setting the ECO function runtime Open the service settings. See 5.1.1 Opening service settings, 62 : Select and confirm. °C 09:11 InfraStyle / InfraStyle i - Operating Instructions... -
Page 72: Defining The Light Source Manually
The current setting is shown on the display. Display symbol Setting Code Inductive/resistive load (lighting for phase con- 8001 trol), if light bulbs are used. Factory setting Capacitive load (lighting for phase control) 8002 Electrical ballasts for phase-cut dimmer Operating Instructions - InfraStyle / InfraStyle i... - Page 73 Disconnect the light source from the main circuit board. Reconnect the power supply and switch on the relay box again. : Select and press and hold until the code entry is displayed. Settings °C 10:01 InfraStyle / InfraStyle i - Operating Instructions...
- Page 74 Disconnect the relay box from the mains supply and reconnect the light source. Close the housing again. Reconnect the power supply and switch on the relay box again. Dim the cabin lighting. Light Setting brightness 09:02 Check the setting on the display. Operating Instructions - InfraStyle / InfraStyle i...
-
Page 75: Heating Period Limiter
The number of hours applies to a continuous heating period. The heating automatically switches off once the heating period has ended. Setting the heating period limiter : Select and press and hold until the code entry is displayed. Settings °C 10:01 InfraStyle / InfraStyle i - Operating Instructions... -
Page 76: Updating Firmware
32 GB. The SD card must be formatted with the FAT32 file sys- tem. You can obtain the update from EOS as follows: Card with firmware. ZIP file with the zipped update files as a download from the EOS home page. NOTICE Equipment damage due to a faulty update The device can become unusable if the update is interrupted. - Page 77 Open the context menu (right mouse click) and choose Format. The SD card must be formatted with the FAT32 file system. Preparing the update Download the most recent firmware from the EOS website. eos-sauna.com/service-support/software Unzipping the ZIP file: a) Unzip the ZIP file you just downloaded and copy it to the formatted memory card.
- Page 78 NOTICE Ensure that the power supply is not interrupted during the up- date process. Insert the memory card in the card slot on the control panel’s circuit board. Insert it until the card is clearly engaged. Operating Instructions - InfraStyle / InfraStyle i...
- Page 79 Repeating the update if unsuccessful Load the old software version onto the card. Perform the steps as described in Installing the update, 78. Repeat the update once the old software version has been restored. InfraStyle / InfraStyle i - Operating Instructions...
-
Page 80: General Terms And Conditions Of Service
The customer shall provide assistance free of charge to the manufacturer in rendering services. In the case of a warranty claim, the manufacturer shall provide replace- ment parts necessary for servicing free of charge. Operating Instructions - InfraStyle / InfraStyle i... - Page 81 Wear parts shall include, for example, light sources, glass elements, tubular heating elements and sauna heater stones. Only original replacement parts may be used within the warranty period. InfraStyle / InfraStyle i - Operating Instructions...
- Page 82 The manufacturer’s General Terms and Conditions of Business, in the ver- sion available at www.eos-sauna.com/agb, shall apply in addition to the foregoing terms and conditions of service. Operating Instructions - InfraStyle / InfraStyle i...
-
Page 83: Disposal
Do not dispose of the unit with household waste. Packaging InfraStyle / InfraStyle i packaging can be completely separated for disposal and recycled. The following materials are used in the packaging: Used paper, cardboard ... - Page 84 Store this address with the Operating Instructions in a safe place. Please always provide us with nameplate data, such as model, item num- ber and serial number so we can provide fast and efficient support. Date of sale Stamp/retailer signature: © EOS Saunatechnik GmbH - All rights reserved.
Need help?
Do you have a question about the InfraStyle and is the answer not in the manual?
Questions and answers