EOS Infratec Classic Assembly And Operating Instruction
Control unit for infrared cabins
Hide thumbs
Also See for Infratec Classic:
- Assembly and operating instruction (41 pages) ,
- Assembly and operating instruction (41 pages)

Related Manuals for EOS Infratec Classic


Summary of Contents for EOS Infratec Classic
- Page 1 Infratec Classic control unit for infrared cabins Assembly and operating instruction Made in Germany Druck Nr. 29343654en / 07.17...
-
Page 2: Table Of Contents
English Table of Contents Technical data ...............................3 General Information ...........................4 General Safety Precautions ........................4 Electrical installations ..........................6 Connection of IR radiators ........................6 Installation of the cabin lighting ......................7 Connection diagram ...........................8 Operation Setting the display language ........................9 Starting the unit ............................10 Cabin lighting............................. -
Page 3: Technical Data
Technical data Voltage: 230 V N AC 50 Hz Fusing: 1 x 16 A Power intake : max. 3500 W Control range: 30 - 60° C Control characteristics: Digital, two-point control Sensor system: KTY sensor Heating time limitation: 1 - 99 Minutes Ambient temperature: -10 bis 40°... -
Page 4: General Information
Ensure that the housing cover is removed Dear Customer, With this IR controller you have purchased a only by a trained employee. high quality electronic appliance developed Use the unit only for the intended purpose and produced in conformance with the latest •... - Page 5 Installation maximum allowed load. The maximum load on the output may not exceed 3.5 kW. Attention! The control unit must not • The cable for cabin lighting shall be connect- be installed inside the IR cabin. ed to the lighting in the cabin (max. 100 W). • For control unit installation make a cut-out in the cabin wall as per drawing given below.
-
Page 6: Electrical Installations
K characteristic (slow reacting fuse). Mount the IR radiator according to the mount- ing instructions supplied with IR radiator. EOS IR radiators include connecting cable with the Wieland type plug (female). The output cable line of the control unit includes the female plug and corresponding plug adap- tor to connect up to 5 lines to IR radiators. -
Page 7: Installation Of The Cabin Lighting
The Infratec Classic control units with- ing, preferably through the middle of one of the wooden boards. out pre-installed cables (item no. 94.4388) 3. Guide the sensor cable through the drilled shall be connected only with the cable resist- hole. -
Page 8: Connection Diagram
Connection diagram Licht Netz Strahler Infratec Classic I R -E m itte r I R -E m itte r I R -E m itte r I R -E m itte r I R -E m itte r S e nsor... -
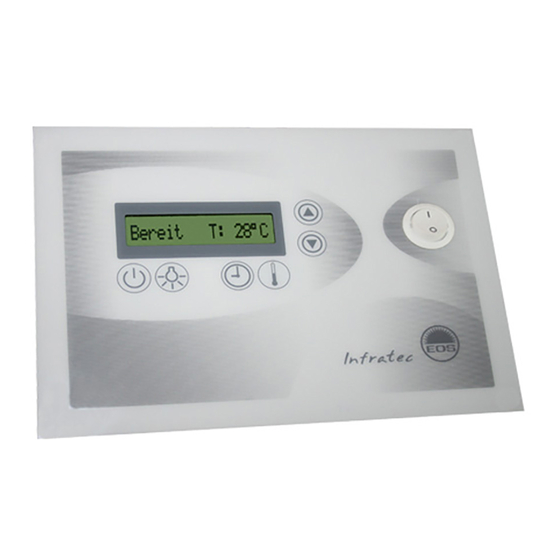
Page 9: Setting The Display Language
Controls Infratec Standby switch On / off Control buttons - up/down Light on / off Mode button - temperature Mode button - heating time Display Setting the display language The unit comes preset with German as the display language. To change the display language to English, first switch off the unit using the Standby switch. -
Page 10: Starting The Unit
Starting the unit Activate the Standby switch. Hello The unit displays a brief greeting and ready T: 28°C enters Standby mode. The display displays the current temperature in the cabin. Cabin lighting To switch the cabin lighting on or off, press the light button. -
Page 11: Setting The Heating Time
Setting the heating time You can preset the heating time between 1-99 minutes with the control unit. First, switch the unit to Standby mode. set time: 25 m Next, select the -button to switch to control mode. Now set the desired heating time using the buttons. -
Page 12: Error Messages And Troubleshooting
Error indicators Temperature sensor fault / circuit broken If the sensor is defective, the message shown sensor error opposite appears in the display. Have the unit examined by a trained technician. Reference value = approx. 2 k W at 20° C Temperature sensor short circuit sensor short error... -
Page 13: Service Address
Service Address: EOS Saunatechnik GmbH Schneiderstriesch 1 35759 Driedorf, Germany Tel: +49 (0)2775 82-514 Fax: +49 (0)2775 82-431 servicecenter@eos-sauna.de www.eos-sauna.de Equipment commissioning date: Please keep this address in a safe place togeth- er with the installation guide. Stamp and signature of the authorized elec-... -
Page 14: Terms And Conditions Of Service
General Terms and Conditions of Service shipments via parcel post. The manufacturer shall accept no liability for damage incurred as a result of improper I. Scope packaging in an individual shipment. Unless otherwise agreed in writing in a specific case, VI.
Need help?
Do you have a question about the Infratec Classic and is the answer not in the manual?
Questions and answers