Table of Contents
Advertisement
Quick Links
Advertisement
Table of Contents

Related Manuals for Honeywell SEARCHZONE SONIK SZSK-SMG Series


Summary of Contents for Honeywell SEARCHZONE SONIK SZSK-SMG Series
- Page 1 Gas Detection SEARCHZONE SONIK Technical Manual...
-
Page 2: Preface
Honeywell shall not be liable to pay for any gas leak investigation or service call carried out or arranged in response to an alarm. Honeywell Analytics Limited can take no responsibility for installation and/or use of its equipment if this is not done in accordance with the appropriate issue and/or amendment of the manual. -
Page 3: Table Of Contents
1 Preface Table of Contents 1 Preface 1.1 Introduction 1.2 Disclaimer 1.3 Scope 1.4 How to Use This Manual 1.5 Copyright & Trademarks 1.6 Patents 1.7 Revision History 2 Safety and Information 2.1 Warnings and Cautions 2.2 Important Information 2.3 Organisational Measures for Functional Safety 3 Overview and Introduction 3.1 Description of Product 3.2 Description of Function 3.3 Applications 3.4 Sensor Technology Description... -
Page 4: Preface
1 Preface 4.7 Bluetooth Considerations 5 Mechanical Installation 5.1 Visual Check after Transportation 5.2 Description 5.3 Main Parts 5.4 Mounting Searchzone Sonik 5.5 Pole Mount Installation 5.6 Wall Mount Installation 5.7 Assemble Cable Glands 5.8 Connect Cable Glands to the Searchzone Sonik 5.9 Detector Attachment 5.9.1 Detector removal 5.10 Connect Wires to PCB Terminals 5.11 Sunshade Installation 6 Electrical Installation 6.1 Power Supply Requirements... -
Page 5: Preface
1 Preface 8 Operation 8.1 Operation 8.2 Status Signalling 8.2.1 Visual Status Indicator 8.2.2 mA Loop Status 8.2.3 Relay Signalling 8.3 Normal Operation 8.4 Operation During Fault 8.5 Operation During Alarm 8.5.1 Pre-alarm 8.5.2 Alarm 8.5.3 Overload 9 Mobile App 9.1 General User Access 9.2 Terminology 9.3 Communications 9.3.1 Company Account Management 9.3.2 Creating a New Company Account 9.4 Connecting to Detectors 9.4.1 How to Connect to a Searchzone Sonik Detector 9.4.2 Making an Ad Hoc Connection to the Detector... -
Page 6: Preface
1 Preface 10 Communications 10.1 HART® 10.1.1 Searchzone Sonik HART Interface 10.2 Menu Structure 10.3 Commissioning using HART Communications 10.3.1 User Configuration 10.3.2 Configure Warning, Inhibit and Over-range Signal Levels 10.3.3 Configure Device Identification Information 10.3.4 Test 4-20 mA Loop Integrity 10.3.5 Configure Internal Alarm Threshold 10.3.6 Clear Alarm Latch 10.4 Maintenance using HART Communications 10.4.1 Inspection 10.4.2 Proof Test (Gas Leak Challenge) -
Page 7: Preface
1 Preface 13.3 IECEx Certification 13.4 CSA Certification 13.5 cULus Certification 13.6 Labelling 13.7 EU Declaration of Conformity 13.8 RoHS 13.9 China RoHS 13.10 WEEE 13.11 EMC 13.12 RED 13.13 REACH 13.14 FCC 13.15 IC 13.16 Export Compliance Classification 13.17 Wireless Approvals 13.18 Bluetooth® 14 Ordering Information 15 Specifications 15.1 Short Form Table Searchzone Sonik − Technical Manual PN 2331M1220 Issue 1 11/2018... -
Page 8: Safety And Information
2 Safety and Information 2 Safety and Information 2.1 Warnings and Cautions WARNING 1. Installation must be in accordance with the recognized standards of the appropriate authority in the country concerned. For Europe see EN 60079-14 and EN 60079-29-2. 2. Installation, operation and maintenance of the unit must meet requirements on safety and operation in hazardous areas. -
Page 9: Important Information
This manual is for use with the Honeywell Searchzone Sonik advanced ultrasonic gas leak detector only. Honeywell Analytics can take no responsibility for installation and/or use of its equipment if not done so in accordance with the appropriate issue and/or amendment of this Manual. -
Page 10: Overview And Introduction
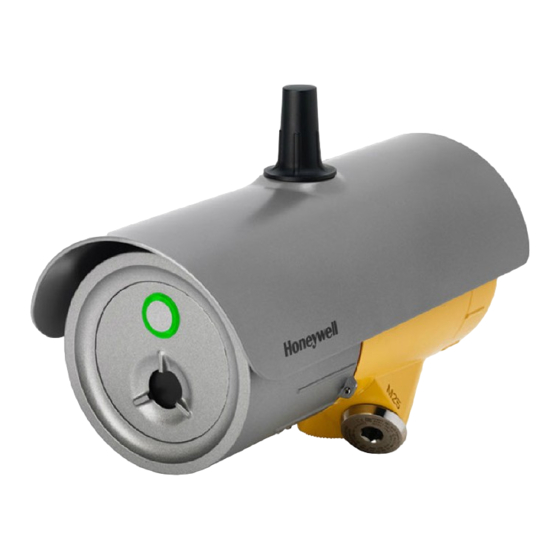
3 Overview and Introduction 3 Overview and Introduction 3.1 Description of Product The Searchzone Sonik is an advanced ultrasonic gas leak detector for use in hazardous areas. It detects high pressure gas leaks within the protection area, in order to provide an early alert to a hazard. While the Searchzone Sonik does not indicate the type of gas, it will respond to any high pressure gas leak within the coverage area and so will protect against the release of dangerous gases, whether they be toxic or flammable. -
Page 11: Range And Field Of Coverage
3 Overview and Introduction world conditions. The sound pressure level generated by a high pressure gas leak is dependent upon the pressure, the leak diameter, and upon the gas density. The Searchzone Sonik detector is designed to detect hazardous high pressure leaks. As a guide, the following table indicates typical maximum detection ranges that can be achieved for various levels of background ultrasonic noise. -
Page 12: Focus Mode
3 Overview and Introduction 3.6.2 Focus Mode Use Focus Mode for closer areas which are subject to high levels of background noise and where nuisance alarm sources are expected. Figure 4. Angular Field of Coverage in Focus Mode (% of Range) 3.7 Description of Gas Leak Detection Using Ultrasound A high pressure gas leak is a broadband continuous phenomenon. -
Page 13: Commissioning And Maintenance Tools
3 Overview and Introduction Figure 5. Standard Adjustable Figure 6. Adjustment ranges Mounting Bracket 3.9 Commissioning and Maintenance Tools The Searchzone Sonik Mobile App is an Android-based application downloadable from Google Play. It connects via Bluetooth to the Searchzone Sonik detectors and is the primary tool for installation, commissioning and maintenance. The HART and Modbus protocols provide additional means of communicating with Searchzone Sonik for the purpose of installation, commissioning and maintenance. -
Page 14: Available Accessories
3 Overview and Introduction 3.10 Available Accessories The Standard Adjustable Mounting Bracket and a Plastic Sunshade are provided as standard. The following items are available as optional accessories. Refer to the Ordering Information section of this manual for more information: 1. Large Adjustable Mounting Bracket 2. -
Page 15: Siting Considerations
4 Siting considerations 4 Siting Considerations When designing an installation for a Searchzone Sonik detector it is important to give due consideration as to where it is to be located, what potential sources of problems that may be encountered in the intended location and how the detector is to be mounted. Users are strongly recommended to consult with experts who are experienced in site mapping and siting of ultrasonic gas leak detectors when determining final positioning. -
Page 16: Mounting Position
4 Siting considerations 4.2.1 Mounting Position It is recommended that Searchzone Sonik is placed close to the area to be protected to maximise the detection performance. For best performance, use the following location principles when determining final positioning of the detector: •... -
Page 17: Bluetooth Considerations
4 Siting considerations 6) Choose Standard or Focus Mode with respect to the expected background noise levels and the nature of the risk to be covered. Refer to the Overview and Introduction section of this manual for more information. 7) Choose the detector’s mounting position and angle, considering a. -
Page 18: Mechanical Installation
5 Mechanical Installation 5 Mechanical Installation 5.1 Visual Check after Transportation The Searchzone Sonik pack includes: • The Searchzone Sonik Gas Leak Detector • Standard Adjustable Mounting Bracket • Plastic Sunshade • One certified blanking plug • Tool Kit To ensure that the Searchzone Sonik unit was not damaged during transport, perform the following checks: 1. -
Page 19: Main Parts
5 Mechanical Installation 5.3 Main Parts Figure 8. Searchzone Sonik general view LEGEND: 1. Searchzone Sonik Advanced Gas Leak Detector 2. Standard Adjustable Mounting Bracket to fit on a plate, pole or plant infrastructure 3. Sunshade 4. Antenna cover 5. Large Adjustable Mounting Bracket (optional) Searchzone Sonik... -
Page 20: Mounting Searchzone Sonik
5 Mechanical Installation 5.4 Mounting Searchzone Sonik Searchzone Sonik will normally be mounted at height, typically secured to a pole using the U-Bolts or Worm Drive Clips supplied in the Pole Installation Kit (optional). The supplied Standard Adjustable Mounting Bracket allows mounting on a plate, pole or other plant infrastructure. All bolts are captive to avoid accidental loss during installation. - Page 21 5 Mechanical Installation Figure 10. Standard Adjustable Mounting Bracket exploded view LEGEND: Position Description Pcs. Standard Adjustable Mounting Bracket flange Vertical pivot Horizontal pivot Keyed insert Conical washer Bolt M10x25 Captive Bolt M10x30 Nord lock washer M10 Bolt cover plate Plate retention strap Bolt M3x10 Nord lock washer M3 Retention strap screw...
-
Page 22: Pole Mount Installation
5 Mechanical Installation 5.5 Pole Mount Installation For pole installation, use the optional Pole Mount Fixing Kit. Refer to the Ordering Information section of this manual. 1. For poles 50 to 101 mm (2 to 4 inches) in diameter use the supplied Standard Adjustable Mounting Bracket. 2. - Page 23 5 Mechanical Installation Horizontal M10 bolts Figure 12. Standard Adjustable Mounting Bracket fitment using Worm Drive Clips Searchzone Sonik − Technical Manual PN 2331M1220 Issue 1 11/2018...
-
Page 24: Wall Mount Installation
5 Mechanical Installation 5.6 Wall Mount Installation For installation onto a wall, use M8 or M10 mounting bolts with washers (not supplied). Figure 13. Wall mount installation Searchzone Sonik − Technical Manual PN 2331M1220 Issue 1 11/2018... -
Page 25: Assemble Cable Glands
5 Mechanical Installation 5.7 Assemble Cable Glands Refer to the original manufacturer’s assembly instructions for the particular cable gland type. The wiring compartment is certified to be able to use EX d or Ex e glands to suite local requirements. Leave a service loop in the cable as per site standard procedures. NOTE Use certified cable glands and blanking plugs as per local standards. -
Page 26: Detector Attachment
5 Mechanical Installation 5.9 Detector Attachment 1. Remove the bolt cover plate (refer to the figure below). 2. Attach the Searchzone Sonik to Standard Adjustable Mounting Bracket. 3. Hold in place and hand-tighten the vertical M10 bolt with washer. The Standard Adjustable Mounting Bracket is designed so that Searchzone Sonik sits on the top spigot and is balanced to aid installation. - Page 27 5 Mechanical Installation Left-facing horizontal M10 bolt Figure 17. Set the vertical position of Detector to 0° Searchzone Sonik − Technical Manual PN 2331M1220 Issue 1 11/2018...
-
Page 28: Connect Wires To Pcb Terminals
5 Mechanical Installation 5.10 Connect Wires to PCB Terminals Wiring Compartment Cover Grub screw Figure 18. PCB Terminals CAUTION Remove power from Searchzone Sonik before performing any electrical installation or maintenance. CAUTION The equipment features pluggable connectors that are mechanically locked into position. These are not accessible by the user during normal operation. - Page 29 5 Mechanical Installation Wiring Compartment Cover Grub screw Left-facing horizontal M10 bolt Figure 19. Example position of 45° Searchzone Sonik − Technical Manual PN 2331M1220 Issue 1 11/2018...
-
Page 30: Sunshade Installation
5 Mechanical Installation 5.11 Sunshade Installation 1. Unscrew the antenna cover from the top of the detector. 2. Fit the standard (supplied) or stainless steel sunshade (optional) onto Searchzone Sonik. 3. Ensure the O-ring around the antenna is not damaged and is properly fitted. 4. -
Page 31: Electrical Installation
6 Electrical Installation 6 Electrical Installation CAUTION Remove power from the Searchzone Sonik before performing any electrical installation or maintenance. 6.1 Power Supply Requirements The Searchzone Sonik detector requires a voltage supply of 18 - 32 Vdc (nominal 24 Vdc). Power consumption is 4 W maximum when the internal heater is not active, i.e. -
Page 32: Relays
6 Electrical Installation The Searchzone Sonik features HART communications to provide access to the detector from a control system or hand-held device for the purpose of configuration and to provide status and diagnostic information. The total load resistance for the 4-20 mA current loop shall be less than 600 Ω, including the resistance of the 4-20 mA cable and input impedance of the equipment to be connected. -
Page 33: Terminal Wiring Description
6 Electrical Installation External earth connection Internal earth connection Figure 22. Terminal Wiring Compartment 6.4.1 Terminal Wiring Description Number Marking Description RS485 A RS-485 A (positive) RS485 B RS-485 B (negative) RS485 D RS-485 D (cable shielding) RS485 D RS-485 D (cable shielding) 4-20mA+ mA signal + 4-20mA-... -
Page 34: Searchzone Sonik Connection For Ma Loop Configuration As Current Source
6 Electrical Installation Number Marking Description Alarm 2 COM Alarm Relay 2 COM contact Alarm 2 NC Alarm Relay 2 NC contact Alarm 2 NO Alarm Relay 2 NO contact Alarm 1 COM Alarm Relay 1 COM contact Alarm 1 NC Alarm Relay 1 NC contact Alarm 1 NO Alarm Relay 1 NO contact... -
Page 35: Searchzone Sonik Connection For Ma Loop Configuration As Current Sink
6 Electrical Installation 6.4.3 Searchzone Sonik Connection for mA Loop Configuration as Current Sink Figure 24. mA loop configuration as current sink 6.4.4 Searchzone Sonik Connection for mA Loop Configuration as Isolated Output Figure 25. mA loop configuration as isolated output 6.5 Cabling Recommendations The cable used must be appropriate for the hazardous area classification and must meet local, national and company regulations. The use of industrial grade, screened field cable is recommended. -
Page 36: Earthing Recommendations
6 Electrical Installation 6.6 Earthing Recommendations CAUTION Any earthing regime employed must avoid earth loops. The following information is provided to assist with proper earthing of the Searchzone Sonik: • The Searchzone Sonik has both INTERNAL and EXTERNAL earth points provided (see Electrical Connections). This is to facilitate connection of the detector to protective earth. -
Page 37: Commissioning And Configuration
NOTE The prerequisite to commissioning using Bluetooth is to have the Searchzone Sonik Mobile App installed to a suitably-approved mobile device and that the user be fully registered to the Honeywell User Management Server (UMS). 7.3.1 Bluetooth® The Searchzone Sonik detector features a Bluetooth interface that allows non-intrusive connection using a mobile device running the Searchzone Sonik App. -
Page 38: Delay Time
7 Commissioning / First Time Operation / Configuration 7.5 Delay Time A delay time is used to minimize the possibility nuisance alarms and/or when immediate response is not required. The delay time setting should be assessed with regards to the following: •... -
Page 39: Operation
8 Operation 8 Operation 8.1 Operation This chapter describes the operation of Searchzone Sonik in different states (Normal, Alarm, Fault, Periodic Test). 8.2 Status Signalling Searchzone Sonik utilizes several outputs to indicate its status, namely the high visibility indicator, the mA Loop, relays and digital communication interfaces (Bluetooth, HART and Modbus). -
Page 40: Ma Loop Status
8 Operation 8.2.2 mA Loop Status The Searchzone Sonik is equipped with a 4-20 mA loop output which can operate in source or sink mode. Source and sink modes are configured by wiring. For more information see the wiring diagram in Electrical Installation section. This output is a safety-related output and is compatible for use in SIL 2 applications. -
Page 41: Operation During Alarm
8 Operation 8.5 Operation During Alarm Searchzone Sonik features three levels of alarm. Pre-Alarm, Alarm and Overload. 8.5.1 Pre-alarm During Pre-Alarm, the Alarm1 relay is energized/de-energized depending on its configuration. The 4-20 mA loop is set to 16 mA in Discrete mode. It is proportional to the sound pressure level (SPL) in Proportional mode. The visual indicator flashes red. 8.5.2 Alarm During Alarm, the Alarm2 relay is energized/de-energized depending on its configuration. -
Page 42: Mobile App
9 Mobile App 9 Mobile App The Searchzone Sonik App is an Android-based mobile application that is used to configure and commission Searchzone Sonik detectors. CAUTION The Searchzone Sonik App has been designed and tested to run on the Ecom Smart-EX 01 mobile phone. -
Page 43: Communications
User Management section of the App to add additional users to the Company group, using a new email address. Note Once the user is registered on ums.honeywell.com, they can use the same credentials (and Company Group) to access other Honeywell Industrial Safety products. - Page 44 9 Mobile App Return to the Searchzone Sonik App. The UMS will automatically complete the account verification process. Note The verification link will expire after 24 hours. After this has passed, repeat the steps in section 9.3.2 and a new verification link will be sent to the nominated email address.
- Page 45 9 Mobile App 9.3.2.3 Adding Further Users to Company Account When authenticated, new users will have the same administrative rights as the Initial User and will be able to access all detectors already registered, in addition to being able to register further detectors. Advise the new user that they will receive an authentication email, and ensure that they are able to respond to the email within 24 hours.
- Page 46 9 Mobile App 9.3.2.6 Logging In to Searchzone Sonik App (without Internet Connection) If your mobile device is not connected to the Internet, you can still log in to the Searchzone Sonik App and access registered detectors. You must have previously carried out at least one normal login (see section 9.3.2.5), with an Internet connection.
-
Page 47: Connecting To Detectors
• The Registration Sheet supplied with detector • Site records • The label inside detector wiring compartment • By contacting your Honeywell Customer Support Tap on the preferred method for entering this information and then either enter the Serial Number and Activation Key manually or scan the QR code as applicable. - Page 48 9 Mobile App The App lists only Searchzone Sonik detectors positioned within range. Other Bluetooth devices are ignored. Tap on ‘DETECTORS‘. To sort the list of detectors, tap on the MENU icon and then tap on ‘Detector List’. Select one of the detectors in the list to establish a connection to it.
-
Page 49: Making An Ad Hoc Connection To The Detector
Site records The label inside detector wiring compartment By contacting your Honeywell Customer Support 2. Ensure the mobile device is NOT connected to the Internet. Disconnect it from Wi-Fi and from the mobile data. The easiest way to do this is to place the mobile device into Airplane Mode. -
Page 50: Detector Overview
9 Mobile App 9.5 Detector Overview 9.5.1 Detector Status Once connected to the detector, the Searchzone Sonik mobile App will display the detector’s status and current ultrasonic sound readings (in decibels). The colour scheme of the Searchzone Sonik app will mirror that of the detector status as shown, in the following table: Detector State App Colour Scheme... -
Page 51: Detector Inhibit
9 Mobile App 9.5.2 Detector Inhibit The detector can be placed in an inhibit state for maintenance purposes. This will have the effect of suppressing the alarms, the current loop will be forced to the level that has been set for inhibit and the visual indicator will light yellow. -
Page 52: Detector Alarm History
9 Mobile App 9.6 Detector Alarm History Connect to the detector and navigate to the ‘Alarms’ tab on the reading screen by swiping left on the screen. Browse through the alarm history of the detector. Select an alarm record. You can see the graphical representation of the alarm readings. -
Page 53: Detector Maintenance
9 Mobile App 9.7 Detector Maintenance The Searchzone Sonik App features a range of tools to aid the correct maintenance of the Searchzone Sonik detector. After connecting to the detector via Bluetooth, you can perform maintenance tasks, e.g., setting the maintenance flag, testing the output current loop, setting relays, checking the function of the visual status indicator settings and running other diagnostic tests. -
Page 54: Set Maintenance Flag
9 Mobile App Tap on the ‘Filter’ icon to open the options. Select the filter options as required. Tap on ‘EXPORT LOG’ to export the diagnostic data to a CSV file on the mobile device. 9.7.2 Set Maintenance Flag It is possible to set a Maintenance Flag on the detector. This allows easy identification of those detectors that have been identified as requiring attention. -
Page 55: Output Test
9 Mobile App You will be prompted to confirm to set the flag. The maintenance icon will be shown on the screen. 9.7.3 Output Test Various aspects of the detector outputs can be manipulated and checked for test and verification purposes. In the ‘Maintenance’... -
Page 56: Diagnostics
9 Mobile App 9.7.3.2 Force timeout On applying a timeout value to ‘Force Timeout’, the following 3 timeout values will be set on the detector: 1. mA Force Loop Timeout 2. Relay Force Timeout 3. LED Force Timeout 9.7.3.3 Force relay This feature allows you to set each of the 3 relays to one of three states: NORMAL Select a ‘RELAY’... - Page 57 9 Mobile App The ‘Diagnostics’ menu opens. Tap on ‘Failures’, ‘Faults’ or ‘Warnings’ to show the results of diagnostics. To export diagnostics data, go to the Diagnostics menu and tap on ‘EXPORT DIAGNOSTICS’. Searchzone Sonik − Technical Manual PN 2331M1220 Issue 1 11/2018...
-
Page 58: Detector Settings
9 Mobile App 9.8 Detector Settings You can view all of the detector settings, including firmware details and background levels, with an option to export this data to a CSV file. (The CSV file is saved in the mobile device in location defined in the Application Settings.) To access the detector settings, tap on the ‘SETTINGS’... -
Page 59: Firmware Version
9 Mobile App After you connect to the detector, navigate to the main menu. Tap on the ‘Settings’ button. 9.8.1 Firmware Version Tap on ‘Firmware Details’ to display the current detector firmware information. Searchzone Sonik − Technical Manual PN 2331M1220 Issue 1 11/2018... -
Page 60: Background Levels
9 Mobile App 9.8.2 Background Levels The Searchzone Sonik App allows you to view a historical record of the background ultrasonic noise that has been logged by the connected Searchzone Sonik detector. This is particularly useful when determining suitable alarm levels for that particular situation. Tap on ‘Background Levels’... -
Page 61: Editing Detector Settings
9 Mobile App 9.8.3 Editing Detector Settings To change the settings, tap on the ‘Edit Settings’ icon. The ‘Edit Settings’ page will open. Enter a ‘Detector ID’ (such as an equipment tag number), which can contain alpha numeric characters. Should the string entered contain invalid characters, a warning message will be displayed. - Page 62 9 Mobile App Use ‘plus’ and ‘minus’ buttons to adjust values as required. Long press the button for faster setup. Tap on the ‘Operation mode’ menu to switch between ‘Discrete’ or ‘Proportional’ mode. Tap on the ‘Algorithm mode’ menu to choose ‘Standard’ or ‘Focus’...
- Page 63 9 Mobile App You will be prompted to confirm or reject the applied changes. If you wish to exit without applying the changes, tap on ‘Yes’. You will be prompted to confirm the applied changes or restore the previous version. Failure to apply the changes generates a warning message.
-
Page 64: How To Change Application Settings
9 Mobile App 9.9 How to Change Application Settings The application settings allow you to manage certificates, storage location for reports and default language. It also provides information on the current App software version. Depending on your administrator privileges, you can manage other user’s rights. Navigate to the main menu and tap on the ‘Settings’... -
Page 65: User Management
9 Mobile App 9.10 User Management In the main menu, tap on ‘User Management’ to view and manage user settings. A list of users associated with your account is shown. If you wish to add a user within the same company, tap on the ‘plus’... - Page 66 9 Mobile App Fill in the new user data. Confirm by tapping on ‘ADD USER’ button. Once the new user registration is complete, an email will be sent to the email address specified. Tap on ‘OK’ button. If you wish to remove a user, select the user and tap on the ‘REMOVE’...
-
Page 67: Communications
HART is a master-slave protocol, i.e. Searchzone Sonik does not continually transmit data but will respond on request. Searchzone Sonik has a HART Device Description (DD) file, which is available to download from Honeywell Analytics website www.honeywellanalytics.com or the HART Communication Foundation website www.fieldcommgroup.org. -
Page 68: Menu Structure
Guest 2 Change login profile 1 Guest 2 Engineer 3 Honeywell Engineer 3 Device Overview 4 Device Setup Selecting Device Setup leads to the further menu options, depending on the access level of the user. The menu structures are given below. ‘xxxx’ represents information, ‘????’ represents a user text field. - Page 69 10 Communications DEVICE SETUP MENU – ENGINEER ACCESS LEVEL Device Setup 1 Operations 1 Internal and Security Events 1 Latest Log 2 Diagnostics 2 Alarms/Proof Test 2 Older Log 3 Event History 3 Service 4 Settings 5 Account Device Setup 1 Operations 1 Detector Status xxxx 1 Start...
- Page 70 10 Communications DEVICE SETUP MENU – ENGINEER ACCESS LEVEL Device Setup 1 Operations 1 Detector Status xxxx 1 Operation Mode xxxx 2 Diagnostics 2 Inhibit Detector 2 Fault Level xxxx 3 Event History 3 Algorithm Mode 3 Inhibit Level xxxx 4 Settings 4 Alarms 4 Warning Level...
- Page 71 10 Communications DEVICE SETUP MENU – ENGINEER ACCESS LEVEL Device Setup 1 Operations 1 Detector Status xxxx 1 Function Test Interval xxxx 2 Diagnostics 2 Inhibit Detector 2 Change Interval 3 Event History 3 Algorithm Mode 4 Settings 4 Alarms 5 Account 5 mA Loop 6 LED...
-
Page 72: Commissioning Using Hart Communications
10 Communications 10.3 Commissioning using HART Communications Note: The instructions that follow assume that a suitable HART host is connected to the Searchzone Sonik and that the user is logged in with ‘Engineer’ profile access privileges. Introduction This section explains several operations that may be required during commissioning. The user should work through First Time Switch On, User Configuration and Configure Device Identification Information, before selecting further operations as required by the specific installation. -
Page 73: User Configuration
10 Communications Note: Depending on the mA Operation Mode that is selected, if gas leak is present, the detector will indicate a gas leak SPL reading. Note: If the output reverts to 3 mA or < 1 mA, a Warning or Fault is present. Follow the instructions below to investigate and clear a Warning or Fault (see Clear Faults or Warnings). -
Page 74: Configure Device Identification Information
10 Communications 1. Select Device Setup. 2. Select Settings. 3. Select mA Loop. 4. Select Inhibit Level. 5. Enter the new value for the current within the allowed range and press Enter. 6. Select Warning Level. 7. Enter the new value for the current within the allowed range and press Enter. 8. -
Page 75: Test 4-20 Ma Loop Integrity
10 Communications 10.3.4 Test 4-20 mA Loop Integrity It is recommended that the 4-20 mA loop integrity is tested by setting the Searchzone Sonik to output an over-range current. This will confirm that there are no faults in the system that would cause a current limit. Note: By default, this function will timeout after 10 minutes of inactivity. -
Page 76: Maintenance Using Hart Communications
10 Communications Note: If no active faults or warnings are present, the 4-20 mA output signal may have latched due to an earlier alarm that has now cleared. 6. Press Back to return to the Device Setup menu. 7. Select Operations. 8. -
Page 77: Proof Test (Gas Leak Challenge)
10 Communications 11. Press OK to confirm the operation. 12. The display shows a confirmation message. Press OK. 13. The display shows a note that the Searchzone Sonik will return to normal operation, press OK. 10.4.2 Proof Test (Gas Leak Challenge) Searchzone Sonik can be functionally checked using a canister of compressed air. -
Page 78: Modbus
10 Communications 10.5 Modbus The Searchzone Sonik detector provides a facility for Modbus digital communication between Searchzone Sonik and an external controller. Modbus is a widely-supported digital data communication protocol that provides a standardised set of data communication protocols. The principal features of the Modbus Interface are: •... -
Page 79: Modbus Electrical Connections
10 Communications 10.5.4 Modbus Electrical Connections Modbus connections are provided through the terminals in the wiring compartment of the Searchzone Sonik detector. Details of the wiring connections can be found in section 6.4.1 of this manual. 10.5.5 Modbus Termination Resistor If Searchzone Sonik is the last node in a Modbus system highway a 120 Ω termination resistor between A and B must be fitted to avoid reflections on the RS-485 circuit. -
Page 80: Modbus Registers
10 Communications 10.5.8 Modbus Registers Modbus Holding Qty Register Parameter Description Description Notes Register Address Type 40001 Modbus slave address MSB -> 0x27 Note 4 LSB -> Slave address (1 to 247) 40002 Detector Id Identical to 40001 Note 4 40003 to 40004 SPL dB value Reported gas leak level - Value of SPL for full spectrum... - Page 81 10 Communications Modbus Holding Qty Register Parameter Description Description Notes Register Address Type 40095 to 40096 mA - A4 level ----- 40097 to 40098 Not used ----- 40099 to 40102 Not used ----- 40103 to 40104 Not used ----- 40105 to 40106 Alarm delay ----- 40107 to 40108...
- Page 82 10 Communications Note 4 - Meaning of Modbuss Address MSByte LSByte 0x27 Modbus Address Note 5 - Definition of Relay configuration bit num name def. val 0 - De-energized 1 - Energized bit 0 Relay 1 Energized/De-energized 0 - Non-latching bit 1 Relay 2 Energized/De-energized 1 - Latching...
- Page 83 10 Communications Note 8 - Meaning of Sensor type invalid, no sensor found of mV default Searchzone Sonik 11 to 255 for future expansion Note 9 - The register is used to store two ASCII codes Note 10 - The float value of voltage/temperature is multiplied with 100 to get 2 decimal point (e.g., 3.2 should be read as 320). Searchzone Sonik...
-
Page 84: Maintenance
If the Searchzone Sonik detector was placed in an inhibit condition for the test, use the Searchzone Sonik App to return the detector to normal operation. 11.3 Suggested Maintenance Schedule The maintenance schedule will reflect local working environment and should be agreed with Honeywell representatives prior to commissioning the Searchzone Sonik. Searchzone Sonik − Technical Manual... -
Page 85: Response To Fault
11 Maintenance 11.4 Response to Fault Refer to the Problem Solving section of this manual for more information. 11.5 Product Life Expectancy The expected operating life of the Searchzone Sonik detector is 10 years. Searchzone Sonik − Technical Manual PN 2331M1220 Issue 1 11/2018... -
Page 86: Problem Solving
1. Searchzone Sonik does not contain any user serviceable parts. Do not open the main enclosure. Doing so will invalidate the warranty. 2. If a problem persists please contact Honeywell Analytics for advice, using the contact details given on the back page. Have the following information to hand:... -
Page 87: Problem Solving
12 Problem Solving 12.2 Problem Solving Fault / Problem Description Remedial Action Detector does not power up Power supply is not available Check that power is available and to specification and does not follow the start- Power supply is not within specification Check that LED indicator in on up cycle Wiring connections are not made... - Page 88 12 Problem Solving Fault / Problem Description Remedial Action 4-20 mA output is in fault 4-20mA loop wiring has been disturbed Check 4-20mA loop is correctly connected and terminated Reset the fault using the App or HART If the fault persists, power cycle the detector If the fault still persists, contact Authorized Service Detector indicates Fault After over-range cleared, detector...
-
Page 89: Certification And Approvals
13 Certification and Approvals 13 Certification and Approvals The Searchzone Sonik detector has attained the below listed approvals: 13.1 Hazardous Locations WARNING The equipment provides isolation according to IEC/EN 60079-11 clause 6.3.13 between circuits and earth. The equipment provides isolation according to UL/CSA 60079-11 clause 6.3.13 between circuits and earth. -
Page 90: Csa Certification
13 Certification and Approvals IEC Standards: • IEC 60079-0, Explosive atmospheres – Part 0: Equipment – General requirements - Edition 6th Edition (2011-06) + CORR. 1 (2012-01) + CORR 2 (2013-12) + I-SH 01 (2013-11) + I-SH 02 (2014-10) • IEC 60079-1, Explosive atmospheres – Part 1: Equipment protection by flameproof enclosures “d” - Edition 7th Edition (2014-06) •... -
Page 91: Labelling
SIMPLIFIED EU DECLARATION OF CONFORMITY R PLATING. UL CERT DRG - SEARCHZONE SONIK Hereby, Honeywell declares that the Searchzone Sonik equipment is in compliance with Directive 2014/53/EU. The full text of the S TO BE BS 3643. ATEX / IECEx AND NORTH AMERICAN CERT EU declaration of conformity is available at: www.honeywellanalytics.com. -
Page 92: China Rohs
Searchzone Sonik is compliant with all requirement and exemption set by the Radio Equipment Directive (2014/53/EU). 13.13 REACH Hereby, Honeywell declares that Searchzone Sonik fully complies with the related requirements of European Union Regulation (EU) 1907/2006 concerning the Registration, Evaluation, Authorization and Restriction of Chemicals (REACH). -
Page 93: Export Compliance Classification
Algeria*, Australia, Bahrain, Brazil, Brunei, China, Egypt*, India*, Indonesia, Iraq*, Israel, Japan*, Kazakhstan*, Korea, Kuwait, Malaysia, Mexico, New Zealand, Oman, Pakistan*, Philippines*, Qatar, Russia*, Saudi Arabia, Singapore, South Africa*, Taiwan, Thailand, UAE, Uzbekistan*, Vietnam* *check with Honeywell for availability 13.18 Bluetooth® Certified and registered Bluetooth SIG. -
Page 94: Ordering Information
14 Ordering Information 14 Ordering Information Part Number Description INSTRUMENTS SZSK-SMGXX Searchzone Sonik Ultrasonic Gas Leak Detector, ATEX/ IECEx, M25, Stainless Steel, includes Sunshade (Plastic) and Standard Adjustable Mounting Bracket SZSK-SNGXX Searchzone Sonik Ultrasonic Gas Leak Detector, cULus, 3/4” NPT, Stainless Steel, includes Sunshade (Plastic) and Standard Adjustable Mounting Bracket ACCESSORIES 2331B1102... -
Page 95: Specifications
15 Specifications 15 Specifications 15.1 Short Form Table Specifications Environmental -55°C to +75°C (-67°F to +167°F); 0 % to 100 % RH condensing Power Supply 24 Vdc nominal (18 Vdc to 32 Vdc) Power Consumption 4 W for ambient operating temperature >= -30°C 15 W for ambient operating temperature <... - Page 96 15 Specifications Specifications Safety Approvals cULus: Class I, Division 1, Groups. B,C,D, T4, Ta -55°C to +75°C (-67°F to 167°F) Class II, Division 1, Groups. E,F,G, T4, Ta -55°C to +55°C (-67°F to 131°F) Class III Div. 1 Class I Zone 1 AEx db ia IIC T4 Gb, Ta -55°C to +75°C (-67°F to 167°F) Class I Zone 1 AEx db eb ia IIC T4 Gb, Ta -55°C to +75°C (-67°F to 167°F) Zone 21 AEx tb IIIC T100°C Db, Ta -55°C to +55°C (-67°F to 131°F) Um = 250 Vrms...
- Page 97 Asia Pacific be accepted for errors or omissions. Data may Honeywell Analytics Asia Pacific change, as well as legislation and you are strongly 7F SangAm IT Tower, 434 Worldcup Buk-ro, advised to obtain copies of the most recently Mapo-gu, Seoul 03922 issued regulations, standards and guidelines.