Table of Contents
Advertisement
Available languages
Available languages
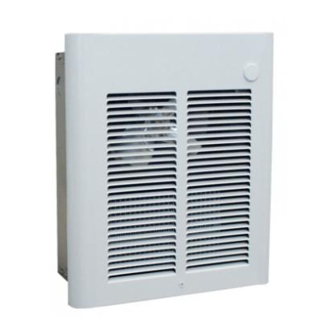
WHB1000 Series
Fan Forced Wall Heaters
Installation, Operation & Maintenance Instructions
Specifications
Model
Volts
Amps
WHB1101FC
120
8.4/4.2
WHB1151FC
120
12.5/6.3
WHB1201FC
120
15.0/7.5
WHB1202FC
240
8.4/4.2
208
7.3/3.6
WHB1207FC
277
7.3/3.6
240
6.3/3.2
WHB1157FC
277
5.5/2.75
240
4.7/2.4
WHB1208FC
208
9.6/4.8
WHEN USING ELECTRIC APPLIANCES, BASIC
PRECAUTIONS SHOULD ALWAYS BE FOLLOWED TO
REDUCE THE RISK OF FIRE, ELECTRIC SHOCK, AND
INJURY TO PERSONS, INCLUDING THE FOLLOWING:
1. Read all instructions before installing or using this heater.
2. This heater is hot when in use. To avoid burns, do not let
bare skin touch hot surfaces. Keep combustible materials,
such as furniture, pillows, bedding, papers, clothes, etc. and
curtains at least 3 feet (0.9 m) from the front of the heater.
3. Extreme caution is necessary when any heater is used by or
near children or invalids and whenever the heater is left
operating and unattended.
4. Do not operate any heater after it malfunctions. Disconnect
power at service panel and have heater inspected by a
reputable electrician before using.
5. Do not use outdoors.
6. To disconnect heater, turn controls to off, and turn off power
to heater circuit at main disconnect panel.
7. Do not insert or allow foreign objects to enter any ventilation
or exhaust opening as this may cause an electric shock, fire,
or damage to the heater.
8. To prevent a possible fire, do not block air intake or exhaust
in any manner.
PPD41511
Watts
BTU/HR
1000/500
3413/1706
1500/750
5120/2560
1800/900
6143/3072
2000/1000
6826/3413
1500/750
5120/2560
2000/1000
6826/3413
1500/750
5120/2560
1500/750
5120/2560
1125/562
3840/1920
2000/1000
6826/3413
IMPORTANT INSTRUCTIONS
WARNING
SAVE THESE INSTRUCTIONS
a n d C S A C 2 2 . 2 , N o . 5 6
C o n f o r m s t o A N S I / U L 2 0 2 1
Conforms to ANSI/UL2021
and CSA C22.2, No. 56
Accessories
Wire
ASMW
Surface Mounting Frame (Accessory) Order
Size
Separately 12-1/2" (318mm)H X 10-3/8"
(264mm)W X 4" (102mm)
14AWG
AS1W
1" (25mm) Recess Mounting Frame (Accessory)
12AWG
Order Separately
12AWG
AS2W
2" (50mm) Recess Mounting Frame (Accessory)
14AWG
Order Separately
14AWG
14AWG
14AWG
14AWG
14AWG
14AWG
!
9. A heater has hot and arcing or sparking parts inside. Do not
use it in areas where gasoline, paint, or flammable liquids
are used or stored.
10. Use this heater only as described in this manual. Any other
use not recommended by the manufacturer may cause fire,
electric shock, or injury to persons.
11. This heater is provided with a red alarm light that will
illuminate only if the heater has turned off as a result of
overheating. If you see the light on, immediately turn the
heater off and inspect for any objects on or adjacent to the
heater that may have blocked the airflow or otherwise
caused high temperatures to have occurred. DO NOT
OPERATE THE HEATER WITH THE ALARM LIGHT
ILLUMINATING.
12. This heater is intended for comfort heating applications and
not intended for use in special environments. Do not use in
damp or wet locations such as marine or greenhouse or in
areas where corrosive or chemical agents are present.
13. When installing, see INSTALLATION INSTRUCTIONS for
additional warnings and precautions.
14. For safe and efficient operation, and to extend the life of
your heater, keep your heater clean - See MAINTENANCE
INSTRUCTIONS.
09/14
( 2 2 m m )
( 2 7 9 m m )
( 2 3 5 m m )
7 / 8 "
9 - 1 / 4 "
( 3 0 7 m m )
1 2 - 1 / 8 "
1 1 "
( 1 0 2 m m )
4 "
( 2 7 0 m m )
1 0 - 5 / 8 "
10-5/8"
(270mm)
12-1/8"
(307mm)
9-1/4"
(235mm)
7/8"
(22mm)
5200-11213-000
4"
(102mm)
11"
(279mm)
Advertisement
Table of Contents

Related Manuals for Marley WHB1000 Series


Summary of Contents for Marley WHB1000 Series
- Page 1 (279mm) (307mm) WHB1000 Series C o n f o r m s t o A N S I / U L 2 0 2 1 a n d C S A C 2 2 . 2 , N o . 5 6 9-1/4”...
-
Page 2: Installation Instructions
INSTALLATION Installation of Back Box in New Construction NOTE: If the finished wall surface is already up, follow INSTRUCTIONS instructions for “Installation of Back Box in Existing Construction”. 1. Determine which side of the back box is to be mounted against a stud and bend the tabs at the rear corners out 90 degrees so that the back box will be square with the stud To prevent a possible fire, injury to persons or damage to the... - Page 3 OPERATING INSTRUCTIONS DO NOT USE A REMOTE THERMOSTAT WITH THIS HEATER. BUILT IN THERMOSTAT CYCLES THE HEATING ELEMENT ONLY. FAN DELAY CONTROL AUTOMATICALLY 1. Heater must be properly installed before operation. TURNS FAN ON AND OFF, AND PROVIDES A FAN DELAY OFF FEATURE TO REMOVE RESIDUAL HEAT AFTER 2.
-
Page 4: Maintenance Instructions
Marley Engineered Products Service Center. Within the limitations of this warranty, inoperative units should be returned to the nearest Marley authorized service center or the Marley Engineered Products Service Center, and we will repair or replace, at our option, at no charge to you with return freight paid by Marley. It is agreed that such repair or replacement is the exclusive remedy available from Marley Engineered Products. -
Page 5: Instrucciones Importantes
1 1 ” ( 2 7 9 m m ) 4 ” ( 1 0 2 m m ) 1 0 - 5 / 8 ” ( 2 7 0 m m ) 1 2 - 1 / 8 ” ( 3 0 7 m m ) 9 - 1 / 4 ”... -
Page 6: Instrucciones De Instalación
INSTRUCCIONES DE Instalación de la caja posterior en una construcción nueva INSTALACIÓN NOTA: si la pared ha sido construída y su superficie terminada anteriormente, siga las instrucciones para ‘Instalación de la caja posterior en una construcción existente’. 1. Determine cuál de los lados de la caja posterior va a montarse contra un travesaño, y doble las aletas de los ángulos posteriores 90º... -
Page 7: Instrucciones De Operación
INSTRUCCIONES DE OPERACIÓN NO UTILICE CON ESTE CALEFACTOR UN TERMOSTATO REMOTO. EL TERMOSTATO INCORPORADO CONECTA Y DESCONECTA (HACE CICLAR) EL ELEMENTO CALEFACTOR ÚNICAMENTE. EL CONTROL DE RETARDO DE VENTILADOR ENCIENDE Y APAGA EL 1. El calefactor debe instalarse correctamente antes de ponerlo en VENTILADOR AUTOMÁTICAMENTE Y PROPORCIONA ADEMÁS UN funcionamiento. -
Page 8: Instrucciones De Mantenimiento
Marley más cercano, o al Centro de Servicio de Marley Engineered Products, y nosotros lo repararemos o reemplazaremos, a nuestra opción, sin cargo para usted, con el flete de retorno pagado por Marley. Se acuerda que tal reparación o reemplazo es el único recurso que Marley Engineered Products pone a su disposición. - Page 9 9 - 1 / 4 ” ( 2 3 5 m m ) 7 / 8 ” ( 2 2 m m ) 1 1 ” ( 2 7 9 m m ) 4 ” ( 1 0 2 m m ) 1 0 - 5 / 8 ”...
-
Page 10: Instructions D'installation
INSTRUCTIONS Positionnement du boîtier arrière dans une construction neuve D'INSTALLATION REMARQUE : Si la finition de surface du mur est déjà faite, suivez les instructions pour "Installation du boîtier arrière dans une construction existante". 1. Déterminez quel côté du boîtier arrière doit être placé contre un poteau mural, et courbez les pattes aux angles arrière à... -
Page 11: Instructions D'utilisation
INSTRUCTIONS D’UTILISATION N’UTILISEz PAS UN THERMOSTAT À DISTANCE AVEC CE RADIATEUR. LE THERMOSTAT INTÉGRÉ ACTIVE SEULEMENT L'ÉLÉMENT DE CHAUFFE. UN CONTRÔLE DE VENTILATEUR ACTIVE/DÉSACTIVE AUTOMATIQUEMENT LE VENTILATEUR, AVEC 1. Le radiateur doit être correctement installé avant d’être mis en UNE TEMPORISATION À LA COUPURE POUR ÉLIMINER LA marche. -
Page 12: Instructions D'entretien
Dans le cadre des limitations de cette garantie, les unités ne fonctionnant pas doivent être renvoyées au centre de service agréé Marley le plus proche, ou directe au centre de service de Marley Engineered Products, où ils seront réparés ou remplacés, à notre choix, sans frais pour vous avec le port de retour payé par Marley. Il est convenu que cette réparation ou ce remplacement sera le seul remède à...
Need help?
Do you have a question about the WHB1000 Series and is the answer not in the manual?
Questions and answers