Advertisement
Quick Links
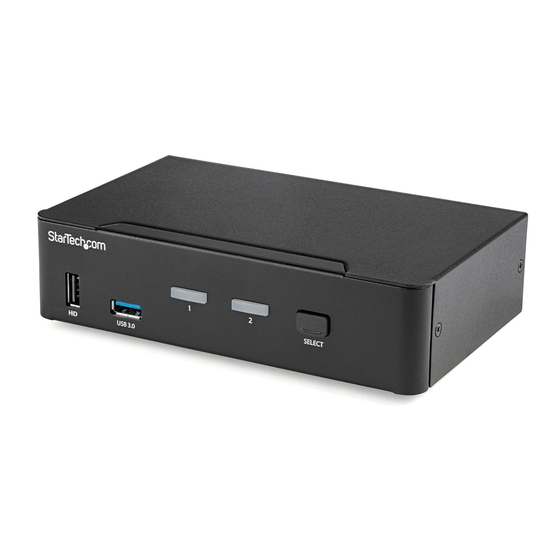
2-Port USB 3.0 KVM Switch - DisplayPort - 4K 60Hz - TAA Compliant
Product Diagram
Actual product may vary from photos
Front View
1
2
1. Console USB HID Port
2. Console USB Hub Port
3. LED Indicators
4. Port Selection Button
Rear View
1
4
5
6
1. Console DisplayPort Port
2. PC 2 DisplayPort Port
3. PC 1 DisplayPort Port
4. Power Input Port
5. USB HID Port
6. Console Audio Port
7. PC 2 USB Port
8. PC 2 Audio Port
9. PC 1 USB Port
10. PC 1 Audio Port
11. Console USB Hub Port
Package Contents
• KVM Switch x 1
• Universal Power Adapter (NA/JP, EU, UK, ANZ) x 1
• Rubber Foot Pads x 4
• Quick-Start Guide x 1
Requirements
Source PCs
• Computer (with DisplayPort) x 2
For the latest information, specifications, and support visit www.startech.com/SV231DPU34K.
3
3
4
2
7
8
9
10
• DisplayPort Cable x 2
• USB 3.0 Cable (Type-A Male to Type-B Male) x 2
• (Optional) 3.5 mm Audio Cable (Male to Male) x 2
Console
• DisplayPort Display x 1
• DisplayPort Cable x 1
• USB Keyboard x 1
• USB Mouse x 1
• (Optional) Speaker-Enabled Audio Device (or Headset/
Headphones) x 1
• (Optional) 3.5 mm Audio Cable (Male to Male) x 1
• (Optional) USB 2.0 HID Devices x 2
• (Optional) USB 2.0 Cables x 2
• (Optional) USB 3.0 Peripherals x 2
• (Optional) USB 3.0 Cables x 2
Attach the Rubber Foot Pads
3
1. Peel off the backing for each of the Rubber Foot Pads.
2. Stick each Rubber Foot Pad onto the bottom of the unit, on each
of the four circular indentations.
Connect the Console
1. Power off your DisplayPort Display and any peripherals before
connecting to the KVM Switch.
2. Connect a DisplayPort Display to the Console DisplayPort Port on
the KVM Switch.
11
3. Connect a USB Keyboard and a USB Mouse to the Console USB
HID Ports on the KVM Switch.
4. (Optional) Connect your USB HID Devices to the Console USB HID
Ports on the KVM Switch.
5. (Optional) Connect your Speaker-Enabled Audio Device to the
Console Audio Port.
Connect the PC
1. Power off your Computer and any peripherals before connecting
to the KVM Switch.
2. Connect a DisplayPort Cable from the DisplayPort Port on the
Computer to the PC DisplayPort Port above PC 1 on the KVM
Switch.
3. Connect a USB A to B Cable (Type-A Male to Type-B Male) from
the USB A Port on the Computer to the PC USB Port below PC 1
on the KVM Switch.
Note: A USB 3.0 Cable is recommended for optimal performance.
4. (Optional) Connect a 3.5 mm Audio Cable from the audio port on
your Computer to the corresponding PC Audio Port below PC 1
on the KVM Switch.
5. Repeat steps 1 to 3 for an additional Computer for PC 2.
Quick-Start Guide
SKU #: SV231DPU34K
Manual Revision: 10/25/2018
Advertisement

Subscribe to Our Youtube Channel
Related Manuals for StarTech.com SV231DPU34K


Summary of Contents for StarTech.com SV231DPU34K
-
Page 1: Product Diagram
KVM Switch. • Quick-Start Guide x 1 5. Repeat steps 1 to 3 for an additional Computer for PC 2. Requirements Source PCs • Computer (with DisplayPort) x 2 For the latest information, specifications, and support visit www.startech.com/SV231DPU34K. Manual Revision: 10/25/2018... -
Page 2: Troubleshooting
15 of the FCC Rules. These limits are designed to provide reasonable protection In no event shall the liability of StarTech.com Ltd. and StarTech.com USA LLP (or their officers, against harmful interference in a residential installation. This equipment generates, uses and can...
Need help?
Do you have a question about the SV231DPU34K and is the answer not in the manual?
Questions and answers