StarTech.com SV431DD2DUA Manual
Dual dvi usb kvm switch
Hide thumbs
Also See for SV431DD2DUA:
- Instruction manual (14 pages) ,
- Instruction manual (14 pages) ,
- Instruction manual (15 pages)
Table of Contents
Advertisement
Quick Links
Dual DVI USB KVM Switch
SV231DD2DUA
SV431DD2DUA
DE: Bedienungsanleitung - de.startech.com
FR: Guide de l'utilisateur - fr.startech.com
ES: Guía del usuario - es.startech.com
IT: Guida per l'uso - it.startech.com
NL: Gebruiksaanwijzing - nl.startech.com
PT: Guia do usuário - pt.startech.com
For the most up-to-date information, please visit: www.startech.com
Manual Revision: 05/06/2016
Advertisement
Table of Contents

Related Manuals for StarTech.com SV431DD2DUA


Summary of Contents for StarTech.com SV431DD2DUA
- Page 1 DE: Bedienungsanleitung - de.startech.com FR: Guide de l'utilisateur - fr.startech.com ES: Guía del usuario - es.startech.com IT: Guida per l'uso - it.startech.com NL: Gebruiksaanwijzing - nl.startech.com PT: Guia do usuário - pt.startech.com For the most up-to-date information, please visit: www.startech.com Manual Revision: 05/06/2016...
- Page 2 Where they occur these references are for illustrative purposes only and do not represent an endorsement of a product or service by StarTech.com, or an endorsement of the product(s) to which this manual applies by the third-party company in question. Regardless of any direct acknowledgement elsewhere in the body of this document, StarTech.com hereby acknowledges...
-
Page 3: Table Of Contents
Packaging Contents ..........................1 System Requirements ..........................1 Installation................................1 Hardware Installation ..........................2 Driver Installation ............................4 Operation ................................4 Front Panel ..............................4 Rear Panel (SV431DD2DUA only) ....................5 HotKey Control ............................6 Alternative HotKey Commands .......................8 Change Leading HotKey........................8 Specifications ..............................9 Technical Support ............................10 Warranty Information ............................10... -
Page 4: Introduction
Introduction Packaging Contents • 1 x SV231DD2DUA or SV431DD2DUA KVM switch • 4 x foot pads • 1 x universal power adapter (NA/EU/UK/AU) • 1 x instruction manual System Requirements • DVI enabled computer system/video card • USB enabled computer system •... -
Page 5: Hardware Installation
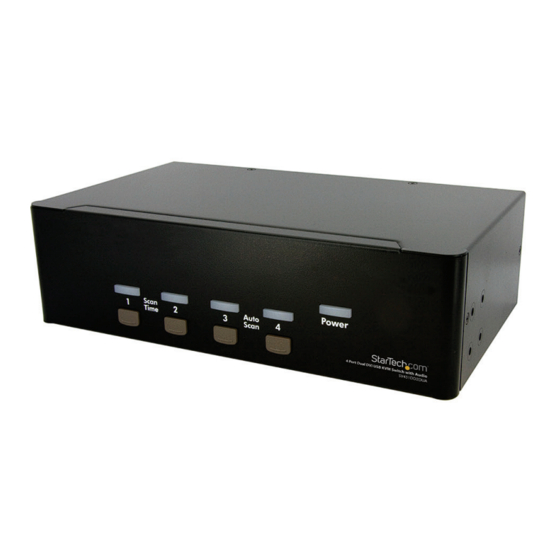
Front View (SV431DD2DUA shown) Port Selection/Link LED Power LED Port Selection button Rear View (SV431DD2DUA shown) Console DVI connector (output) connectors FUNC button DC Power connector USB Hub connectors 3.5 mm Audio Speaker/MIC USB keyboard/ mouse connectors Instruction Manual... - Page 6 KVM’s PC ports (ie. PC1). A dedicated DVI, USB and audio 4-in-1 KVM cable can be used (ie. StarTech.com ID: USBDVI4N1A6). 3. Use a USB type A-B Cable to connect the KVM’s USB port (type B, square connector) for the PC port used in Step 2, and the USB port on the computer (type A, flat connector).
-
Page 7: Driver Installation
To change the Scan Time interval, press both front panel buttons “1” and “2” simultaneously. The unit beeps 1, 2, 3 or 4 times for Scan Time of 3, 8, 15 or 30 seconds respectively. (SV431DD2DUA only) NOTE: Scan Time is automatically set to the default of 3 seconds when the units loses power. -
Page 8: Rear Panel (Sv431Dd2Dua Only)
Rear Panel (SV431DD2DUA only) To adjust the video signal strength/equalization settings for the length or quality of DVI cable being used, the “FUNC” button combined with the front panel push buttons can be used. 1. Press “FUNC” button three times, and the LED for “POWER” will start to flash once per second. -
Page 9: Hotkey Control
HotKey Control A Hotkey command is a short keyboard sequence for selecting a computer, activating computer scan, etc. A hotkey sequence starts with two left <CTRL> keystrokes (successively within 0.2 seconds) followed by one or two more keystrokes. A high-pitch beep will be generated for each correct hotkey command;... - Page 10 Scan Time Four options are available for users to set the Scan Time duration, it Includes 3, 8, 15 and 30 seconds. Note: Scan Time is set to 3 seconds by default. To adjust Scan Rate, set the scan time of duration before switching to the next computer: Left <CTRL>...
-
Page 11: Alternative Hotkey Commands
Alternative Hotkey Commands In addition to the Left <CTRL> + Left <CTRL> hotkeys, there are two alternative hotkey sequences available. 1. For the following operations, users may press <ScrollLock> twice instead of pressing left <CTRL> twice. To select a computer: <ScrollLock>... -
Page 12: Specifications
Specifications SV231DD2DUA SV431DD2DUA Number of Ports 2 x DVI-I female Computer Connectors 1 x USB type B (per port) 2 x 3.5mm mini-jack 2 x DVI-I female Console Connectors 4 x USB type A 2 x 3.5mm mini-jack Maximum Video Resolution... -
Page 13: Technical Support
Limitation of Liability In no event shall the liability of StarTech.com Ltd. and StarTech.com USA LLP (or their officers, directors, employees or agents) for any damages (whether direct or indirect, special, punitive, incidental, consequential, or otherwise), loss of profits, loss of business, or any pecuniary loss, arising out of or related to the use of the product exceed the actual price paid for the product. - Page 14 StarTech.com is an ISO 9001 Registered manufacturer of connectivity and technology parts. StarTech.com was founded in 1985 and has operations in the United States, Canada, the United Kingdom and Taiwan servicing a worldwide market.
Need help?
Do you have a question about the SV431DD2DUA and is the answer not in the manual?
Questions and answers