Eaton Powerware Series User Manual
Rack power module 24–96a: 208y/120v, 400y/230v
Hide thumbs
Also See for Powerware Series:
- User manual (120 pages) ,
- Mechanical installation manual (28 pages) ,
- Instructions manual (16 pages)

Related Manuals for Eaton Powerware Series


Summary of Contents for Eaton Powerware Series
- Page 1 Powerware Series ® Eaton Rack Power Module 24–96A: 208Y/120V, 400Y/230V User's Guide...
- Page 3 Powerware Series ® Eaton Rack Power Module 24–96A: 208Y/120V, 400Y/230V User's Guide...
- Page 4 National Fire Protection Association, Inc. All other trademarks are property of their respective companies. ECopyright 2007–2010 Eaton Corporation, Raleigh, NC, USA. All rights reserved. No part of this document may be reproduced in any way without the express written approval of Eaton Corporation.
- Page 5 Special Symbols The following are examples of symbols used on the UPS or accessories to alert you to important information: RISK OF ELECTRIC SHOCK - Indicates that a risk of electric shock is present and the associated warning should be observed. CAUTION: REFER TO OPERATOR'S MANUAL - Refer to your operator's manual for additional information, such as important operating and maintenance instructions.
-
Page 7: Table Of Contents
............. . . Eaton Rack Power Module (24–96A: 208Y/120V, 400Y/230V) User's Guide 164201675 Rev 2 www.eaton.com/powerquality... - Page 8 TABLE OF CONTENTS Eaton Rack Power Module (24–96A: 208Y/120V, 400Y/230V) User's Guide 164201675 Rev 2 www.eaton.com/powerquality...
-
Page 9: Introduction
RPM-3U/3Ui's unique benefits include the following: Provides plug-and-play primary distribution from a three-phase UPS to secondary power distribution devices. The RPM-3U/3Ui is ideal for enhancing the output distribution of UPSs such as the Eaton BladeUPS ® Functions in a wide variety of applications supporting various data center loads at various voltages, power cord configurations, and layouts. - Page 10 Such a configuration could support a minimum of two high-density racks or a maximum of nine low-density (approximately 2 kVA) racks. Eaton Rack Power Module (24–96A: 208Y/120V, 400Y/230V) User's Guide 164201675 Rev 2 www.eaton.com/powerquality...
-
Page 11: Safety Warnings
For PERMANENTLY CONNECTED EQUIPMENT, a readily accessible disconnect device shall be incorporated in the building installation wiring. For PLUGGABLE EQUIPMENT, the power outlet shall be installed near the equipment and shall be readily accessible. Eaton Rack Power Module (24–96A: 208Y/120V, 400Y/230V) User's Guide 164201675 Rev 2 www.eaton.com/powerquality... - Page 12 être incorporé au câblage d'installation du bâtiment. En ce qui concerne l'ÉQUIPEMENT ENFICHABLE, la prise d'alimentation doit être installée près de l'équipement et doit être facile d'accès. Eaton Rack Power Module (24–96A: 208Y/120V, 400Y/230V) User's Guide 164201675 Rev 2 www.eaton.com/powerquality...
- Page 13 Für PERMANENT ANGESCHLOSSENE GERÄTE: In der Gebäudeverkabelung muss eine leicht zugängliche Trennvorrichtung enthalten sein. Für GERÄTE MIT STECKERN: Die Steckdose muss sich in der Nähe des Geräts befinden und leicht zugänglich sein. Eaton Rack Power Module (24–96A: 208Y/120V, 400Y/230V) User's Guide 164201675 Rev 2 www.eaton.com/powerquality...
- Page 14 Para EQUIPO ENCHUFABLE, la salida de alimentación debe estar instalada cerca del equipo y estar fácilmente accesible. Eaton Rack Power Module (24–96A: 208Y/120V, 400Y/230V) User's Guide 164201675 Rev 2 www.eaton.com/powerquality...
-
Page 15: Installation
5/16” nut driver or socket and wrench For a hardwired installation, the following additional tools may be needed: #2 flat-bladed screwdriver #1 Phillips screwdriver 10 mm nut driver or socket and wrench Eaton Rack Power Module (24–96A: 208Y/120V, 400Y/230V) User's Guide 164201675 Rev 2 www.eaton.com/powerquality... -
Page 16: Checking The Accessory Kit
NOTE For more detailed information, download the Power Xpert Gateway Series 1000 Card User's Guide from the Documentation page on the Power Xpert card once the card is accessible on the user's network or from www.eaton.com/powerxpert. Eaton Rack Power Module (24–96A: 208Y/120V, 400Y/230V) User's Guide 164201675 Rev 2 www.eaton.com/powerquality... -
Page 17: Cable Tray Installation (Optional)
2. Secure the cable tray with the supplied four M4 flat-head screws. 3. Continue to “Rack Installation” on page 20. M4 Flat-Head Screws (4 places) Figure 1. Installing the Cable Tray (Plug-Receptacle Unit Shown) Eaton Rack Power Module (24–96A: 208Y/120V, 400Y/230V) User's Guide 164201675 Rev 2 www.eaton.com/powerquality... -
Page 18: Wallmount Installation
50.8 cm (20”) 40.6 cm (16”) Horizontal dimension for customer-supplied Cable Tray mounting fasteners (optional) M4 Flat-Head Screws (4 places) Figure 2. Wallmount Installation (Hardwired Unit Shown) Eaton Rack Power Module (24–96A: 208Y/120V, 400Y/230V) User's Guide 164201675 Rev 2 www.eaton.com/powerquality... - Page 19 See “Specifications” on page 33 for weights. 8. Continue to one of the RPM-3U/3Ui installation sections: “Plug-Receptacle Installation” on page 23. “Hardwired Installation” on page 24. Eaton Rack Power Module (24–96A: 208Y/120V, 400Y/230V) User's Guide 164201675 Rev 2 www.eaton.com/powerquality...
-
Page 20: Rack Installation
2. Secure the brackets with the supplied four M4 flat-head screws. M4 Flat-Head Screws (4 places) Mounting Bracket Figure 3. Installing the Front Mounting Brackets (Hardwired Unit Shown) Eaton Rack Power Module (24–96A: 208Y/120V, 400Y/230V) User's Guide 164201675 Rev 2 www.eaton.com/powerquality... - Page 21 Wing Nuts Rear Rail Hex-Head Screws and Clip Nuts Front Rail Hex-Head Screws Figure 4. Securing the Front and Rear of Rails (Left Rail on Typical Rack Shown) Eaton Rack Power Module (24–96A: 208Y/120V, 400Y/230V) User's Guide 164201675 Rev 2 www.eaton.com/powerquality...
- Page 22 Figure 5. Attaching the RPM-3U/3Ui to the Rack (Hardwired Unit Shown) 11. Continue to one of the RPM-3U/3Ui installation sections: “Plug-Receptacle Installation” on page 23. “Hardwired Installation” on page 24. Eaton Rack Power Module (24–96A: 208Y/120V, 400Y/230V) User's Guide 164201675 Rev 2 www.eaton.com/powerquality...
-
Page 23: Plug-Receptacle Installation
6. For each receptacle to be monitored, turn its circuit breaker on the RPM-3U/3Ui front panel to the ON ( ) position. NOTE If power to the RPM-3U/3Ui is interrupted, check each circuit breaker and reset if necessary. Eaton Rack Power Module (24–96A: 208Y/120V, 400Y/230V) User's Guide 164201675 Rev 2 www.eaton.com/powerquality... -
Page 24: Hardwired Installation
(not included) to the ground bonding screw on the RPM-3U/3Ui rear panel. Figure 6 shows the location of the ground bonding screw. Eaton Rack Power Module (24–96A: 208Y/120V, 400Y/230V) User's Guide 164201675 Rev 2 www.eaton.com/powerquality... - Page 25 7. Insert the fitting through the wiring access entry and secure with a locking nut. Strip 1.5 cm (0.5”) of insulation from the end of each incoming wire. Eaton Rack Power Module (24–96A: 208Y/120V, 400Y/230V) User's Guide 164201675 Rev 2 www.eaton.com/powerquality...
- Page 26 ) Table 310.16 for four (4) current ® ® carrying conductors in conduit. 9. Replace the input box access cover and secure with the four screws removed in Step 4. Eaton Rack Power Module (24–96A: 208Y/120V, 400Y/230V) User's Guide 164201675 Rev 2 www.eaton.com/powerquality...
- Page 27 13. For each receptacle to be monitored, turn its circuit breaker on the RPM-3U/3Ui front panel to the ON ( ) position. NOTE If power to the RPM-3U/3Ui is interrupted, check each circuit breaker and reset if necessary. Eaton Rack Power Module (24–96A: 208Y/120V, 400Y/230V) User's Guide 164201675 Rev 2 www.eaton.com/powerquality...
-
Page 28: Advanced Metering Installation (Optional)
Xpert card once the card is accessible on your network or from www.eaton.com/powerxpert. Configuration Ethernet Ethernet (Serial) Port Port 1 Port 2 Figure 9. Power Xpert Gateway Series 1000 Card Eaton Rack Power Module (24–96A: 208Y/120V, 400Y/230V) User's Guide 164201675 Rev 2 www.eaton.com/powerquality... -
Page 29: Operation
Figure 10 shows an example of a rear panel. Input Plate Output Plate Right Output Plate Left Figure 10. RPM-3U/3Ui Rear Panel [Plug-Receptacle Unit with IEC 320-C19 (208 Vac) Output Plates Shown] Eaton Rack Power Module (24–96A: 208Y/120V, 400Y/230V) User's Guide 164201675 Rev 2 www.eaton.com/powerquality... -
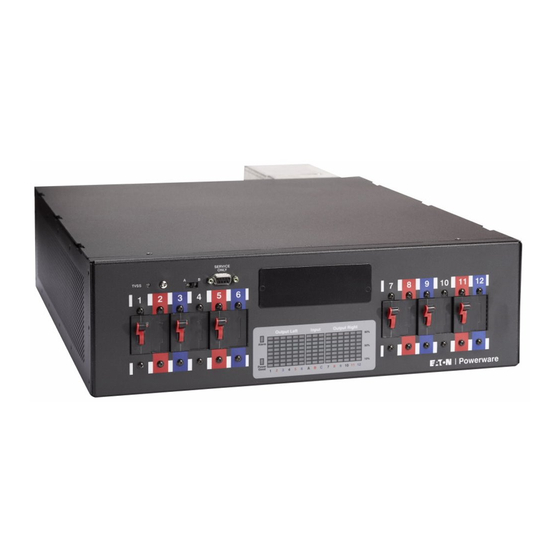
Page 30: Breakers
The columns of LEDs in the LED display (see Figure 11) are labeled with numbers and colors that match their breaker/receptacle pairs. Eaton Rack Power Module (24–96A: 208Y/120V, 400Y/230V) User's Guide 164201675 Rev 2 www.eaton.com/powerquality... -
Page 31: Led Display
(phases A, B, C for RPM-3U units, or L1, L2, L3 for RPM-3Ui units). See Figure 12 and Figure 13. Figure 12. LED Display (RPM-3U Units) Figure 13. LED Display (RPM-3Ui Units) Eaton Rack Power Module (24–96A: 208Y/120V, 400Y/230V) User's Guide 164201675 Rev 2 www.eaton.com/powerquality... -
Page 32: Alarm And Power Indicators
* TVSS failure sounds an audible buzzer. See “Troubleshooting” on page 39. Service Only Port and Switches The DB-9 communication port, A/B switch, and reset switch are service-only features. Eaton Rack Power Module (24–96A: 208Y/120V, 400Y/230V) User's Guide 164201675 Rev 2 www.eaton.com/powerquality... -
Page 33: Specifications
Table 4. Communication Options X-Slot Connectors (1) available X-Slot connector Compatible X-Slot Cards Power Xpert Gateway Series 1000 Card Modbus Card ® Serial Port RS-232 DB-9 (service only) Eaton Rack Power Module (24–96A: 208Y/120V, 400Y/230V) User's Guide 164201675 Rev 2 www.eaton.com/powerquality... - Page 34 RPM-3Ui BladeUPS 33.3A 33.3A NOTE Input power cords are available in the following length options: 1.8m (6 ft), 3.0m (10 ft), 4.6m (15 ft), 6.1m (20 ft). Eaton Rack Power Module (24–96A: 208Y/120V, 400Y/230V) User's Guide 164201675 Rev 2 www.eaton.com/powerquality...
- Page 35 Number of Receptacles Receptacle Phases Power Connection 208 Vac Phase to Phase Number of Breakers Receptacles per Breaker Breaker Rating 3 two-pole breakers 30A / 5,000 AIC Eaton Rack Power Module (24–96A: 208Y/120V, 400Y/230V) User's Guide 164201675 Rev 2 www.eaton.com/powerquality...
- Page 36 Receptacle Voltage Number of Receptacles Receptacle Phases Power Connection 208 Vac Phase/Phase/Phase/Neutral Number of Breakers Receptacles per Breaker Breaker Rating 2 three-pole breakers 20A / 5,000 AIC Eaton Rack Power Module (24–96A: 208Y/120V, 400Y/230V) User's Guide 164201675 Rev 2 www.eaton.com/powerquality...
- Page 37 Number of Receptacles Receptacle Phases Power Connection 230 Vac Phase to Neutral Number of Breakers Receptacles per Breaker Breaker Rating 6 single-pole breakers 16A / 5,000 AIC Eaton Rack Power Module (24–96A: 208Y/120V, 400Y/230V) User's Guide 164201675 Rev 2 www.eaton.com/powerquality...
- Page 38 L14-20R IEC 320-C13 (208Y/120V) 5-20R L14-30R IEC 320-C13 (400Y/230V) L6-15R L15-20R IEC 320-C19 (208Y/120V) L6-20R L15-30R IEC 320-C19 (400Y/230V) L6-30R L21-20R L21-30R Figure 14. Output Receptacle Types Eaton Rack Power Module (24–96A: 208Y/120V, 400Y/230V) User's Guide 164201675 Rev 2 www.eaton.com/powerquality...
-
Page 39: Troubleshooting
One phase is dropped, or the TVSS If the condition persists, contact your illuminated. The TVSS indicator has failed. service representative. (if TVSS is installed) is red. Eaton Rack Power Module (24–96A: 208Y/120V, 400Y/230V) User's Guide 164201675 Rev 2 www.eaton.com/powerquality... -
Page 40: Service And Support
Please have the following information ready when you call for service: Model number Serial number Date of failure or problem Symptoms of failure or problem Customer return address and contact information Eaton Rack Power Module (24–96A: 208Y/120V, 400Y/230V) User's Guide 164201675 Rev 2 www.eaton.com/powerquality... -
Page 41: Warranty
Eaton-provided accessories (individually and collectively, the ”Warranted Items”) are free from defects in material and workmanship. If, in the opinion of Eaton, a Warranted Item is defective and the defect is within the terms of this Warranty, Eaton's sole obligation will be to repair or replace such defective item (including by providing service, parts, and labor, as applicable), at the option of Eaton. - Page 42 (including interest charges, if any). During such time as Eaton has not received payment of any amount due to it for the Product, in accordance with the contract terms under which the Product is sold, Eaton shall have no obligation under this Warranty.
- Page 44 *1642016752* 164201675 2...
Need help?
Do you have a question about the Powerware Series and is the answer not in the manual?
Questions and answers