Table of Contents
Advertisement
Available languages
Available languages
VWR
Eu
uropean
n catalog
71
0-0867
71
0-0866
71
0-0943
71
0-0944
71
0-0945
71
0-0946
71
0-0977
71
0-0978
®
R
M
icrob
biolog
SA
AS Sup
SAS S
Super I
SA
AS Sup
per DUO
INST
TRUCT
TION M
gue num
mbers:
gical A
Air S
Sampl
er DUO
O
SOLAT
TOR
O ISOL
LATOR
R
MANU
UAL
Version:
V
I
ssued: J
July 2016
ler
1.2
6
Advertisement
Chapters
Table of Contents

Related Manuals for VWR International DUO SAS 360 Contact


Summary of Contents for VWR International DUO SAS 360 Contact
- Page 1 ® icrob biolog gical A Air S Sampl AS Sup er DUO SAS S Super I SOLAT AS Sup per DUO O ISOL LATOR INST TRUCT TION M MANU uropean n catalog gue num mbers: 0-0867 0-0866 0-0943 0-0944 0-0945 0-0946 0-0977 0-0978...
- Page 2 Legal address of manufacturer Europe VWR International Srl Via S. Giusto 85 20153 Milano Italy Tel.: + 39 02-3320311 http://be.vwr.com Country of origin: Italy...
-
Page 3: Table Of Contents
Table of contents Warning ............................5 Safety information ........................5 Unit descriptions ......................... 6 Technical features ........................7 Intended use ..........................7 Principle ............................7 The basic idea..........................8 Brief instructions ........................8 Brief instructions for SAS Isolator ....................8 Brief operating instructions for DUO SAS Super 360 - DUO SAS Isolator ........ - Page 4 ‘MODE’ ............................16 ‘SET AUTOSWITCH’ ........................16 ‘PRINT’ ............................17 ‘DISPLAY RECORD’ ........................17 ‘CLEAR RECORD’ ......................... 18 ‘LANGUAGE’ ..........................18 ‘IDENTIFY’ ............................. 18 ‘SAMPLING SITE’ .......................... 18 ‘CALIBRATION DUE’ (optional) ..................... 19 List of system messages ....................... 19 Accessories ..........................20 Troubleshooting ........................
-
Page 5: Warning
Warning This document is the property of VWR International S.r.l. - Milan - Italy It may not be duplicated or distributed without the owner’s authorisation. Patent Pending Manufactured by VWR International S.r.l. - Milan, Italy Safety information Use the device just for the indicated purposes. -
Page 6: Unit Descriptions
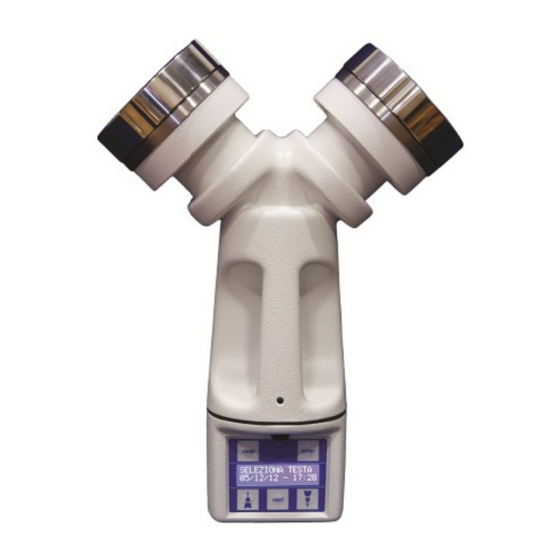
Unit descriptions 1. Command unit 8. Arrow “Down” 2. Stainless steel head 9. Standing feet 3. Motor housing 10. Printer connection (not used) 4. “Clear” button 11. Main switch 5. “Enter” button 12. Serial number 6. Arrow “Up” 13. CE mark 7. -
Page 7: Technical Features
Technical features Model DUO SAS 360 DUO SAS 360 DUO SAS DUO SAS Contact Petri ISOLATOR Contact ISOLATOR Petri Cat. No. 710-0867 710-0866 710-0977 710-0978 Airflow 180 l/min 180 l/min 180 l/min 180 l/min Used with 55 mm contact 90 mm Petri dishes 55 mm contact 90 mm Petri dishes plates... -
Page 8: The Basic Idea
The basic idea The key features of the Surface Air System (SAS) are: 1. To use a simple and inexpensive “contact plate” (“SURFAIR PLATE”, “RODAC”) for surface, hands or air control. These plates are very well known and easily available. They can be purchased ready poured with different media. -
Page 9: Practical Use Of Contact Plates
ctical use o of contact plates Remo ove the aspir rating head. Insert t an identified d, closed and d prepared p plate and rem move the plat te lid. Repla ace the aspir rating head. Selec ct required ai rflow and sta art the unit. -
Page 10: Preliminary Inspection
AUTO SWITCH OFF To disconnect the automatic switch-off when the ‘Infrared Remote’ is used PRINT To export the recorded sampling data MODE To select the aspiration mode between single and multiple CALIBRATION DUE To check the calibration due date Preliminary inspection The apparatus is subject to specific quality tests before shipment and is carefully packed to avoid possible damage during transit. -
Page 11: Start With The Same Air Volume As The Previous Sample
Suggested air volumes: - Contaminated areas (communities, processing rooms, etc) 10 - 200 litres of air - Normal areas (laboratory benches, houses, etc) 200 - 500 litres of air - Sterile or high risk areas (cleanrooms, operating theatres, etc) 500 - 1000 litres of air. Start with the same air volume as the previous sample SAS SUPER ISOLATOR Switch on the SAS using the ‘ON/OFF’... -
Page 12: User Mode
Press the ‘ENTER’ button, now you can scroll the eight sampling volume. The selectable volumes are 10, 20, 30, 50, 100, 200, 500, 1000 litres). S.PROG XXXX MM/DD/YY - HH:MM Once the desired sampling volume has been reached press the ‘ENTER’ button to confirm. The instrument is now ready to sample the selected volume of air. -
Page 13: Delay Mode
Switch on the instrument and wait until the main screen is displayed: START FOR MM/DD/YY - HH:MM Press the “▼” or “▲” arrows to reach the PROGRAM MODE MM/DD/YY - HH:MM Press the ‘ENTER’ button, now you can scroll the eight user-selectable sampling volumes. S.PROG XXXX MM/DD/YY - HH:MM... -
Page 14: Multimode
20 minutes. Press ‘ENTER’ button to confirm. When a delay has been selected, after the ‘START’ button has been pressed, a delay warning message will be displayed L A Y ** ‘MULTIMODE’ This programme is very useful for extending the time of sampling with the purpose of obtaining a more representative environmental sample “in actual operating conditions”. -
Page 15: Utility Mode
Press the ‘ENTER’ button to confirm. NOTE: Before running multimode sampling, set the aspirating mode to MULTIMODE (see UTILITY MODE paragraph) Starting a multimode sampling cycle Before running multimode sampling, set the aspirating mode to MULTIMODE (see chapter 4.8.2). When the sampler aspiration mode is set to MULTIMODE, the main display will alternately show the number of cycles and the volume of each cycle: START FOR MM/DD/YY - HH:MM... -
Page 16: Set Time
‘SET TIME’ From the UTILITY MODE select the ‘SET TIME’ function This option is used to programme day, month, year and time of the day. SET TIME MM/DD/YY - HH:MM Press ‘ENTER’ and “▼” or “▲” arrows to change month Press ‘ENTER‘... -
Page 17: Print
AUTOSWITCH OFF MM/DD/YY - HH:MM Select the desired options and press ‘ENTER’ to confirm and exit. This setting will be lost after the instrument is switched off. ‘PRINT’ The SAS can be connected with a RS232 cable to the SAS printer (Cat. No. ZZ30PCDPT100-I-12) or to a Personal Computer with the SAS software (Cat. -
Page 18: Clear Record
‘CLEAR RECORD’ This option is used to delete all the data memorised in the DISPLAY RECORD. Before starting this procedure, please be certain that existing data is not required or that it has been downloaded. From the UTILITY MODE select the ‘CLEAR RECORD’. CLEAR RECORD MM/DD/YY - HH:MM... -
Page 19: Calibration Due' (Optional)
From the UTILITY MODE select ‘SAMPLING SITE’ function. SAMPLING SITE MM/DD/YY - HH:MM Press ‘ENTER’ to modify the sampling site SAMPLING SITE XXXX Select the desired character using the “▲” or “▼” arrows and confirm with ‘ENTER’. Select the next desired characters and confirm them by pressing ‘ENTER’. The selected values are stored in the memory and it will be kept also after the instrument has been switched off. -
Page 20: Accessories
- OFF The instrument is switching off NEXT CAL The calibration due date is approaching CAL EXPIRED The calibration due date has expired Accessories Description Cat. No. Aspirating head for contact plates, Ø 55 mm Stainless steel aspirating head for contact plates, Ø 55 mm 710-0880 Sterile daily head for contact plates, Ø... -
Page 21: Troubleshooting
Battery is low Recharge battery “LOW BATTERY” message “CAL EXPIRED” message Instrument needs to be calibrated Send the instrument to VWR International VWR or an authorised dealer Infrared remote switch doesn’t switch Remote control battery is low Replace infrared remote battery... -
Page 22: Technical Service
VWR representative or visit vwr.com Warranty VWR International warrants that this product will be free from defects in material and workmanship for a period of two (2) years from date of delivery. If a defect is present, VWR will, at its option and cost, repair, replace, or refund the purchase price of this product to the customer, provided it is returned during the warranty period. -
Page 23: Equipment Disposal
Equipment disposal This equipment is marked with the crossed out wheeled bin symbol to indicate that this equipment must not be disposed of with unsorted waste. Instead it's your responsibility to correctly dispose of your equipment at lifecycle -end by handing it over to an authorised facility for separate collection and recycling. - Page 24 Inhaltsverzeichnis Warnung ............................. 25 Sicherheitshinweise ........................25 Beschreibungen des Geräts ....................26 Technische Daten ........................27 Verwendungszweck ........................27 Kurzanleitung ..........................28 Funktionen ..........................31 „UTILITY MODE“ ........................36 Zubehör ............................40 Problembehebung ........................41 Technischer Kundendienst ...................... 42 Gewährleistung ......................... 42 Befolgung lokaler Gesetze und anderer Rechtsvorschriften ..........
-
Page 25: Warnung
Warnung Das vorliegende Dokument ist Eigentum von VWR International S.r.l., Mailand, Italien Es darf ohne Genehmigung des Eigentümers nicht dupliziert oder verteilt werden. Zum Patent angemeldet Hergestellt von VWR International S.r.l., Mailand, Italien Sicherheitshinweise Verwenden Sie das Gerät nur für den vorgesehen Zweck. -
Page 26: Beschreibungen Des Geräts
Beschreibungen des Geräts 15. Steuereinheit 22. Pfeil nach unten 16. Edelstahlkopf 23. Standfüße 17. Motorgehäuse 24. Drucker-Anschluss (nicht verwendet) 18. Taste „Clear“ 25. Hauptschalter 19. Taste „Enter“ 26. Seriennummer 20. Pfeile nach oben 27. CE-Kennzeichnung 21. Taste „Start“ 28. Ladegerät-Anschluss... -
Page 27: Technische Daten
Technische Daten Modell DUO SAS 360 Contact DUO SAS 360 DUO SAS ISOLATOR DUO SAS Petri Contact ISOLATOR Petri Best.-Nr. 710-0867 710-0866 710-0977 710-0978 Luftstrom 180 l/min 180 l/min 180 l/min 180 l/min Verwendet mit 55-mm-Abklatschplatten 90-mm-Petrischalen 55-mm-Abklatschplatten 90-mm-Petrischalen Tragbar... -
Page 28: Kurzanleitung
Grundkonzept Die Hauptmerkmale des Surface Air Systems (SAS) sind folgende: 8. Verwendung einer einfachen und preisgünstigen „Abklatschplatte“ („SURFAIR PLATE“, „RODAC“) für Oberflächen-, Hand- oder Luftsteuerung. Diese gängigen und problemlos erhältlichen Platten können mit unterschiedlichen Nährmedien vorgefüllt erworben werden. 9. Entnahme eines bekannten Luftvolumens über einen variablen Zeitraum zur Bereitstellung eines Spektrums an Probenvolumen. - Page 29 Schw warzen Betri iebsschalter „ON/OFF“ d rücken. nn auf dem D Display die M Meldung „SEL LECT HEAD D“ angezeigt w wird, „ENTE R“ drücken. Mit d den Auf- und d Abwärtspfe eile die Optio n „LEFT HEA AD“, „RIGHT T HEAD“...
- Page 30 Zur Einstellung von Datum und Uhrzeit. PROBENAHMESTELLE Zur Angabe des Ortes für die Probenahme. Zur Angabe des Namens des Benutzers. LANGUAGE Zum Anzeigen des Textes in unterschiedlichen Sprachen. CLEAR RECORD Zum Löschen der aufgezeichneten Probendaten. MENU DISPLAY RECORD Zum Anzeigen der aufgezeichneten Probendaten. AUTO SWITCH OFF Zur Deaktivierung der automatischen Abschaltung bei Nutzung der Infrarot-Fernbedienung.
-
Page 31: Funktionen
Funktionen Operative Bereiche Den schwarzen Betriebsschalter „ON/OFF“ drücken, um das Gerät einzuschalten. Der schwarze Betriebsschalter „ON/OFF“ muss zweimal gedrückt werden, um das Gerät einzuschalten, wenn die automatische Abschaltung bei der letzten Verwendung ausgelöst wurde. Durch Drücken auf „CLEAR“ kann jederzeit zum anfänglichen Hauptbild „START FOR“ zurückgekehrt werden. Der Luftkeimsammler ist mit acht festen Luftvolumen („Standard Mode“) und acht programmierbaren Luftvolumen („USER MODE“) ausgestattet, die vom Benutzer ausgewählt werden. - Page 32 MM/DD/YY - HH:MM „STANDARD MODE“ Mit der Funktion „Standard Mode“ kann der Bediener ein Entnahmevolumen aus einer Liste mit acht Standardvolumen auswählen. Das Gerät einschalten und warten, bis das Hauptbild angezeigt wird: START FOR MM/DD/YY - HH:MM Die Pfeile „▲“ und „▼“ drücken, um zu folgendem Bild zu gelangen: STANDARD MODE MM/DD/YY - HH:MM Die Taste „ENTER“...
- Page 33 MM/DD/YY - HH:MM Nach Anwahl des gewünschten Entnahmevolumens die Taste „ENTER“ zur Bestätigung drücken. Das Gerät ist nun zur Entnahme des gewählten Luftvolumens bereit. Die Taste „START“ drücken, um den Entnahmezyklus zu starten. START FOR MM/DD/YY - HH:MM Insgesamt stehen im „USER MODE“ acht Optionen zur Verfügung. Das maximale Luftvolumen pro Entnahmezyklus beträgt 1999 Liter.
- Page 34 Mit dieser Funktion ist es möglich, den Beginn des Entnahmezyklus zu verzögern. Wenn eine Verzögerung ausgewählt wurde, beginnt der Entnahmezyklus nach der ausgewählten Wartezeit. Das Gerät einschalten und warten, bis das Hauptbild angezeigt wird: START FOR MM/DD/YY - HH:MM Die Pfeile „▲“ und „▼“ drücken, um zu folgendem Bild zu gelangen: DELAY MODE MM/DD/YY - HH:MM...
- Page 35 05 MIN Die gewünschte Intervallzeit mithilfe der Pfeile „▲“ und „▼“ wählen. Die wählbaren Intervallwerte sind 5, 10, 15, 20, 25, 30 oder 60 Minuten. Die Taste „ENTER“ drücken, um die Intervallzeit anzuzeigen. Anschließend wird die Anzahl der Durchläufe angezeigt. NUMBER OF RUNS 20 NC Die gewünschte Anzahl der Zyklen mithilfe der Pfeile „▲“...
-
Page 36: Utility Mode
angezeigt: - 02 CYCLES D E L A Y „UTILITY MODE“ Mithilfe dieser Funktion ist es möglich, alle Einstellungen des Luftkeimsammlers zu ändern. Der UTILITY MODE ist in die folgenden zehn Untermenüs gegliedert: Set Time, Mode, Set Autoswitch, Print, Display Record, Clear Record, Language, Identify, Sampling Site, Calibration due. - Page 37 „ENTER“ und die Pfeile „▲“ und „▼“ drücken, um zwischen SINGLE MODE und MULTI MODE zu wechseln. MULTI MODE MM/DD/YY - HH:MM SINGLE MODE MM/DD/YY - HH:MM Den gewünschten Ansaugmodus auswählen, und zum Bestätigen und Beenden „ENTER“ drücken. Diese Einstellung wird auch nach dem Ausschalten des Geräts gespeichert. „SET AUTOSWITCH“...
- Page 38 „DISPLAY RECORD“ Die letzten 99 Proben werden in der Datei „DISPLAY RECORD“ gespeichert. Die einzelnen Proben sind in chronologischer Reihenfolge sortiert und Datum, Uhrzeit, Benutzer, Ort und Volumen der entnommenen Luft (nur nach vollständig durchlaufenem Zyklus) werden angegeben. Im UTILITY MODE die Option „DISPLAY RECORD“ wählen. DISPLAY RECORD MM/DD/YY - HH:MM „ENTER“...
- Page 39 Die Pfeile „▲“ und „▼“ drücken, um die gewünschte Sprache auszuwählen, und zur Bestätigung „ENTER“ drücken. Sechs Sprachen stehen zur Verfügung: Englisch, Französisch, Spanisch, Deutsch, Portugiesisch und Italienisch. „IDENTIFY“ Diese Option dient zur Identifikation des Benutzers. Die Identität sollte angepasst werden, wenn der Sammler von verschiedenen Benutzern verwendet wird, und insbesondere dann, wenn die Daten gedruckt werden sollen.
-
Page 40: Zubehör
MM/DD/YY - HH:MM „ENTER“ drücken, um das nächste Kalibrierdatum anzuzeigen: NEXT CAL MM/YYYY Auf dem Display wird der Monat angezeigt, in dem die Kalibrierung ausgeführt werden soll. Ein Monat vor Fälligkeit der Kalibrierung wird auf dem SAS-Display die folgende Meldung angezeigt: CALIBRATION DUE MM/YYYY Wenn diese Meldung angezeigt wird, drücken Sie zum Bestätigen auf „ENTER“. -
Page 41: Problembehebung
Meldung „LOW BATTERY“ Der Akku ist leer. Akku aufladen. Meldung „CAL EXPIRED“ Das Gerät muss kalibriert werden. Gerät an VWR International VWR oder einen autorisierten Händler senden. Gerät lässt sich mit Die Batterie der Fernbedienung ist leer. Batterie der Infrarot-Fernbedienung Infrarot-Fernschalter ersetzen. -
Page 42: Technischer Kundendienst
VWR Vertriebszentrum oder besuchen Sie unsere Website unter www.vwr.com Gewährleistung VWR International gewährleistet, dass dieses Produkt ab Lieferung zwei (2) Jahre frei von Material- und Herstellungsfehlern ist. Liegt ein Fehler vor, entscheidet VWR nach eigenem Ermessen, das Produkt kostenlos zu reparieren oder auszutauschen oder dem Kunden den Kaufpreis des Produkts zu erstatten, sofern es innerhalb des Gewährleistungszeitraums zurückgesendet wird. - Page 43 Entsorgung des Produktes Dieses Produkt ist mit dem Symbol der „durchgestrichenen Mülltonne“ versehen. Das bedeutet, dass dieses Produkt nicht mit dem Restmüll entsorgt werden darf. Stattdessen ist es in Ihrer Verantwortung, das Produkt am Ende der Nutzungsdauer ordnungsgemäß zu entsorgen, indem Sie es an eine autorisierte Entsorgungseinrichtung geben, die das Produkt separat sammelt und dem Recycling zuführt.
- Page 44 Table des matières Avertissement..........................45 Informations de sécurité ......................45 Descriptions de l'unité ......................46 Caractéristiques techniques ....................47 Usage prévu ..........................47 Instructions simplifiées ......................48 Fonctions ........................... 51 UTILITY MODE ........................... 56 Accessoires ..........................61 Résolution des problèmes ....................... 61 Service technique ........................
-
Page 45: Avertissement
Avertissement Ce document est la propriété de VWR International S.r.l. - Milan - Italie Il ne peut pas être reproduit ni distribué sans l'autorisation du propriétaire. Brevet en attente Fabriqué par VWR International S.r.l. - Milan, Italie Informations de sécurité... -
Page 46: Descriptions De L'unité
Descriptions de l'unité 29. Module de commande 36. Flèche « Bas » 30. Tête en acier inoxydable 37. Pieds d'appui 31. Carters moteur 38. Connecteur pour imprimante (non utilisé) 32. Bouton « Clear » 39. Interrupteur principal 33. Bouton « Enter » 40. -
Page 47: Caractéristiques Techniques
Caractéristiques techniques Modèle SAS DUO SUPER SAS DUO SAS DUO SUPER SAS DUO SUPER 360 pour boîtes de SUPER 360 pour 360 ISOLATOR 360 ISOLATOR contact boîtes de Petri pour boîtes de pour boîtes de Petri contact Petri Code Art. 710-0867 710-0866 710-0977... -
Page 48: Instructions Simplifiées
Description générale Les principales caractéristiques du Surface Air System (SAS) sont les suivantes : 15. Utilisation d'une boîte de contact simple et économique pour le contrôle des surfaces, des mains ou de l'air. Ces boîtes sont très répandues et faciles à trouver, et peuvent être achetées prêtes à l'emploi avec différents milieux. - Page 49 nstructions d'utilisatio on prélimin naires pour r le systèm me DUO SA AS SUPER 3 360 - DUO S SOLATOR ppuyez sur l' interrupteur « ON/OFF » » (bouton noi orsque l'écra n affiche le m message « S SELECT HEA AD », appuye ez sur «...
- Page 50 programmables. UTILITY MODE Cette option permet d'accéder au sous-menu suivant : SET TIME Permet de programmer la date et l'heure SITE D'ÉCHANTILLONNAGE Permet d'identifier le point d'échantillonnage IDENTIFICATION Permet d'identifier le nom de l'opérateur LANGUAGE Permet d'afficher un texte dans différentes langues CLEAR RECORD Permet d'effacer les données d'échantillonnage enregistrées MENU...
-
Page 51: Fonctions
Installation sur un trépied (en option) Le système SAS peut être fixé sur une table, un trépied de sol ou un support mural. Le connecteur avec filetage se trouve sous l'unité, entre les deux pieds avant. Lorsque l'unité n'est pas utilisée, la cavité du connecteur est protégée par un insert à vis en métal. Fonctions Opérations Appuyez sur l'interrupteur «... - Page 52 START FOR MM/JJ/AA - HH:MM Appuyez sur le bouton « START » pour commencer un cycle d'échantillonnage avec le volume d'air affiché. [ XX] → MM/JJ/AA - HH:MM « STANDARD MODE » La fonction « standard mode » permet à l'opérateur de sélectionner un volume d'échantillonnage dans une liste de huit volumes standard.
- Page 53 Appuyez sur les flèches « ▼ » et « ▲ » pour ouvrir USER MODE MM/JJ/AA - HH:MM Appuyez sur le bouton « ENTER ». Vous pouvez maintenant faire défiler les huit volumes d'échantillonnage définis par l'utilisateur. S.PROG XXXX MM/JJ/AA - HH:MM Une fois le volume d'échantillonnage souhaité...
- Page 54 confirmer → X000 MM/JJ/AA - HH:MM Appuyez sur les flèches « ▼ » et « ▲ » pour sélectionner le deuxième chiffre et appuyez sur « ENTER » pour confirmer. Répétez l'étape précédente jusqu'au dernier caractère. Lorsque le dernier caractère est confirmé, le nouveau volume est mémorisé...
- Page 55 Mettez l'instrument sous tension et attendez que l'écran principal s'affiche : START FOR MM/JJ/AA - HH:MM Appuyez sur les flèches « ▼ » et « ▲ » pour ouvrir MULTI MODE MM/JJ/AA - HH:MM Appuyez sur le bouton « ENTER ». La durée de l'intervalle s'affiche INTERVAL TIME 05 MIN Sélectionnez la durée d'intervalle souhaitée entre les prélèvements à...
-
Page 56: Utility Mode
MM/JJ/AA - HH:MM NC 02x1000 L. (Nombre de cycles 20x1000 l) MM/JJ/AA - HH:MM Appuyez sur le bouton « START » pour lancer un échantillonnage multiple ; l'affichage indique le volume aspiré sur la première ligne et le nombre de cycles restants sur la deuxième ligne : [ XX] - 02 CYCLES... - Page 57 Appuyez sur « ENTER » et utilisez les flèches « ▼ » et « ▲ » pour modifier le mois Appuyez sur « ENTER » et utilisez les flèches « ▼ » et « ▲ » pour modifier le jour Appuyez sur «...
- Page 58 « PRINT » Le SAS peut être connecté à l'aide d'un câble RS232 à l'imprimante SAS (code art. ZZ30PCDPT100-I-12) ou à un ordinateur équipé du logiciel SAS (code art. 710-0975). Cette fonction permet de lancer le transfert de données du SAS vers un périphérique externe. Dans le menu UTILITY MODE, sélectionnez l'option «...
- Page 59 Appuyez sur « ENTER » pour supprimer toutes les données mémorisées ; l'affichage indique que la réinitialisation est en cours RESETTING... ►►►► « LANGUAGE » Le texte du menu peut être affiché dans plusieurs langues. Dans le menu UTILITY MODE, sélectionnez l'option «...
- Page 60 Appuyez sur « ENTER » pour modifier le site d'échantillonnage SITE D'ÉCHANTILLONNAGE XXXX Sélectionnez le caractère souhaité à l'aide des flèches « ▲ » et « ▼ » et confirmez en appuyant sur « ENTER ». Sélectionnez les caractères suivants souhaités et confirmez-les en appuyant sur « ENTER ». Les valeurs sélectionnées sont conservées en mémoire même lorsque l'instrument est mis hors tension.
-
Page 61: Accessoires
Accessoires Description Code Art. Tête d'aspiration pour boîtes de contact, Ø 55 mm Tête d'aspiration en acier inoxydable pour boîtes de contact, Ø 55 mm 710-0880 Tête stérile pour boîtes de contact, Ø 55 mm 710-0890 Tête d'aspiration en aluminium pour boîtes de contact, Ø 55 mm 710-0892 Têtes d'aspiration pour boîtes de Petri, Ø... - Page 62 Message « LOW BATTERY » Niveau de batterie faible Rechargez la batterie L'instrument doit être étalonné Envoyez l'instrument à VWR International Message « CAL EXPIRED » VWR ou à un revendeur autorisé L'interrupteur de la télécommande Niveau de batterie de la télécommande...
-
Page 63: Service Technique
VWR local ou visitez le site www.vwr.com Garantie VWR International garantit ce produit pièces et main-d'œuvre pour une durée de deux (2) ans à compter de la date de livraison. En cas de vice, VWR pourra, à sa discrétion et à ses frais, réparer, remplacer ou rembourser au client le prix d'achat du produit, à... - Page 64 Elimination des déchets de cet équipement Cet équipement est muni du symbole de la poubelle rayée, cela veut dire que cet équipement ne peut pas être éliminé comme les déchets résiduels. Au lieu de cela, vous êtes responsable d’éliminer l'équipement dûment en donnant celui-ci à...
- Page 65 Sommario Avvertenza ..........................66 Norme di sicurezza ........................66 Descrizione dell'unità ....................... 67 Caratteristiche tecniche ......................68 Uso previsto ..........................68 Istruzioni in breve ........................69 Funzioni ............................. 72 Utility mode ..........................77 Accessori ........................... 81 Risoluzione dei problemi ......................82 Assistenza tecnica ........................
-
Page 66: Avvertenza
Avvertenza Questo documento è di proprietà di VWR International S.r.l. - Milano (Italia) È vietata la copia o la distribuzione senza l'autorizzazione del proprietario. In attesa di brevetto Prodotto da VWR International S.r.l. - Milano (Italia) Norme di sicurezza Utilizzare lo strumento solo per gli scopi indicati. -
Page 67: Descrizione Dell'unità
Descrizione dell'unità 43. Unità di comando 51. Piedini di appoggio 44. Testata in acciaio inox 52. Collegamento per stampante (non 45. Alloggiamento motore utilizzato) 46. Pulsante "Clear" 53. Interruttore principale 47. Pulsante "Enter" 54. Numero di serie 48. Freccia su 55. -
Page 68: Caratteristiche Tecniche
Caratteristiche tecniche Modello DUO SAS 360 Contact DUO SAS 360 DUO SAS ISOLATOR Contact DUO SAS ISOLATOR Petri Petri Cod. 710-0867 710-0866 710-0977 710-0978 prod. Flusso 180 l/min 180 l/min 180 l/min 180 l/min d'aria Utilizzato Piastre a contatto da... -
Page 69: Istruzioni In Breve
L'idea di base Le caratteristiche principali del campionatore SAS sono le seguenti: 22. Utilizzo di piastre a contatto semplici ed economiche (SURFAIR, RODAC) per controllo di superfici, mani o aria. Queste piastre sono facilmente reperibili e possono essere acquistate già pronte con diversi terreni. 23. - Page 70 emere "ENTE ER" per acce edere al men nu secondario o del parame etro scelto. re riferimento o al manuale e di istruzioni i per modifica are le impost tazioni. emere l'interr ruttore "ON/O OFF" al term ine delle ope erazioni di ca ampionamen nto.
- Page 71 START FOR XXX Il messaggio indica che il campionatore d'aria è pronto per il campionamento del volume visualizzato (XXX) dopo aver premuto il pulsante "Start" USER MODE La funzione consente di modificare gli 8 volumi di campionamento programmabili UTILITY MODE Il menu comprende i seguenti menu secondari: SET TIME Per regolare la data e l'ora...
-
Page 72: Funzioni
evitare che il terreno tocchi la superficie interna della testata di aspirazione. Montaggio del treppiedi (optional) Il campionatore SAS può essere fissato su un treppiedi da tavolo o da pavimento, oppure su un supporto da parete. L'attacco filettato si trova sotto l'unità, tra i due piedini anteriori. Quando non utilizzato, la cavità... - Page 73 principale START FOR MM/DD/YY - HH:MM Premere il pulsante "START" per avviare un ciclo di campionamento con il volume di aria visualizzato. [ XX] → MM/DD/YY - HH:MM STANDARD MODE La modalità standard consente all'operatore di selezionare un volume di campionamento da un elenco di otto volumi standard.
- Page 74 Premere le frecce ▼ o ▲ per accedere a USER MODE MM/DD/YY - HH:MM Premere il pulsante "ENTER" per poter scorrere tra gli otto volumi di campionamento definiti dall'utente. S.PROG XXXX MM/DD/YY - HH:MM Dopo aver selezionato il volume di campionamento desiderato, premere il pulsante "ENTER" per confermare. Lo strumento è...
- Page 75 MM/DD/YY - HH:MM Premere le frecce ▼ o ▲ per selezionare la seconda cifra e premere il tasto "ENTER" per confermare. Ripetere l'operazione precedente fino a raggiungere l'ultima cifra. Alla conferma dell'ultima cifra, il nuovo volume viene memorizzato e aggiunto all'elenco degli otto volumi selezionabili dall'utente. Per avviare un ciclo di campionamento con il nuovo valore, accedere a USER MODE e selezionarlo utilizzando la procedura descritta nel paragrafo relativo a USER MODE.
- Page 76 Premere le frecce ▼ o ▲ per accedere a MULTI MODE MM/DD/YY - HH:MM Premere il pulsante "ENTER"; viene visualizzato la durata dell'intervallo INTERVAL TIME 05 MIN Selezionare la durata dell'intervallo desiderata tra le aspirazioni con le frecce ▼ o ▲. I valori selezionabili per l'intervallo sono 5, 10, 15, 20, 25, 30 o 60 minuti.
-
Page 77: Utility Mode
visualizzato il volume di aspirazione nella prima riga e il numero residuo di aspirazioni nella seconda riga: [ XX] → - 02 CYCLES Al termine dell'aspirazione, durante l'intervallo, sul display viene visualizzato il numero di aspirazioni restanti: - 02 CYCLES D E L A Y Utility mode Questa funzione consente di modificare tutte le impostazioni del campionatore d’aria. - Page 78 In UTILITY MODE, selezionare la voce "MODE". Questa opzione consente di scegliere la modalità di aspirazione tra modalità SINGLE MODE e MULTIMODE. MODE MM/DD/YY - HH:MM Premere "ENTER" e le frecce ▼ o ▲ per scegliere tra SINGLE MODE e MULTIMODE MULTI MODE MM/DD/YY - HH:MM SINGLE MODE...
- Page 79 SENDING DATA Per ulteriori informazioni, vedere il manuale utente della stampante o del software. DISPLAY RECORD Gli ultimi 99 campionamenti vengono memorizzati nel file "DISPLAY RECORD". Ciascun campionamento viene identificato in ordine cronologico ed è contrassegnato con data, ora, operatore, punto di campionamento e volume di aria campionata.
- Page 80 MM/DD/YY - HH:MM Premere "ENTER" per elencare tutte le lingue disponibili: ITALIANO Utilizzare le frecce ▼ o ▲ per selezionare la lingua desiderata e premere "ENTER" per confermare. Sono disponibili sei lingue diverse: Inglese, francese, spagnolo, tedesco, portoghese e italiano. IDENTIFY Questa opzione viene utilizzata per identificare l'operatore e deve essere modificata se il campionatore viene utilizzato da operatori diversi, soprattutto se i dati devono essere stampati.
-
Page 81: Accessori
consente all'utente di vedere quando eseguire la prossima calibrazione. In UTILITY MODE, selezionare la voce "CALIBRATION DUE". CALIBRATION DUE MM/DD/YY - HH:MM Premere "ENTER" per vedere la data della prossima calibrazione: NEXT CAL MM/YYYY Sul display viene visualizzato il mese in cui deve essere eseguita la calibrazione. A un mese dalla scadenza della calibrazione, sul campionatore SAS viene visualizzato il messaggio di avvertenza seguente: CALIBRATION DUE... -
Page 82: Risoluzione Dei Problemi
Messaggio "LOW BATTERY" Batteria scarica Ricaricare la batteria Messaggio "CAL EXPIRED" Calibrare lo strumento Inviare lo strumento a VWR International VWR o un rivenditore autorizzato Telecomando a infrarossi non Batteria del telecomando scarica Sostituire la batteria del telecomando a funzionante infrarossi Il terreno microbiologico è... -
Page 83: Assistenza Tecnica
Garanzia VWR International garantisce per questo prodotto l'assenza da difetti nei materiali e di fabbricazione per un periodo di due (2) anni dalla data di consegna. In caso contrario, VWR provvederà, a sua discrezione e a proprie spese, alla riparazione, sostituzione o al rimborso del prezzo di acquisto del prodotto al cliente, purché... - Page 84 Smaltimento dell’apparecchio Questo apparecchio è provvisto del simbolo del cassonetto barrato, il che significa che il prodotto non può essere smaltito con i rifiuti non riciclabili. Avete invece la responsabilità di smaltire regolarmente il prodotto al termine della vita in servizio, consegnandolo ad un servizio autorizzato che lo raccolga separatamente e lo avvii al riciclaggio. Siete inoltre responsabili della decontaminazione dell’apparecchio in caso di inquinamento biologico, chimico o radiologico, per non danneggiare la salute delle persone incaricate dello smaltimento e del riciclaggio.
- Page 85 Índice Advertencia ..........................86 Información de seguridad ......................86 Descripción de la unidad ......................87 Características técnicas......................88 Uso previsto ..........................88 Instrucciones breves ........................ 89 Funciones ..........................92 ‘UTILITY MODE’ ........................97 Accesorios ..........................101 Resolución de problemas ...................... 102 Servicio técnico ........................
-
Page 86: Advertencia
Advertencia Este documento es propiedad de VWR International S.r.l. - Milán - Italia Queda prohibida su reproducción o distribución sin la autorización del propietario. Pendiente de patente Fabricado por VWR International S.r.l. - Milán, Italia Información de seguridad Utilice el dispositivo solo para los fines indicados. -
Page 87: Descripción De La Unidad
Descripción de la unidad 57. Unidad de comandos 64. Flecha “abajo” 58. Cabezal de acero inoxidable 65. Pies de soporte 59. Alojamiento del motor 66. Conexión a impresora (no se usa) 60. Botón “Clear” (Borrar) 67. Interruptor principal 61. Botón “Enter” (Intro) 68. -
Page 88: Características Técnicas
Características técnicas Modelo DUO SAS 360 DUO SAS 360 DUO SAS DUO SAS Contact Petri ISOLATOR Contact ISOLATOR Petri Referencia 710-0867 710-0866 710-0977 710-0978 Flujo de aire 180 l/min 180 l/min 180 l/min 180 l/min Se usa con Placas de contacto Placas Petri de Placas de contacto Placas Petri de... -
Page 89: Instrucciones Breves
La idea principal Las principales características del sistema de aire de superficie (SAS) son: 29. Permite usar una sencilla y económica “placa de contacto” (“SURFAIR PLATE”, “RODAC”) para el control de superficies, manos y aire. Estas placas son muy conocidas y fáciles de obtener. Pueden comprarse ya montadas con diferentes medios. - Page 90 Inst trucciones de funcion namiento b breves para a DUO SAS S Super 360 0 - DUO SA AS Isolator Puls se el interrup ptor de encen ndido/apagad do (botón ne egro). ando en la pa antalla apare zca el mens aje ‘SELECT T HEAD’, pul lse ‘ENTER’...
- Page 91 Ajusta la fecha y la hora SAMPLING SITE Identifica el punto de muestreo IDENTIFY Identifica el nombre del operario LANGUAGE Muestra el texto en diferentes idiomas CLEAR RECORD Elimina los datos de muestreo recogidos MENU DISPLAY RECORD Muestra los datos de muestreo registrados AUTO SWITCH OFF Desconecta el apagado automático cuando se usa el ‘control remoto por infrarrojos’...
-
Page 92: Funciones
Funciones Operaciones Pulse el interruptor de encendido/apagado (botón negro) para encender la unidad. Debe puslarse dos veces el interruptor de encendido/apagado (botón negro) para encender la unidad si se ha usado anteriormente el temporizador de apagado automático. Pulse ‘CLEAR’ en cualquier momento para volver a la pantalla principal ‘START FOR’ inicial. El muestreador de aire se proporciona con ocho volúmenes de aire fijos (‘Standard Mode’) almacenados en la memoria y ocho volúmenes de aire programados (‘USER MODE’) entre los que puede elegir el operador. - Page 93 ‘STANDARD MODE’ La función de modo estándar permite al operador seleccionar un volumen de muestra en una lista de ocho volúmenes estándar. Encienda el instrumento y espere hasta que aparezca la pantalla principal: START FOR MM/DD/YY - HH:MM Pulse las flechas “▼” o “▲” para llegar a STANDARD MODE MM/DD/YY - HH:MM Pulse el botón ‘ENTER’...
- Page 94 Una vez alcanzado el volumen de la muestra deseado, pulse el botón ‘ENTER’ para confirmalo. El instrumento ya estará listo para muestrear el volumen de aire seleccionado. Pulse el botón ‘START’ para comenzar el ciclo de muestreo. START FOR MM/DD/YY - HH:MM El número total de programas de ‘USER MODE’...
- Page 95 de muestreo comenzará tras el tiempo de retraso seleccionado. Encienda el instrumento y espere hasta que aparezca la pantalla principal: START FOR MM/DD/YY - HH:MM Pulse las flechas “▼” o “▲” para llegar a DELAY MODE MM/DD/YY - HH:MM Pulse el botón ‘ENTER’ y se mostrará el tiempo de retraso. DELAY MM/DD/YY - HH:MM Selecione el tiempo de retraso deseado con las flechas “▼”...
- Page 96 pueden seleccionar son 5, 10, 15, 20, 25, 30 o 60 minutos. Pulse el botón ‘ENTER’ para confirmar el tiempo de intervalo y aparecerá el número de series. NUMBER OF RUNS 20 NC Seleccione el número de ciclos deseado con las flechas “▼” o “▲”. Los valores que se pueden seleccionar son 2, 3, 4, 5, 6, 7, 8, 9, 10, 15 o 20 series.
-
Page 97: Utility Mode
‘UTILITY MODE’ Con esta función es posible modificar todos los parámetros del muestreador de aire. UTILITY MODE se divide en diez submenús: Set time; Mode; Set Autoswitch; Print; Display Record; Clear Record; Language; Identify; Sampling site; Calibration due. Empiece siempre desde UTILITY MODE para llegar a uno de estos submenús. Encienda el instrumento y espere hasta que aparezca la pantalla principal: START FOR MM/DD/YY - HH:MM... - Page 98 SINGLE MODE MM/DD/YY - HH:MM Seleccione el modo de aspiración deseado y pulse ‘ENTER’ para confirmar y salir. Este parámetro se almacenará en la memoria incluso después de apagar el instrumento. ‘SET AUTOSWITCH’ Para ahorrar batería, el SAS se apaga automáticamente después de 4 minutos. La opción SET AUTOSWITCH se usa para activar o desactivar el apagado automático.
- Page 99 DISPLAY RECORD MM/DD/YY - HH:MM Pulse ‘ENTER’ para ver los valores memorizados. 001 MM/DD HH:MM ID. /SITE VOL. OP Se registran los siguientes parámetros: Número secuencial; día y mes; hora; identificación/lugar; volumen de la muestra; opción Si no hay datos almacenados en la memoria, en la pantalla aparecerá * * * * * * * * * * * * * * * * * * * * * * * * ‘CLEAR RECORD’...
- Page 100 En UTILITY MODE seleccione ‘IDENTIFY’. IDENTIFY MM/DD/YY - HH:MM Pulse ‘ENTER’ para modificar el código de identificación. IDENTIFY XXXX Seleccione el carácter que desee con las flechas “▲” o “▼” y confírmelo con ‘ENTER’. Seleccione los siguientes caracteres que desee y confírmelos pulsando ‘ENTER’. Los valores seleccionados se almacenan en la memoria y se conservarán después de haber apagado el instrumento.
-
Page 101: Accesorios
Un mes antes de cumplirse la fecha de calibración, el SAS mostrará el siguietne mensaje de advertencia: CALIBRATION DUE MM/YYYY Cuando aparezca este mensaje, pulse ‘ENTER’ para confirmarlo. Cuando la calibración haya vencido, el SAS mostrará el siguiente mensaje de advertencia: EXPIRED Cuando aparezca este mensaje, pulse ‘ENTER’... -
Page 102: Resolución De Problemas
Mensaje “LOW BATTERY” (Poca Queda poca batería Recargue la batería batería) Hay que calibrar el instrumento Envíe el instrumento a VWR International Mensaje “CAL EXPIRED” (La calibración ha vencido) VWR o a un distribuidor autorizado. El interruptor infrarrojo remoto no La batería del control remoto está... -
Page 103: Servicio Técnico
VWR o visite. www.vwr.com Garantía VWR International garantiza que este producto estará libre de defectos de material y fabricación durante un periodo de dos (2) años a partir de la fecha de entrega. En el caso de que exista algún defecto, VWR elegirá, a su elección y corriendo con los gastos, reparar, cambiar o rembolsar el importe... - Page 104 Eliminación del equipo Este equipo se halla identificado con el símbolo de un cubo de basura tachado, lo que significa que no debe eliminarse en los desechos residuales habituales. En lugar de ello, usted es responsable de eliminar el equipo de forma adecuada al finalizar su vida útil, llevándolo a un centro autorizado que lo recoja y proceda a su reciclaje.
- Page 105 Índice Aviso............................106 Informações de segurança ..................... 106 Descrição da unidade ......................107 Especificações técnicas ......................108 Utilização prevista ........................108 Breves instruções ........................109 Funções ........................... 112 UTILITY MODE" ........................117 Acessórios ..........................121 Resolução de problemas ......................122 ...
-
Page 106: Aviso
Aviso Este documento pertence à VWR International S.r.l. - Milão - Itália É proibida a duplicação ou distribuição sem autorização do proprietário. Patente pendente Fabricado por VWR International S.r.l. - Milão, Itália Informações de segurança Utilize o dispositivo apenas para os fins indicados. -
Page 107: Descrição Da Unidade
Descrição da unidade 71. Unidade de comando 78. Seta para baixo 72. Cabeça em aço inoxidável 79. Pés de apoio 73. Caixa do motor 80. Ligação para impressora (não utilizada) 74. Botão "Clear" 81. Interruptor principal 75. Botão "Enter" 82. Número de série 76. -
Page 108: Especificações Técnicas
Especificações técnicas Modelo DUO SAS 360 DUO SAS 360 DUO SAS DUO SAS Contact Petri ISOLATOR Contact ISOLATOR Petri Ref.ª 710-0867 710-0866 710-0977 710-0978 Fluxo de ar 180 l/min 180 l/min 180 l/min 180 l/min Utilizado com Placas de contacto Placas Petri de 90 Placas de contacto Placas Petri de 90... -
Page 109: Breves Instruções
As principais funcionalidades do Surface Air System (SAS) são: 36. A utilização de uma "placa de contacto" simples e económica ("SURFAIR PLATE", "RODAC") para controlo de superfícies, mãos ou ar. Estas placas são bem conhecidas e são fáceis de obter. Podem ser adquiridas já... - Page 110 eves instruç ções de fu ncionamen nto para o DUO SAS S Super 360 - DUO SAS S Isolator Prim ma o interrupt tor "ON/OFF F" (botão pre to). ando o visor a apresentar a a mensagem "SELECT H HEAD", prima a "ENTER".
- Page 111 programáveis UTILITY MODE Direciona para o seguinte submenu: SET TIME Para ajustar a data e hora SAMPLING SITE Para identificar o ponto de colheita de amostras IDENTIFY Para identificar o nome do operador LANGUAGE Para apresentar o texto em diferentes idiomas CLEAR RECORD Para limpar os dados de colheita de amostras registados MENU...
-
Page 112: Funções
Instalação de tripé (opcional) É possível fixar o SAS a uma mesa, a um tripé ou a um suporte de parede. A ligação roscada situa-se sob a unidade, entre os dois pés dianteiros. Quando não estiver em utilização, a cavidade de ligação é protegida por um inserto roscado de metal. Funções Operações Prima o interruptor "ON/OFF"... - Page 113 [ XX] → MM/DD/YY - HH:MM "STANDARD MODE" Esta função permite ao operador selecionar um volume de colheita de amostras de uma lista de oito volumes standard. Ligue o instrumento e aguarde até ser apresentado o ecrã principal: START FOR MM/DD/YY - HH:MM Prima as setas "▼"...
- Page 114 Prima o botão "ENTER". Agora é possível navegar nos oito volumes de colheita de amostras definidos pelo utilizador. S.PROG XXXX MM/DD/YY - HH:MM Depois de selecionar o volume de colheita de amostras pretendido, prima o botão "ENTER" para confirmar. O instrumento fica então pronto para colher amostras do volume de ar selecionado.
- Page 115 lista de oito volumes selecionáveis pelo utilizador. Se pretender iniciar um ciclo de colheita de amostras com o novo valor, deve introduzir o USER MODE e selecioná-lo utilizando o procedimento descrito no parágrafo USER MODE. "DELAY MODE" Com esta função, é possível atrasar o início do ciclo de colheita de amostras. Se tiver sido selecionado um retardamento, o ciclo de colheita de amostras só...
- Page 116 MM/DD/YY - HH:MM Prima o botão "ENTER". É então apresentado o tempo de intervalo pretendido INTERVAL TIME 05 MIN Selecione o tempo de intervalo pretendido entre cada operação com as setas "▼" ou "▲" . Os valores de intervalo disponíveis são 5, 10, 15, 20, 25, 30 ou 60 minutos. Prima o botão "ENTER"...
-
Page 117: Utility Mode
No final da operação, durante o intervalo, é apresentado no visor o número de "ciclos restantes" (operações): - 02 CYCLES D E L A Y UTILITY MODE" Com esta função, é possível alterar todas as definições do amostrador de ar. O UTILITY MODE divide-se em dez submenus: Set time;... - Page 118 MM/DD/YY - HH:MM Prima "ENTER" e as setas "▼" ou "▲" para alternar entre SINGLE MODE e MULTIMODE MULTI MODE MM/DD/YY - HH:MM SINGLE MODE MM/DD/YY - HH:MM Selecione o modo de aspiração pretendido e prima "ENTER" para confirmar e sair. Esta definição fica guardada na memória mesmo depois de desligar o instrumento.
- Page 119 "DISPLAY RECORD" As últimas 99 amostras estão memorizadas no ficheiro "DISPLAY RECORD". Cada amostra está identificada por ordem cronológica e apresenta a data, hora, operador, local e volume de ar recolhido. Em UTILITY MODE, selecione "DISPLAY RECORD". DISPLAY RECORD MM/DD/YY - HH:MM Prima "ENTER"...
- Page 120 Estão disponíveis seis idiomas: Inglês, francês, espanhol, alemão, português e italiano. "IDENTIFY" Esta opção é utilizada para identificar o operador. Deve ser alterada caso o amostrador seja utilizado por diferentes operadores, especialmente se os dados se destinarem a impressão. Em UTILITY MODE, selecione "IDENTIFY". IDENTIFY MM/DD/YY - HH:MM Prima "ENTER"...
-
Page 121: Acessórios
Prima "ENTER" para ver a próxima data de calibração: NEXT CAL MM/YYYY O visor apresenta o mês em que deve ser realizada a calibração. Um mês antes da data da calibração, o SAS apresenta a seguinte mensagem de aviso: CALIBRATION DUE MM/YYYY Quando esta mensagem for apresentada, prima "ENTER"... -
Page 122: Resolução De Problemas
Estojo de transporte flexível para DUO SAS 710-0888 Estojo de transporte em alumínio para DUO SAS 710-0876 Estojo de transporte em alumínio para SAS ISOLATOR 710-1022 Tripé 710-0889 Mesa e suporte de parede em aço inoxidável para SAS 710-0963 Adaptador para converter o modelo de placa de contacto de modo a aceitar placas Petri de 710-0882 90 mm Cabeça Petri SAS em aço inoxidável + adaptador... - Page 123 Garantia A VWR International garante que este produto está isento de defeitos de material e de fabrico por um período de dois (2) anos a partir da data de fornecimento. Caso seja detectado um defeito, a VWR irá, a seu crédito e custos, reparar, substituir ou reembolsar o preço de compra deste produto ao cliente, desde que o produto seja devolvido durante o período de garantia.
- Page 124 Eliminação do equipamento Este equipamento contém o símbolo do contentor do lixo com uma cruz para indicar que não deve ser eliminado no lixo comum. Em vez disso, é da sua responsabilidade eliminar o seu equipamento corretamente no fim da vida útil, entregando-o a uma empresa autorizada para a recolha e reciclagem.
- Page 125 Your Distributor Australia Germany Poland VWR International Pty. LTD VWR International GmbH VWR International Sp. z o.o. Level 1, Unit 1a/60 Enterprise Place Hilpertstraße 20a Limbowa 5 Tingalpa D - 64295 Darmstadt 80-175 Gdansk QLD 4173 Australia Freecall: 0800 702 00 07 Tel.: 058 32 38 200...
Need help?
Do you have a question about the DUO SAS 360 Contact and is the answer not in the manual?
Questions and answers