Digi IX14 User Manual
Hide thumbs
Also See for IX14:
- User manual (828 pages) ,
- User manual (338 pages) ,
- User manual (529 pages)
Table of Contents
Advertisement
Quick Links
Download this manual
See also:
User Manual
Advertisement
Table of Contents

Related Manuals for Digi IX14


Summary of Contents for Digi IX14
- Page 1 Digi IX14 User Guide...
- Page 2 Information in this document is subject to change without notice and does not represent a commitment on the part of Digi International. Digi provides this document “as is,” without warranty of any kind, expressed or implied, including, but not limited to, the implied warranties of fitness or merchantability for a particular purpose.
- Page 3 Feedback To provide feedback on this document, email your comments to techcomm@digi.com Include the document title and part number (Digi IX14 User Guide, 90002291 A) in the subject line of your email. Digi IX14 User Guide...
- Page 4 WARNING! This device must be powered off where blasting in progress, where explosive atmospheres are present, or near medical or life support equipment. CAUTION! Do not use an antenna not supplied by Digi. If a different antenna is required, consult Digi for antenna recommendations for your environment.
- Page 5 Changes or modifications to this equipment not expressly approved by Digi may void the user’s authority to operate this equipment. Digi IX14 Declaration of Conformity (DoC) Digi has issued Declarations of Conformity for Digi IX14 concerning emissions, EMC, and safety. For more information, see www.digi.com/resources/certifications. Important note Digi customers assume full responsibility for learning and meeting the required guidelines for each country in their distribution market.
- Page 6 The Digi IX14 is certified for use in several European countries. For information, visit www.digi.com/resources/certifications. If the Digi IX14 is incorporated into a product, the manufacturer must ensure compliance of the final product with articles 3.1a and 3.1b of the RE Directive (Radio Equipment Directive). A Declaration of...
- Page 7 Special safety notes for wireless routers Digi International products are designed to the highest standards of safety and international standards compliance for the markets in which they are sold. However, cellular-based products contain radio devices which require specific consideration. Take the time to read and understand the following guidance.
- Page 8 At the end of its life this product MUST NOT be mixed with other commercial waste for disposal. Check with the terms and conditions of your supplier for disposal information. Digi International Ltd WEEE Registration number: WEE/HF1515VU Digi IX14 User Guide...
- Page 9 Certifications This product complies with the requirements of the following Electromagnetic Compatibility standards. There are no user-serviceable parts inside the product. Contact your Digi representative for repair information. Certification category Standards EN 300 328 v1.8.1 Electromagnetic Compatibility (EMC) compliance standards EN 301-489-17 V3.1.12017...
-
Page 10: Table Of Contents
Step 4: Sign up for Digi Remote Manager Step 5: Access the Digi IX14 local web interface Step 6: Configure cellular connection using the web interface Step 7: Add your Digi IX14 to your Digi Remote Manager account Next steps Hardware setup... - Page 11 Configure Simple Network Management Protocol (SNMP) Configure a multicast route Schedule tasks and applications Run Python applications Start an interactive Python session Run a Python application interactively Get help with Python programming on the Digi IX14 digidevice.cli module Digi IX14 User Guide...
- Page 12 Digi Remote Manager Configure Central management Log into Digi Remote Manager Add a device to Digi Remote Manager View and manage a Digi IX14 device Use the Digi Remote Manager mobile app Review Digi IX14 default settings Configure multiple devices using profiles...
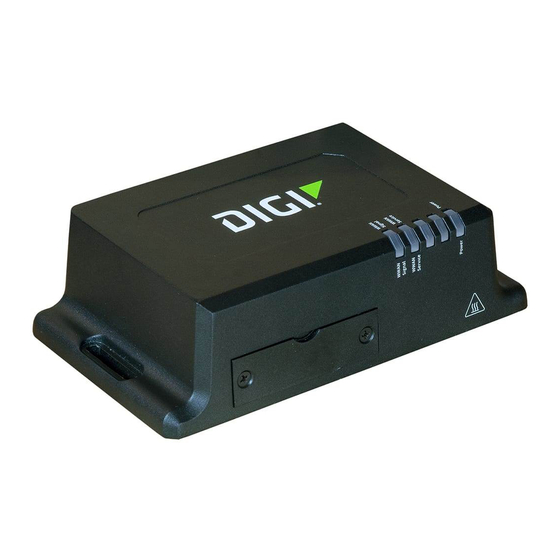
- Page 13 Welcome Digi IX14 features and specifications Digi IX14 front view Digi IX14 back view Digi IX14 LEDs Digi IX14 power supply requirements Digi IX14 serial pinout Digi IX14 accessory kits Digi IX14 antennas Digi IX14 User Guide...
-
Page 14: Welcome
Digi IX14 features and specifications Digi IX14 features and specifications Digi IX14 is a compact LTE CAT1 machine-to-machine (M2M) router suitable for a broad range of applications in rugged industrial environments. Key features include: Industrial grade components (operating temperatures from -29° F to +165° F/-34° C to +74° C) -
Page 15: Digi Ix14 Leds
Excellent signal. (-63 dBm to -51 dBm) WWAN service No cellular service Flashing yellow Cellular connection coming up Solid yellow Connected to 2G or 3G Solid green Connected to 4G WAN/ETH1 port Solid yellow 100 Mbps connection; Off for no connection Digi IX14 User Guide... -
Page 16: Digi Ix14 Power Supply Requirements
12 VDC/0.75 A or 24 VDC/0.375 A minimum. If the Digi IX14 is operated in an ambient temperature range from +0 C to +40 C, use the Digi power supply accessory kits 76002078 or 76002080 to meet the temperature criteria. -
Page 17: Digi Ix14 Accessory Kits
Part numbers and accessories for details. Digi IX14 antennas Digi IX14 obtained complete certification by using the antenna described here. Use an antenna that matches these specifications to maintain the product certification. You can use antennas of the same type but operating with a lower gain. -
Page 18: Digi Ix14 Quick Start
Quick start with Digi IX14 local web UI If you do not have a smart phone or tablet, access the Digi IX14 local web UI to manually set up your Digi IX14. Go to Quick start with Digi IX14 local web... -
Page 19: Quick Start With Digi Remote Manager Mobile App
Digi Remote Manager mobile app. Note If you do not have a smart phone or tablet, access the Digi IX14 local web UI to manually set up your Digi IX14. Go to Quick start with Digi IX14 local web... -
Page 20: Step 3: Connect Hardware
Quick start with Digi Remote Manager mobile app Step 3: Connect hardware Antennas Use antennas provided by a Digi accessory kit or use alternate antennas that comply with the Digi IX14 antenna requirements. Phillips-head screwdriver Use a #1 Phillips-head screwdriver to remove and replace the SIM door when installing SIM cards. -
Page 21: Step 4: Quick Setup Using The Digi Remote Manager Mobile App
Quick start with Digi Remote Manager mobile app Step 4: Quick setup using the Digi Remote Manager mobile app c. Power on the Digi IX14 by connecting a DC power source. See Digi IX14 power supply requirements. d. Power LED is solid blue as the device prepares to boot up. -
Page 22: Next Steps
Quick start with Digi Remote Manager mobile app Next steps Next steps Congratulations! You have completed the Quick start. To manage and configure your Digi IX14 remotely Digi Remote using Digi Remote Manager, see Manager To manage and configure your Digi IX14 locally... -
Page 23: Quick Start With Digi Ix14 Local Web Ui
Digi IX14 local web UI. Note If you have a smart phone or tablet, you can use the Digi Remote Manager mobile app to quickly set up your Digi IX14. Go to Quick start with Digi Remote Manager mobile app. -
Page 24: Step 3: Connect Hardware
Digi IX14 antenna requirements. Ethernet cable Use an Ethernet cable to connect the Digi IX14 WAN/ETH1 port to a laptop or PC to access the local web interface via a browser or connect to a WAN. Phillips-head screwdriver... -
Page 25: Step 4: Sign Up For Digi Remote Manager
Click on the link in the email to log into Digi Remote Manager. Step 5: Access the Digi IX14 local web interface a. If you have not already done so, use an Ethernet cable to connect your Digi IX14 WAN/ETH1 port to your PC. -
Page 26: Step 6: Configure Cellular Connection Using The Web Interface
(The same default password is also shown on the label affixed to the bottom of the device.) a. Click Add. b. Click OK. Digi Remote Manager adds your Digi IX14 to your account and it appears in the Device Management view. Next steps Congratulations! You have completed the Quick start. -
Page 27: Hardware Setup
Hardware setup Install SIM cards Attach and position antennas Connect the WAN/ETH1 port Connect the serial port Power on the Digi IX14 Digi IX14 User Guide... -
Page 28: Install Sim Cards
1. On the Digi IX14 front panel, use a #1 Phillips-head screwdriver to remove the SIM door. 2. If the Digi IX14 device is used in an environment with high vibration levels, SIM card contact fretting may cause unexpected SIM card failures. To protect the SIM cards, Digi strongly recommends that you apply a thin layer of dielectric grease to the SIM contacts prior to installing the SIM cards. -
Page 29: Connect The Wan/Eth1 Port
Connect the WAN/ETH1 port Connect the WAN/ETH1 port Use an Ethernet cable to connect the Digi IX14 to your local laptop or PC or to your local network (LAN). If you connect directly to your PC, the factory default IP address is 192.168.2.1 If you connect to a LAN that has a DHCP server, reboot the device after you connect and wait for the DHCP server to assign an IP address to the device. - Page 30 Initial configuration Review Digi IX14 default settings Access the Digi IX14 local web UI Access the admin command line interface (cli) Reset default password for root Configure modem (cellular) APNs Change the default LAN subnet Change the LAN address type...
-
Page 31: Initial Configuration
Access the Digi IX14 local web UI To connect to the Digi IX14 local web UI: 1. Use an Ethernet cable to connect the Digi IX14 WAN/ETH1 port to a laptop or PC. 2. Open a browser and go to 192.168.2.1. -
Page 32: Access The Admin Command Line Interface (Cli)
IX14 login: root Password: Connecting now, 'exit' to disconnect from Admin CLI ... End an admin command line interface (cli) session To exit the admin CLI: At the command prompt, enter exit: # exit Disconnected from Admin CLI Digi IX14 User Guide... -
Page 33: Get Help For Commands
Show IPSEC debug information Reset default password for root Digi recommends you change the factory-assigned default password for user root after initial login. Local web UI To change a Digi IX14 user password using the local web UI: 1. From the menu, click Configuration. -
Page 34: Change The Default Lan Subnet
3. Click Save. Change the default LAN subnet You can change the Digi IX14 default LAN subnet—192.168.2.1/24—to any range of private IPs. The local DHCP server range will also change to the range of the LAN subnet. To change the LAN subnet: 1. -
Page 35: Change The Lan Address Type
Data bits: Select the number of data bits. The default is 8. Parity: Select the parity type. The default is None. Stop bits: Select the number of stop bits. The default is 1. Flow control: Select the flow control. The default is None. 3. Click Save. Digi IX14 User Guide... -
Page 36: Configure System Settings
1. From the menu, click Configuration. 2. Open Services > Bluetooth. 3. Enable or disable the Bluetooth service as needed. 4. Click Save. Note You will not see the Digi IX14 Bluetooth service listed on your smart phone or tablet. Digi IX14 User Guide... -
Page 37: Authentication
Authentication About Digi IX14 authentication Configure idle timeout Configure the authentication method Configure user groups Create a new user Digi IX14 User Guide... -
Page 38: About Digi Ix14 Authentication
You can modify the released groups and create additional groups as needed for your site. A user can be assigned to more than one group. Users: Local users for the Digi IX14. By default, there is one local user named root that belongs to both the admin and serial groups. -
Page 39: Configure User Groups
Access permissions for a user are determined by the group(s) assigned to the user. By default, there are two configured groups: admin and serial. The default user root is assigned to both admin and serial groups. To create a new user for your Digi IX14: 1. From the menu, click Configuration. 2. Open Authentication > Users. -
Page 40: System Administration
Upgrade device firmware Update cellular modem firmware Reboot the device Save and restore configuration(s) Reset to factory default settings using Reset button Reset to factory default settings using System menu Configure firewall Create a Virtual LAN (VLAN) route Digi IX14 User Guide... -
Page 41: System Administration
Review device status Review device status To review Digi IX14 status: 1. Access the Digi IX14 local web UI. See Access the Digi IX14 local web 2. From the menu, click Status. 3. Open the details panel for the status you want to view. - Page 42 System administration Save and restore configuration(s) To save the current configuration to a file: 1. Access the Digi IX14 local web UI. See Access the Digi IX14 local web 2. From the menu, click System. 3. Under Configuration Management, click Save Config.
-
Page 43: Reset To Factory Default Settings Using Reset Button
Configure packet filtering By default, packet filtering is enabled and monitors traffic going to and from the Digi IX14. The predefined settings are intended to block unauthorized inbound traffic while providing an unrestricted flow of data from LAN to WAN. -
Page 44: Configure Port Forwarding
4. Click Save. Configure port forwarding Remote computers can access applications or services hosted on a local network with the Digi IX14 by setting up port forwarding. It provides mapping instructions that direct incoming traffic to the proper device on a LAN. -
Page 45: Services And Applications
Services and applications Allow remote access for ssh, web administration, or remote control services Configure DNS Configure Simple Network Management Protocol (SNMP) Configure a multicast route Schedule tasks and applications Digi IX14 User Guide... -
Page 46: Allow Remote Access For Ssh, Web Administration, Or Remote Control Services
1. From the menu, click Configuration. 2. Open DNS > DNS servers. 3. Click Add and configure the DNS server. 4. Click Save. To configure DNS: 1. From the menu, click Configuration. 2. Open Services > DNS. Digi IX14 User Guide... -
Page 47: Configure Simple Network Management Protocol (Snmp)
Once the configuration has been set, you can connect to the device agent. Since the agent is read- only, command changes to the device are not possible. To download the default MIBs provided by Digi: 1. From the menu, click System. -
Page 48: Schedule Tasks And Applications
Upload. 2. Run or schedule application execution: a. From the menu, click Configuration. b. Open Applications. c. Click Add and select the application you want to schedule. d. Provide options for the application. 3. Click Save. Digi IX14 User Guide... -
Page 49: Run Python Applications
Run Python applications Digi IX14 supports Python 3.6 and provides you with the ability to run Python applications on the device interactively or from a file. You can also specify Python programs to be run each time the device starts up or with a specified schedule. -
Page 50: Run Python Applications
Python command is not available in CLI. You must access a device shell in order to execute python. Get help with Python programming on the Digi IX14 You can use the following Digi tools to assist in Python programming for a Digi IX14 device digidevice.cli module Help for executing CLI commands digidevice.datapoint module... -
Page 51: Digidevice.cli Module
Execute a CLI command with the timeout specified returning the results. >>> digidevice.datapoint module Use the digidevice.datapoint module to upload data points to Digi Remote Manager. The Digi Remote Manager connection must be enabled and connected. For example: # python Python 3.6.4 >>>... -
Page 52: Digidevice.config Module
Run Python applications Get help with Python programming on the Digi IX14 Python 3.6.4 >>> from digidevice import datapoint >>> help(datapoint.upload) Help on function upload in module digidevice.datapoint: upload(stream_id:str, data, *, description:str=None, timestamp:float=None, units:str=None, geo_location:Tuple[float, float, float]=None, quality:int=None, data_ type:digidevice.datapoint.DataType=None, timeout:floa t=None) >>>... -
Page 53: Help For Reading And Modifying Configurations
Run Python applications Get help with Python programming on the Digi IX14 Help for reading and modifying configurations Get help for reading and modifying the device configuration by accessing help for digidevice.config: # python Python 3.6.4 >>> from digidevice import config >>>... -
Page 54: Run Custom Applications
/etc/config/scripts directory. If you want to specify an application in another directory, provide the complete path for the application file. Log script output: Save stdout to the system log. Log script errors: Save stderr to the system log. Digi IX14 User Guide... - Page 55 Once: Enable this option if you want to execute the application only once at specified set time. Sandbox: Enable this option if you want to run the application in a protected sandbox to prevent the application execution from affecting the system. 5. Click Save. Digi IX14 User Guide...
- Page 56 Digi Remote Manager Digi recommends you use Digi Remote Manager to manage Digi IX14 routers. Use the local web admin only when necessary. Configure Central management Log into Digi Remote Manager Add a device to Digi Remote Manager View and manage a Digi IX14 device...
-
Page 57: Digi Remote Manager
(The same default password is also shown on the label affixed to the bottom of the device.) c. Click Add. d. Click OK. Digi Remote Manager adds your Digi IX14 to your account and it appears in the Device Management view. Digi IX14 User Guide... -
Page 58: View And Manage A Digi Ix14 Device
5. Click the More menu to perform a task. Use the Digi Remote Manager mobile app If you have a smart phone or tablet, you can use the Digi Remote Manager mobile app to automatically provision a new devices and monitor devices in your account. -
Page 59: Review Digi Ix14 Default Settings
2. Follow the prompts to complete your Digi IX14 registration. Digi Remote Manager registers your Digi IX14 and adds it to your Digi Remote Manager device list. You can now manage the device remotely using Digi Remote Manager. -
Page 60: Learn More
Digi Remote Manager Learn more Learn more For information on using Digi Remote Manager to configure and manage Digi IX14 routers, see Digi Remote Manager User Guide. For information on using Digi Remote Manager APIs to develop custom applications, see the... -
Page 61: Monitoring
Monitoring Collect device health data Configure IntelliFlow Configure NetFlow Probe Digi IX14 User Guide... -
Page 62: Collect Device Health Data
IntelliFlow keeps track of network data usage and traffic information and displays the information in a series of charts available the local web UI. To use IntelliFlow, the Digi IX14 must be powered on and you must have access to the local web UI. Once you enable IntelliFlow, the Dashboard option appears in the main navigation menu. -
Page 63: Top Data Users Chart
3. Click Top Servers Accessed. Data over time chart To generate a Data over time chart: 1. If you have not already done so, enable IntelliFlow. See Configure IntelliFlow. 2. From the menu, click Dashboard. 3. Click Data Over Time. Digi IX14 User Guide... -
Page 64: Port Usage Chart
The chart is saved as a PNG file and downloaded to your PC. Print a chart To print a chart: 1. When a chart is displayed, click (Chart menu). 2. Select Print chart. 3. Fill in print options and click Print. Digi IX14 User Guide... -
Page 65: Configure Netflow Probe
Active timeout: Amount of time a flow can be active before sent to the collector. Maximum flows: Enter the maximum number of flows to probe simultaneously. Collectors: Add the server to send collected data. 3. Click Save. Digi IX14 User Guide... -
Page 66: Virtual Private Networks (Vpns)
Virtual private networks (VPNs) Example: Configure VPN access with IPSec tunnels Digi IX14 User Guide... -
Page 67: Example: Configure Vpn Access With Ipsec Tunnels
Rule to allow return traffic from the remote network through the IPsec tunnel back to the local LAN devices The sample configuration shows a Digi IX14 with a tunnel to a VPN server at 12.13.14.15 through its cellular modem. The client laptop connected to the Digi IX14 LAN Ethernet port can then use the IPsec tunnel to access any IP address in the 10.255.0.0/16 range behind the IPsec server. - Page 68 Virtual private networks (VPNs) Example: Configure VPN access with IPSec tunnels Set Action to Accept, set IP version to Any, and set Protocol to Any. Set Source Zone to IPsec and set Destination Zone to Internal. 6. Click Save. Digi IX14 User Guide...
-
Page 69: Diagnostics
Diagnostics View event and system logs Preserve system logs Analyze network traffic Generate a support report Digi IX14 User Guide... -
Page 70: View Event And System Logs
From the menu, click System Logs. Preserve system logs By default, the Digi IX14 erases system logs each time the device is powered off or rebooted. Note You should only enable Preserve system logs temporarily to debug issues. Once you are finished debugging, immediately disable Preserve system logs to avoid unnecessary wear to the flash memory. -
Page 71: Start Capturing Packets
Save captured data traffic to a file. Define filters for capturing data traffic To filter captured data, use the Analyze network traffic filter command. For example: # analyzer filter ip host 192.168.1.1 http://www.tcpdump.org/manpages/pcap-filter.7.html for more information on analyzer filters. Digi IX14 User Guide... -
Page 72: Show Captured Traffic Data
192.168.107.3.63028 > 239.255.255.250.ssdp: UDP, length 174 0x0000: 0100 5e7f fffa 0060 6ed5 93da 0800 4500 ..^..`n..E. 0x0010: 00ca 6fdd 0000 0111 2da0 c0a8 6b03 efff ..o..-...k... 0x0020: fffa f634 076c 00b6 dd88 4d2d 5345 4152 ...4.l..M-SEAR Digi IX14 User Guide... -
Page 73: Save Captured Data Traffic To A File
IP address of your host Digi IX14. /source/absolute/path/filename Full path of the file in the Digi IX14 tp transfer to your PC. /destination/absolute/path/filename Full path of the destination file in your host PC. For example, to download the traffic saved in file eth0.pcpng to the /home/john directory for user john on a local PC with the IP 192.168.210.2:... -
Page 74: Clear Captured Data
IP address of your host Digi IX14. /source/absolute/path/filename Full path of the file in the Digi IX14 tp transfer to your PC. /destination/absolute/path/filename Full path of the destination file in your host PC. For example, to download the traffic saved in eth0.pcapng file to c:\ directory of a local PC: C:\>pscp.exe -scp root@192.168.210.1:/etc/config/analyzer/eth0.pcapng...
Need help?
Do you have a question about the IX14 and is the answer not in the manual?
Questions and answers