Table of Contents
Advertisement
Quick Links
Download this manual
See also:
User Manual
Advertisement
Table of Contents

Related Manuals for Avermedia AVerVision330


Summary of Contents for Avermedia AVerVision330
- Page 1 ® ® Digital Document Camera...
- Page 2 P / N 3 0 0 A A C D A M a d e i n T a i w a n...
- Page 3 The information contained in this documentation is subject to change without notice. In no event will AVerMedia be liable for direct, indirect, special, incidental, or consequential damages arising out of the use or inability to use this product or documentation, even if advised of the possibility of such damages.
- Page 4 THE MARK OF CROSSED-OUT WHEELED BIN INDICATES THAT THIS PRODUCT MUST DISPOSED WITH YOUR OTHER HOUSEHOLD WASTE. INSTEAD, YOU NEED TO DISPOSE OF THE WASTE EQUIPMENT BY HANDING IT OVER TO A DESIGNATED COLLECTION POINT FOR THE RECYCLING OF WASTE ELECTRICAL AND ELECTRONIC EQUIPMENT.
-
Page 5: Table Of Contents
Table of Contents Introduction ................E-1 Package Contents..............E-1 Optional Accessories ............... E-1 Parts of the AVerMedia® AVerVision330 ........ E-2 Technical Specification ............E-2 Hardware Installation and Setup ..........E-3 Connection Ports...................E-3 Setting the DIP Switch...................E-3 Connecting a VGA, Mac Display Monitor or LCD/DLP Projector....E-3 Connecting a TV....................E-4... -
Page 7: Introduction
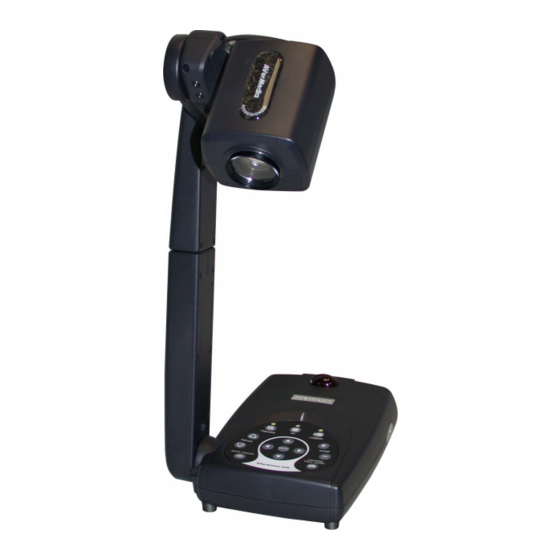
Your AVerMedia® AVerVision330 package contains the following: Thank you for purchasing the AVerMedia® AVerVision330. This document camera RCA Cable displays any documents, negatives, transparencies and 3D objects onto a TV, S-Video Cable LCD or DLP projector making product demonstration a snap. - Page 8 ® ® The following diagrams indicate the names of each component, and port of the unit. Camera Lens Extendable Arm Side Panel Control Panel IR Remote Sensor Back Panel Power TV/ RS-232 Port 10. USB Port 11. SD Card Slot 12.
-
Page 9: Hardware Installation And Setup
Connection Ports The ports on the back and side panel of the AVerVision330 are for connecting the unit to a computer, graphics display monitor or LCD/ DLP projector, TV and other devices. Illustrated below are the ports that are located at the back and side panel of the AVerVision330 with their corresponding labels. -
Page 10: Connecting A Tv
SCART TV Connector To Computer COM PORT Note: The RS-232 adapter allows you to control AVerVision330 using a computer through an RS-232 connection. Refer to the RS-232 control. Connecting an IBM Compatible PC or Macintosh Computer You can connect the AVerVision330 to an IBM compatible PC, Macintosh, or notebook (laptop) computer. -
Page 11: Using Avervision330 As Usb Pc Cam
Computer Operating System Requirement Windows 2000 SP4 and XP No driver is required. Plug the AVerVision330 into an available USB port. A new disk icon appears on your system. Windows Me and 98/98SE You need to install the driver before connecting the unit to the computer USB port. -
Page 12: Connecting To A Microscope
Connecting to a Microscope Connecting the AVerVision330 to a Microscope enables you to examine microscopic objects on a big screen without straining your eyes. To view microscopic images, you must set the unit to microscope mode, and then adjust the microscope for a clearer image. -
Page 13: Led Panel
When using the remote control, aim it at the Infrared Sensor, which is located at the font panel of the AVerVision330. Use the AVerVision330 Remote Control to enhance your presentation, switch between (3) three presentation modes and access additional features. To use the remote control, first insert the batteries (2 size “AAA”... - Page 14 Name Button Function (5) EFFECTS Convert and display the video in BW, Negative or Color. (camera mode only) (6) TIMER Display, start and hide the on-screen display timer. You can toggle to display or hide the remaining time when the timer countdown has started. (See Timer Function for more details) (7) REVERSE Rotate the image by 180°.
-
Page 15: Touch Button Control Panel
Name Button Function (21) DELETE Remove the selected picture permanently in Playback mode. The touch button control panel located on the top side of AVerVision330 provides quick access to commonly used functions. (10) Name Button Function Switch to Camera mode and display the image from the AVerVision330’s built-in digital video camera. -
Page 16: Timer Function
The AVerVision330 enables you to control the pace of your presentation by displaying the remaining time on the countdown screen. This merely serves as a reminder. When the time is up, the timer blinks at the top right corner of the screen and the presentation screen will not be affected in any way. -
Page 17: Osd Navigation Tree
RGB VIDEO OUTPUT OSD BRIGHTNESS CONTRAST MENU ZOOM BRIGHTNESS OPTICAL CONTRAST DIGITAL ZOOM TIMER : MIN. TIMER MODE EFFECT MODE DEFAULT TEXT ADVANCED GRAPHICS MICROSCOPE EFFECT COLOR NEGATIVE MIRROR REVERSE DEFAULT MANUAL EXPOSURE AUTO MANUAL FLICKER FLICKER NIGHT VIEW 50 HZ 60 HZ WHITE BALANCE AUTO... -
Page 18: Menu Functions
FORMAT DEFAULT The AVerVision330 provides MENU functions enabling you to fine-tune your screen display, set the timer, select OSD language and more. Press the MENU button to call up and exit from the main menu or sub-menu display. Then use ▲or▼ buttons to select the items in the menu list. Use (►ENTER) button to enter sub-menu. - Page 19 EXPOSURE : AUTO Use ▲or▼ buttons to select between Auto and Manual. MANUAL AVerVision330 allows you to automatically or manually adjust the FLICKER camera to determine how much light is required. NIGHT VIEW If you choose to manually adjust the exposure, press ►or◄ buttons to MANUAL adjust the exposure level.
-
Page 20: Troubleshooting
I have set up the AVerVision330 and checked all the connections as specified in the manual, but I can not get a picture on the preferred presentation screen. Once power is connected. You need to switch AVerVision330 "ON" from the unit to display the picture on the presentation screen. -
Page 21: Limited Warranty
You as the original purchaser. Except for the foregoing, the Product is provided “AS IS.” In no event does AVerMedia warrant that You will be able to operate the Product without problems or interruptions, or that the Product is suitable for your purposes. Your exclusive remedy and the entire liability of AVerMedia under this paragraph shall be, at AVerMedia’s option, the repair or replacement of...
Need help?
Do you have a question about the AVerVision330 and is the answer not in the manual?
Questions and answers