
Related Manuals for Rose electronics Xcion DVI/VGA over CATx


Summary of Contents for Rose electronics Xcion DVI/VGA over CATx
- Page 1 Xcion Extender DVI / VGA / HDMI / USB 2.0 KVM Extender over CATx / Fiber Installation Operation Manual 10707 Stancliff Road Phone: (281) 933-7673 Houston, Texas 77099 tech-support@rose.com...
- Page 2 LIMITED WARRANTY Rose Electronics warrants the Xcion Extender to be in good working order for one year from the date of purchase from Rose Electronics or an authorized dealer. Should this product fail to be in good working order at any time during this one-year warranty period, Rose Electronics will, at its option, repair or replace the Unit as set forth below.
- Page 3 DECLARATIONS OF CONFORMITY This is to certify that, when installed and used according to the instructions in this manual, together with the specified cables, the Units listed in Appendix B are shielded against the generation of radio interferences in accordance with the application of Council Directives 2006/95/EC and 2004/108/EC, as well as these standards: ■...
-
Page 4: Table Of Contents
Contents Disclaimer System Introduction Features Package Contents Xcion Models Front View All Models Rear View DVI CATx and Fiber Models Connector Description DVI Models HDMI CATx Model Connector Description HDMI Model Installation Xcion Menu System Update Flash Firmware USB Memory Option Lock Menu Show Last Image DDC Option... - Page 5 Tables Table 1. Connectors on the Xcion DVI Models Table 2. Connectors on the Xcion HDMI Model Table 3. Troubleshooting the Xcion Extenders Table 4. Xcion Extender Specifications Table 5. Xcion Extender Part Numbers Table 6. CATx Cable Pins Appendices Appendix A –...
-
Page 6: Disclaimer
(See limited warranty.) System Introduction Thank you for choosing the Xcion family of extenders. They are the result of Rose Electronics commitment to providing state-of-the-art solutions for today’s demanding workplace. The Xcion Digital Extender is the ideal device for extending HDMI, DVI or VGA video and USB with no loss of video quality. -
Page 7: Package Contents
Package Contents The package contents consist of t he following: ■ 1 x Transmitter ■ 1x Receiver ■ 1 x DVI cable or 1 x HDMI cable, depending on the model ■ 1x USB Cable ■ 2 x 12V 1 Amp Power Supply Units ■... -
Page 8: Xcion Models
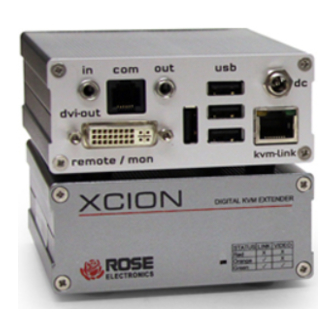
MODELS Xcion Models The Xcion is available in three distinct models as described below. Front View All Models Figure 1. Xcion Extenders Transmitter and Receiver Front View Rear View DVI CATx and Fiber Models Figure 2. Xcion DVI CATx Receiver and Transmitter Rear View Figure 3. -
Page 9: Connector Description Dvi Models
Connector Description DVI Models 1. DVI In: Use the supplied DVI cable to connect this port to the DVI port on the source PC. 2. DVI Out: Connect a DVI monitor to this port for a local display. 3. PC USB: Use the supplied USB cable to connect to the USB port on the source PC. -
Page 10: Hdmi Catx Model
HDMI CATx Model Figure 6. Xcion HDMI Rear View Connector Description HDMI Model 1. PC In: Use the supplied HDMI cable to connect this port to the HDMI port on the source PC. 2. Monitor Out: Connect a HDMI monitor to this port for a local display. -
Page 11: Installation
INSTALLATION AND OPERATION Installation Easy installation and minimal setup allows the extension system to be available for use quickly. Connect the Transmitter to the host computer using the supplied video cable (DVI or HDMI), and to a local display, if desired. -
Page 12: Xcion Menu System
Press the U key on the keyboard to initiate the upgrade of the flash firmware on the Transmitter and Receiver. The latest version of the flash firmware can be obtained from Rose Electronics. All update files are accompanied by a detailed description of the update process to assist in performing this operation. -
Page 13: Lock Menu
Electronics. If it is available on the extender, it can be turned on or off in the submenu at any time. Conversely, if the units did not come with this feature enabled, contact Rose Electronics for an enable code. In this case, the submenu will display an ID for the Xcion system. -
Page 14: Ddc Option
DDC Option Press the O key on the keyboard to select which EDID information is to be used for the Xcion system. This can be selected from the DDC Options submenu. Figure 13. DDC Option Submenu The available options are as follows. ■... -
Page 15: Vga Parameters
VGA Parameters Press the V key on the keyboard to modify VGA settings. Figure 14. VGA Parameters Submenu The available settings are as follows. ■ Press F1 to move the video up or F4 to move the video down. ■ Press F2 to move the video left or F3 to move the video right. -
Page 16: Audio Input Gain
Audio Input Gain Press the N key on the keyboard to set the volume of the audio input for a microphone connected to the Receiver. Figure 15. Audio Input Gain Submenu The default audio level is 5. It ranges from 1 to 9. If the audio level is set to 0, audio input from the Receiver is disabled. -
Page 17: Troubleshooting
Ensure that the interconnect cable (CATx or Fiber) Transmitter and Receiver is connected securely on both ends. A clicking noise should be heard when plugging in the cable. Contact Rose Electronics if the problem still occurs. LED lights up orange No picture on the monitor ■... -
Page 18: Safety
PRODUCT SAFETY Safety The Xcion extender system, like all electronic equipment, should be used with care. To protect yourself from possible injury and to minimize the risk of damage to the Unit, read and follow these safety instructions. Follow all instructions and warnings marked on this Unit. ... -
Page 19: Maintenance And Repair
This Unit does not contain any internal user-serviceable parts. In the event a Unit needs repair or maintenance, you must first obtain a Return Authorization (RA) number from Rose Electronics or an authorized repair center. This Return Authorization number must appear on the outside of the shipping container. -
Page 20: Table 4. Xcion Extender Specifications
APPENDICES Appendix A – Specifications Physical Specifications (All Models) Dimension (W x D x H) 3.88 in x 4.17 in x 1.6 in / 98 mm x 106 mm x 41 mm Rackmount Up to 4 channels in a 19” 1U rack Weight 1.19 lb (540 g) Video... -
Page 21: Table 5. Xcion Extender Part Numbers
Appendix B – Part Numbers Product Part Number XCK-2DTXUD1D Xcion DVI / VGA over CATx USB 2.0 Hight Speed Option (64 Mbps) Analog Audio/RS232 Serial Option VGA Option Switch Mode Option for distributed KVM switching Xcion DVI / VGA over Fiber Xcion Multimode XCK-2DFMUD1D Xcion Singlemode... -
Page 22: Table 6. Catx Cable Pins
Appendix C – Cable Specification CAT5/6/7 Cables The pins are connected 1:1. EIA/TIA-568 B Schema Color Orange / White Orange Green / White Blue Blue / White Green Brown / White Brown Table 6. CATx Cable Pins Notes: The pins are connected to EIA/TIA-568A (rare) or EIA/TIA-568 B (common) pairs. Erroneous assignments can not be found with a simple cable tester. - Page 23 ▪ ▪ WWW.ROSE.COM sales@rose.com (800) 333-9343 ▪ ▪ Rose Electronics 10707 Stancliff Road Houston, Texas 77099 Rose USA (281) 933-7673 ▪ Rose Europe +49 (0) 2454 969442 ▪ Rose Asia +65 6324 2322 Rose Australia +61 (0) 421 247083 WWW.ROSE.COM...
Need help?
Do you have a question about the Xcion DVI/VGA over CATx and is the answer not in the manual?
Questions and answers