Table of Contents
Advertisement
Quick Links
Advertisement
Table of Contents

Subscribe to Our Youtube Channel
Related Manuals for Arctiko UPUL 580


Summary of Contents for Arctiko UPUL 580
- Page 1 OPERATING INSTRUCTIONS UPUL 580...
-
Page 2: Table Of Contents
INDEX ............PAGE Before using the freezer . -
Page 3: Before Using The Freezer
IMPORTANT Before using the freezer For safety reasons, the instructions should be read before the freezer is commissioned. The operating instructions should always be available and accessible to personnel! The appliance concerned complies with the following directives and standards except for refrigerant amount: Low Voltage Directive 2006/95/EEC Electromagnetic Compatibility Directive 2004/108/EEC... -
Page 4: Installing The Freezer
Appliance with flammable refrigerant As the appliance contain a mixture of refrigerant, which are flammable, it is essential to ensure that the refrigerant pipes are not damaged. Operating Instructions For safety reasons these operating instructions should be read before the freezer is commissioned. The operating instructions should always be available and accessible to personnel! The drawings and symbols in these operating instructions are for safety purposes when commissioning and using the freezer. -
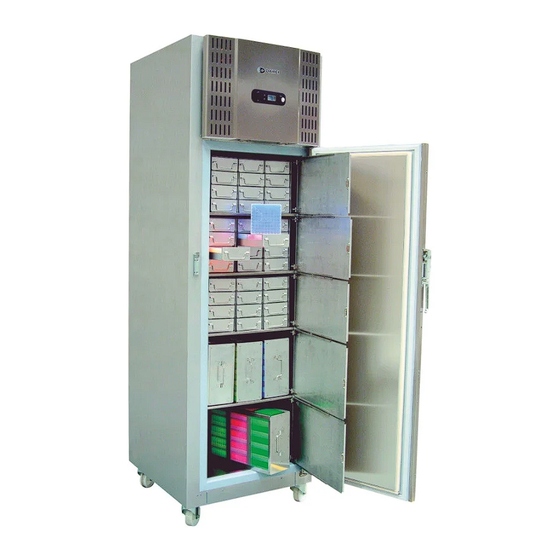
Page 5: Inner Doors
Inner doors NOTE The inner doors should be used at all times. Make sure to close them tightly. (figure 1) The manufacturer is not responsible for damage to the freezer caused by failure to do so. Electrical Connection The machine meets current EU directives. Low voltage 2006/95/EEC. Electromagnetic compatibility 2004/108/EEC. -
Page 6: Before Commissioning
Before Commissioning Clean the freezer both inside and out using a damp, wrung out cloth. Dry with a dry cloth. Start Procedure Put the plug in the socket. The digital thermostat/thermometer will start to flash. The thermostat is pre-set by the producer. The freezer should run for at least 6 hours before the thermostat is changed to allow for stabilisation of the cooling system. -
Page 7: Turn/Push Button
Turn/Push button The LMC 260 control panel is controlled by turning / pushing the button at the right hand side of the display. The button has three functions: Turn CW :Next Menu or increase set value Turn CCW :Previous Menu or decrease set value :Select Menu and accept edited set value Push Main switch... -
Page 8: Usage
Usage Setup The freezer must be set up by an authorized person. In the settings menu the correct code must be entered so that the items below become visible. SETPOINT : The temperature that the controller is set to achieve [SetPoint] T DIFF : The difference between the SetPoint and the temperature that causes the fan and compressor to restart... -
Page 9: Alarm
Example SetPoint is adjusted to -83°C. The reference thermometer indicates -85°C. To correct this enter -2°C and the freezer will cool down to -85°C. The LMC260 will now operate with the new correct value. Resetting this value to the factory setting is done by setting the CALI value to 0°C. Alarm Alarm list Alarm no. -
Page 10: Explanation Of Alarms
Explanation of Alarms: AL10 - T1 OPEN : Temperature sensor to freezer interrupted AL11 - T1 SHORT : Temperature sensor to freezer short circuited AL12 - T2 OPEN : Temperature sensor to room interrupted AL30 - MAINS OFF : No mails supply to the freezer AL31 - DOOR : Dor was open for more than 5 minutes AL32 - ROOMTEMP... -
Page 11: Filling Procedure
Filling procedure: • Empty the system and evacuate to 2 mbar. Evacuation must be performed at two places in the system; both from the filling pipe and from the pipe mounted on the pressure side of the compressor. • Mount the capillary pipe with mounting screws between the filling station and the service bottle. •... -
Page 12: Spare Parts
Note Unplug the appliance before carrying out maintenance. Do not use abrasive products; stain removers (e.g. acetone, trichloroethylene) to clean the appliance. Spare parts When ordering spare parts that you can easily fit yourself, please give unit type number and the function of the part(s) concerned. -
Page 13: Menu Overview
MENU OVERVIEW Test menu will be active after pushing the button for 10 seconds. -80°C Can also be done by the user. This menu is applied by the technician to decide whether the freezer should run automatically or manually. View menu shows set point and the number of alarms. - Page 14 In this menu the technician can programme the freezer to run automatically or manually. Back to previous menu. -80°C Shows current set point. Shows how many alarms are saved in the alarm log. Back to previous menu.
- Page 15 Back to menu. If the freezer has not been programmed on set point in more than one hour, the display shows “not ready”. Otherwise the calibration menu is shown. The technician can set the code, which gives access to the service menus. -80°C The technician can programme the set point of the freezer.
- Page 16 Back to previous menu. Alarm ## shows the location of the alarm in the log. Text shows a describing text with reference to the alarm. Shows the last 15 alarms. Back to previous menu. Back to previous menu. Shows which software version is installed in the unit.
- Page 17 Back to previous menu. Manual running of the compressor. Manual running of Fan. Manual running of light. Manual running of CTS. Test of Power Sence Relay. When this relay runs out it is discovered by D12. Test of battery and test of Battery Disconnect Relay.
-
Page 18: Connection Diagram
CONNECTION DIAGRAM... - Page 20 WWW.ARCTIKO.COM LAMMEFJORDSVEJ 5 DK-6715 ESBJERG N DENMARK TEL. +45 70 20 03 28 FAX. +45 70 20 03 29 INFO@ARCTIKO.COM WWW.ARCTIKO.COM 50 80 014-xx-GB...
Need help?
Do you have a question about the UPUL 580 and is the answer not in the manual?
Questions and answers